

TL;DR:
Want to record your screen with VLC? This guide shows you how to use VLC on Windows and Mac to capture screen activity. If VLC's recording settings feel too complicated or you need an easier way to capture system audio, microphone, and webcam footage, discover a powerful VLC alternative - Screen Recorder for smoother recordings.
Trying to record your screen with VLC? You might be surprised to learn that this free media player can do more than play your favorite videos. With the right settings, you can use VLC to capture desktop activity, save video streams, and even record audio. The catch? Its recording features aren't exactly easy to find.
In this guide, we'll walk you through how to record your screen with VLC on Windows and Mac, share practical fixes for common recording problems, and explore an easier alternative if VLC doesn't quite meet your needs.
Part 1. Can VLC Record Screen?
Yes. VLC Media Player offers different media capture features across platforms such as Windows and macOS. On Windows, you can typically record your screen using the Desktop mode under Open Capture Device, then convert the captured footage into a video file.
VLC screen recording is suitable for the following scenarios:
- Recording basic desktop activities and software workflows.
- Capturing presentations displayed on your computer screen.
- Creating simple tutorials that don't require complex post-production.
- Using a free tool for basic screen capture tasks.
Keep in mind that menu names and capture options may vary depending on your operating system and VLC version. VLC is not specifically designed as a screen recording software, so it may not offer the same convenience as dedicated tools when recording system audio, webcam footage, gameplay, or multiple audio sources.
VLC Screen Recorder: Pros and Cons
- Free to use without a paid subscription.
- Support Windows and macOS.
- Can capture desktop activity and save it as a video file.
- Work well for users who already have VLC installed.
- Screen recording options are not very intuitive for beginners.
- Configuring system audio and microphone capture can be complicated.
- Lack advanced features such as webcam picture-in-picture, scene switching, and convenient annotation tools.
- High-resolution and high-frame-rate recording performance depends on hardware and settings.
Part 2. How to Record Screen with VLC
The exact process depends on your operating system and VLC version.
2.1 How to Screen Record with VLC on Windows
Step 1. Launch VLC Media Player and select "Media" > "Open Capture Device".
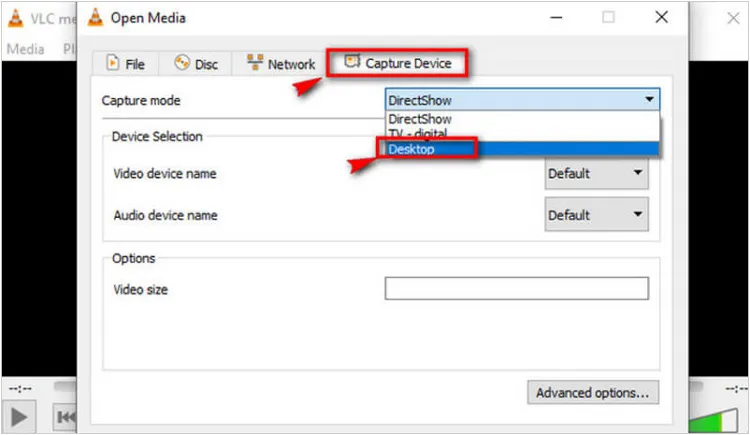
Step 2. In the "Capture Device" tab, find the Capture mode drop-down and select "Desktop". Set the desired frame rate under the available options.
Step 3. Click the arrow next to "Play" and select "Convert". Choose an output profile, such as H.264, then click "Browse" to select a save location and filename.
Step 4. Click "Start" to begin recording your desktop. Switch to the content you want to capture and perform the necessary actions.
Step 5. Return to VLC and click "Stop". Open the saved file to verify the video and audio. If the file is empty, silent, or won't play, check the capture settings, output profile, and save location.
2.2 How to Record Screen with VLC on Mac
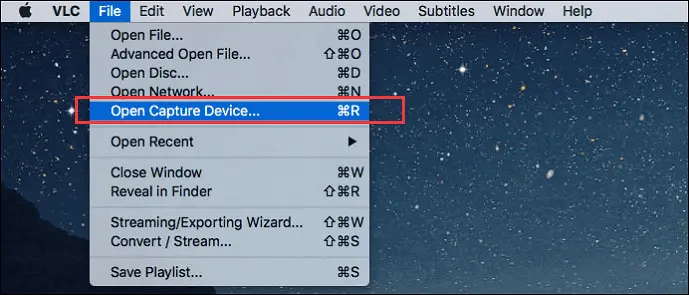
Step 1. Open VLC Media Player on your Mac and navigate to "File". If available, select "Open Capture Device" to access the screen-capture settings.
Step 2. In the "Open Source" window, click the "Capture" tab and select "Screen" as the video source, if this option is available.
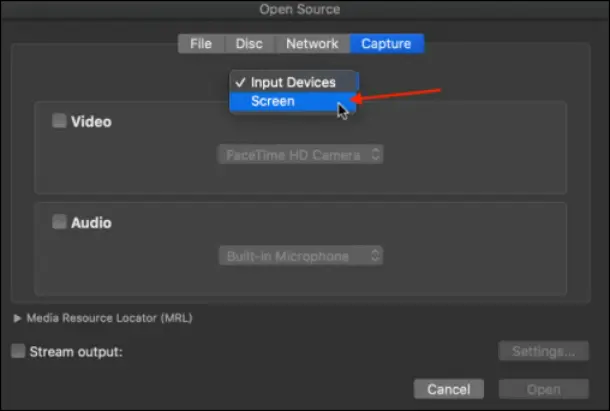
Step 3. Expand the "Settings" section in the lower-right corner of the window and adjust the frame rate to suit your recording needs. A frame rate of 10–15 fps may be sufficient for basic tutorials, while fast-moving content generally requires a higher frame rate.
Step 4. Confirm your settings and click "Open" to close the "Open Source" window.
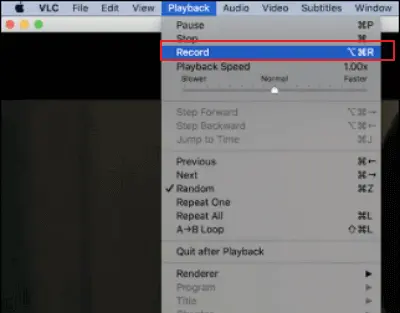
Step 5. Navigate to "Playback" and select "Record" to start capturing your screen. When you're finished, click the "Stop" button to end the recording, then check the output location for your saved video.
Part 3. Best VLC Screen Recorder Alternative - Screen Recorder
VLC is a useful free option for basic media tasks, but its screen recording workflow can be frustrating if you frequently create tutorials, record online meetings, or need to capture system audio and microphone narration together. In these situations, Screen Recorder is worth considering.
It is a professional screen recording tool for Windows and Mac that offers dedicated recording modes for capturing your screen, gameplay, webcam, system audio, and microphone. It also supports custom recording areas, real-time annotations, scheduled recordings, and phone screen mirroring, making it ideal for creating tutorials, presentations, and recording online meetings.
Key features of Screen Recorder:
- Record the full screen, selected areas, windows, gameplay, webcam, or phone screen.
- Capture videos at up to 8K and 120 FPS, depending on hardware and recording mode.
- Record system audio and microphone input simultaneously.
- Add text, arrows, shapes, and highlights while recording.
- Mirror and record iPhone or Android screens on a computer.
- Schedule recordings to start and stop automatically.
- Remove or replace webcam backgrounds with AI on supported hardware.
- Customize video quality, frame rate, and audio settings.
- Trim, merge, and compress recordings with built-in editing tools.
- Capture full-screen, selected-area, and scrolling screenshots.
Download for Win Download for Mac
How to Use Screen Recorder to Record a Screen:
-
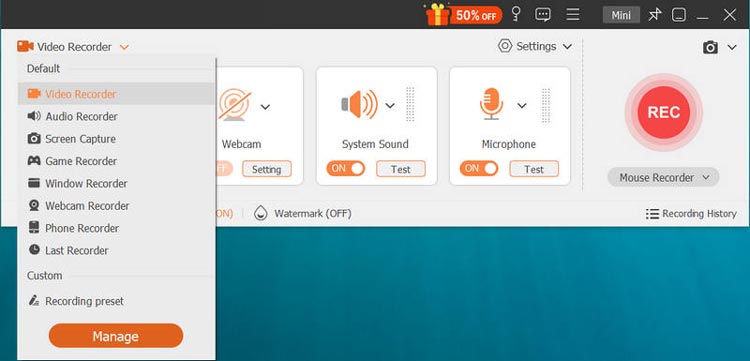
Download and install the software on your computer, then open it and select "Video Recorder". Choose "Full" or "Custom" to set the recording area.
-
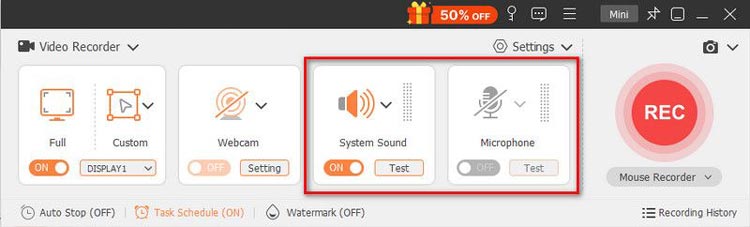
Enable "System Sound" and "Microphone" as needed, then click "REC" to begin recording. Use the annotation tools to highlight important on-screen details.
-
Click "Stop" when finished, preview the recording, trim unwanted footage if necessary, and save the video.
Limitations to Consider Before Choosing Screen Recorder
A dedicated recorder can make the workflow easier, but it is not automatically the right choice for everyone.
- The free trial has restrictions: Its published purchase information lists a three-minute screen recording limit for the trial, so check the current licensing terms before recording a long session.
- It requires installation: Unlike using an already-installed VLC player, you need to download and set up another application.
- Recording quality depends on your computer: High resolutions and frame rates can use substantial CPU, GPU, and storage resources.
- Some content may be protected: DRM-protected streaming content may prevent successful capture or playback, regardless of which recorder you choose.
Best for: Users who need a more convenient way to record screen activity with audio, demonstrate software, create tutorials, or record webcam footage.
Part 4. VLC vs. Screen Recorder: Which Should You Choose?
| Feature | VLC Media Player | Aiseesoft Screen Recorder |
|---|---|---|
| Price | Free | Free trial and paid options |
| Screen Recording Setup | More technical | More straightforward |
| Custom Recording Area | Depends on capture method and version | Supported |
| System Audio and Microphone | Requires source-specific setup | Dedicated audio controls |
| Webcam Recording | Available through supported capture devices | Dedicated webcam mode |
| Real-Time Annotations | Limited for screen recording | Supported |
| Best For | Basic recording without additional cost | Tutorials, presentations, and regular recording |
Which one should you choose?
Choose VLC if you want a free solution for occasional, basic screen recording and don't mind configuring the settings yourself. Choose Screen Recorder if you regularly create tutorials, record meetings, need to capture system audio and microphone input together, or want tools such as webcam recording and real-time annotations.
Part 5. FAQs About VLC Screen Recording
Q1. Where is the record button in VLC?
The Record button is located in the Advanced Controls toolbar, above the standard playback bar. Go to "View" > "Advanced Controls" to display the toolbar. A red Record button will appear on the left side.
Note that this button records media currently playing in VLC, such as a video or stream, rather than your desktop screen.
Q2. Why is VLC not recording your screen?
VLC may fail to record your screen due to outdated software, an incompatible output format or codec, or issues with its capture settings. Try restarting VLC, updating it to the latest version, and checking your recording configuration. If the problem persists, reinstalling VLC may help.
Q3. Can VLC record from a webcam?
Yes, VLC can record webcam footage. Open "Media" > "Open Capture Device", select your webcam as the video device, and configure the available settings before recording. However, VLC offers fewer webcam recording features than dedicated recording software.
Q4. Can VLC record streaming videos?
Yes, VLC can play and record some network streams. Go to "Media" > "Open Network Stream", enter the stream URL, and click "Play" to start playback. However, clicking Play alone does not start recording. Use VLC's available recording or conversion options to save the stream, and note that protected content may not be recordable.
Q5. Can VLC record the screen and audio at the same time?
VLC's screen recording feature does not capture screen video and audio together by default. You may need to configure audio separately or use dedicated screen recording software to capture both simultaneously.
Q6. Can VLC record in MP4 format?
Yes, VLC can save recordings in MP4 format if you select a compatible output profile and file extension in the Convert/Save settings. You don't need to record in RAW format first and convert the file afterward.
Q7. How long can VLC record for?
VLC has no fixed recording time limit, so you can record for as long as your device has enough storage space and remains operational. However, longer recordings require more disk space and may be affected by system performance or recording settings. If you plan to capture hours of footage, check your available storage beforehand and consider using a dedicated screen recorder for better recording controls.
Q8. Where are VLC screen recordings saved?
VLC screen recordings are typically saved in your system's default video folder, but the exact location depends on your operating system and recording settings. On Windows 10, check C:\Users\[username]\Videos. On a Mac, use Spotlight Search to look for the recorded video or check the destination configured in VLC. If you want to save recordings somewhere else, choose your preferred output folder before recording, if your capture method supports it.
Last Words
Overall, VLC is a handy free option for basic screen recording, especially if you already use it as your media player. However, its recording settings can be confusing. If you want a simpler way to record tutorials, gameplay, online meetings, or other desktop activities, Screen Recorder is worth considering. It offers a more straightforward recording experience with options for capturing screen activity, audio, and webcam footage, making it a practical alternative when VLC feels too limited.
Download for Win Download for Mac
Related Articles
How to Record Live TV on Different Devices with Reliable Methods
How to Record Roblox Gameplay Smoothly: 5 Effective Methods
ScreenRec Review: Features, Pricing, Pros, Cons & Best Alternative