Whether you are creating a tutorial, capturing a video call, or recording gameplay, you need to know how to screen record on Mac. Luckily, macOS offers effective ways to capture your screen, and some practical tools also support screen recording on Mac. In this guide, you can directly get 5 methods about screen recording on a Mac computer. Follow the steps to complete your screen recording with ease.
- Part 1: How to Screen Record on Mac Using Built-in Screenshot App
- Part 2: How to Record Screen on Mac via QuickTime Player
- Part 3: How to Record a Screen on Mac via Screen Recorder
- Part 4: How to Record Screen on MacBook Air via OBS Studio
- Part 5: How to Complete Screen Recording on Mac via QuickRecorder
- Part 6: Q&A About Screen Recording on Mac
Take a quick look at the pros and cons of these screen recording methods:
| Method | Pros | Cons |
|---|---|---|
| 1. Built-in Screenshot App | 1. Fastest access via Cmd+Shift+5. 2. No installation needed. 3. Very low system impact. |
1. No native system audio recording. 2. Limited to basic capture. |
| 2. QuickTime Player | 1. Pre-installed on macOS. 2. Reliable for basic tasks |
1. Dated interface. 2. Hard to record internal sound. |
| 3. Screen Recorder | 1. Captures system audio or voice easily. 2. Includes real-time drawing and editing. 3. Save videos in various formats, like MP4, WMV, MOV, AVI, GIF, etc. 4. Support 4K/8K. |
1. Paid software license. 2. Higher resource usage. |
| 4. OBS Studio | 1. Free and open-source. 2. Professional features (webcams, layouts). |
1. Difficult for beginners. 2. Heavy on battery and CPU. |
| 5. QuickRecorder | 1. Optimized for M1/M2/M3 chips. 2. Lightweight and clean UI. |
1. Must be downloaded manually. 2. No advanced post-editing tools. |
Part 1: How to Screen Record on Mac Using Built-in Screenshot App
Since the release of macOS Mojave, Apple has included a powerful built-in tool that makes screen recording incredibly fast without needing to open any specific apps. However, it cannot record the internal audio on your Mac computer.
Guide on screen recording on Mac with the Screenshot app:
-
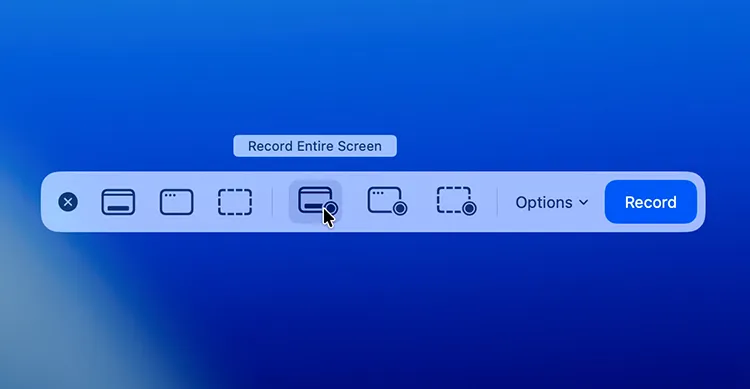
Press "Command" + "Shift" + "5" on your keyboard. A floating toolbar will appear at the bottom of the screen.
-
Choose between "Record Entire Screen" (the icon showing a full screen with a dot) or "Record Selected Portion" (the icon with a dashed box and a dot).
-
Click "Options" to select where to save the file, set a timer, or choose your microphone.
-
Click "Record". To stop, click the "Stop" button in the menu bar at the top of your screen or press "Command" + "Control" + "Esc".
Read also: Want to compress your videos on your computer? Then you can use a practical video compressor.
Part 2: How to Record Screen on Mac via QuickTime Player
Before the unified screenshot toolbar existed, QuickTime Player was the primary way to record screens. It remains a reliable fallback for older macOS versions or users who prefer a dedicated app.
To record the screen on Mac with QuickTime Player:
-
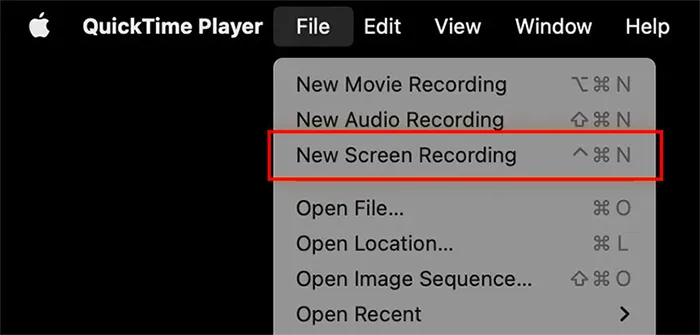
Open QuickTime Player from your Applications folder on your Mac device. Then go to the top menu bar and select "File" > "New Screen Recording".
-
Click the downward arrow next to the record button to select your microphone, tap the red "Record" button, and choose to record the full screen or selected area.
-
Once completed, click "Stop" in the menu bar, and save the recording file manually.
Part 3: How to Record a Screen on Mac via Screen Recorder
If you need more advanced features, such as hardware acceleration, real-time drawing tools, or the ability to record specific app windows without capturing your desktop clutter - Screen Recorder is a top-tier choice. You can record the system audio when recording the Mac's screen.
Main features of the Screen Recorder software:
* Record the screens on Mac and Windows computers.
* Enable you to complete the screen recording with simple clicks.
* Support capturing the full screen or selected region with high resolution.
* Allow you to trim a video or audio file to select your desired part.
* Help you compress your video files.
Download the Screen Recorder software on your computer.
Download for Mac Download for Win
Here's how to record a screen on a MacBook with Screen Recorder:
-
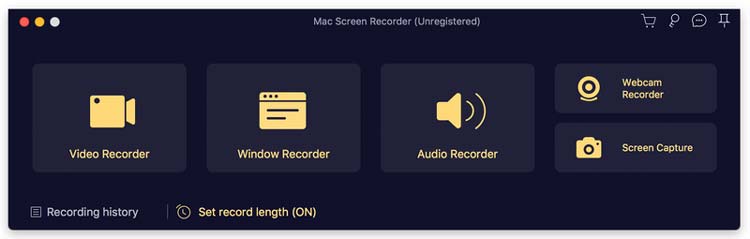
Install and launch the Screen Recorder on your Mac computer after downloading.
-
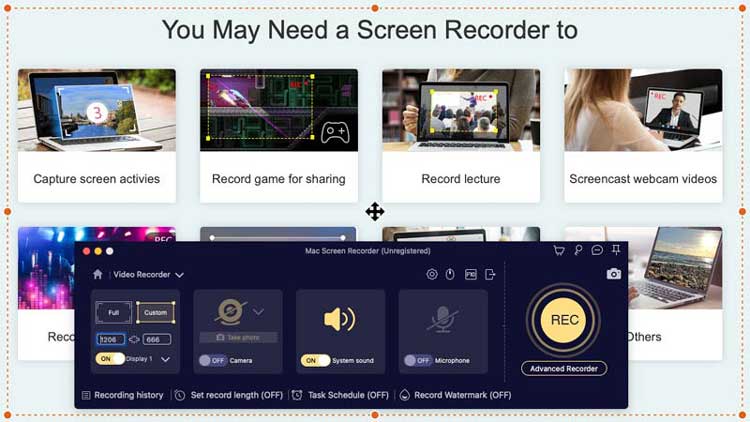
Select "Video Recorder" from the main interface. Next, choose your recording area (Full or Custom) and toggle on "System Sound" or "Microphone" as needed.
-
Click the "REC" button to begin. After recording, you can preview the video, and click "Export" to save the file on your Mac.
Tips: If you want to record the screen on an Android phone, you can open this link to get 5 approaches.
Part 4: How to Record Screen on MacBook Air via OBS Studio
For creators, gamers, or power users, OBS Studio is the industry standard. It is free, open-source, and allows for complex "scenes" (e.g., your screen plus your webcam in the corner). However, it not user-friendly enough.
Here's how to record a screen on Mac with OBS Studio:
-
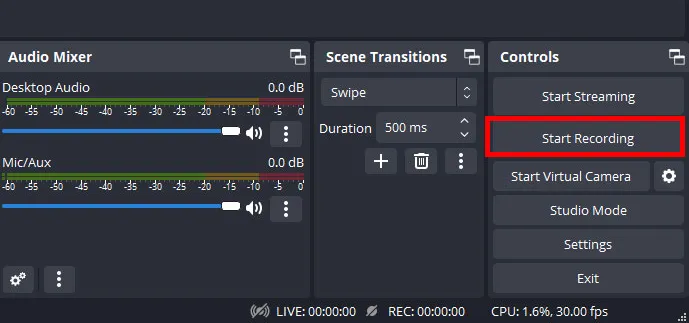
Download and open OBS Studio on your MacBook. In the "Sources" box at the bottom, click the "+" icon and select "macOS Screen Capture".

-
Give it a name and choose the display or window you want to record.
-
Go to "Settings" > "Output" to choose your recording format (like MP4 or MOV). Next, click "Start Recording" on the right-hand control panel.
Part 5: How to Complete Screen Recording on Mac via QuickRecorder
QuickRecorder is a lightweight, open-source alternative for macOS users who find OBS too complex but want more flexibility than the built-in Apple tool. It is highly optimized for Apple Silicon (M1/M2/M3 chips).
To record the screen on a Mac computer with QuickRecorder:
-
Open QuickRecorder on your Mac after installing it successfully.
-
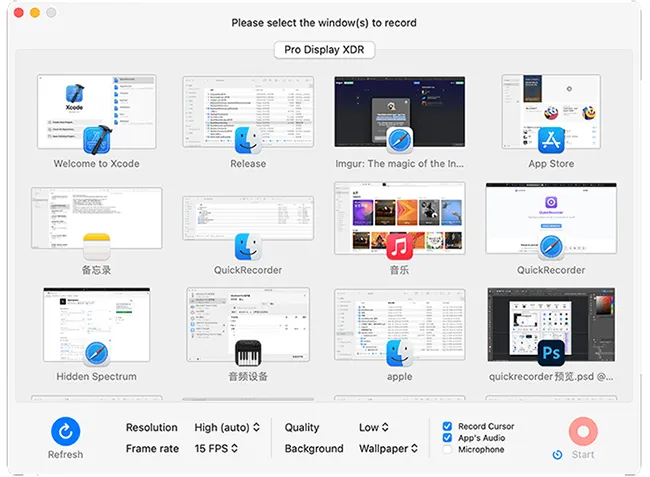
Select the specific window, screen, or even a mobile device connected to your Mac. Then configure your audio inputs and video quality in the simple pop-up menu.
-
Click the "Start" icon to begin the process.
Part 6: Q&A About Screen Recording on Mac
Q1: Why can't I screen record with sound on Mac?
By default, macOS does not allow apps to record "System Audio" (the sound coming from inside the computer) due to security and privacy policies. To fix this, you usually need a virtual audio driver (like BlackHole) or use third-party software like Screen Recorder that includes its own audio driver installation.
Q2: Can I record the screen on Mac with my sound?
Yes, you can. When using the Command + Shift + 5 toolbar or QuickTime, click Options and select your built-in or external microphone. This will capture your voice while you record the screen.
Q3: Where are screen recordings saved?
For the built-in tool, the default location is the Desktop. You can change this by pressing Command + Shift + 5, clicking Options, and choosing a different folder under the "Save to" section. For third-party apps like OBS or Screen Record, you can set the destination in the app's Settings/Preferences.
Conclusion
Screen recording on Mac is flexible and accessible, whether you rely on built-in macOS tools or advanced software like Screen Recorder. For quick tasks, the Screenshot toolbar and QuickTime Player are sufficient. For professional-grade recordings with system audio, editing, and customization, tools like Screen Recorder, OBS Studio, or QuickRecorder provide significantly more capability.
By selecting the appropriate method based on your needs, you can efficiently capture high-quality screen recordings on any Mac device.
Download for Mac Download for Win
Related Articles
Best Video Compressor Software: Top 12 Tools Reviewed for High-Quality Video Compression
Best Screen Recorder for Android: 11 Options (With or Without Computer)
Guide: Cast Android to Windows 10 PC (Contain USB and Wi-Fi Connections)
Solve Notes Not Syncing Between iPhone and Mac in 9 Ways