


When you intend to transfer videos from an iPad to a Mac for backup, editing, or simply enjoying content on a large screen, you can get help from this guide, which offers 6 practical solutions. Even though you want to transfer a long movie, you can complete it without any hurdles. What's more, among some methods, you won't lose the resolution during the process.

- Part 1: How to Transfer Videos from iPad to Mac via iCloud Photos
- Part 2: How to Transfer a Video from iPad to Mac via AirDrop
- Part 3: How to Transfer Movies from iPad to Mac via iReaShare iPhone Manager
- Part 4: How to Get Videos from iPad to Mac via Files App
- Part 5: How to Transfer Movies from iPad to Mac via Image Capture
- Part 6: How to Send a Video from iPad to Mac via Snapdrop
- Part 7: Q&A About Transferring Videos from iPad to Mac
Take a quick look at these 6 methods:
| Method | Pros | Cons |
|---|---|---|
| iCloud Photos |
1. Automatic background syncing. |
1. Requires paid iCloud storage for large libraries. 2. Relies on stable internet speeds. |
| AirDrop | 1. Fast and wireless. 2. No internet required (uses local Wi-Fi/Bluetooth). 3. Maintains high quality. |
1. Requires devices to be close together. 2. Can be slow or fail with very large 4K files. |
| iReaShare iPhone Manager | 1. High-speed wired transfers. 2. Manages movies outside the Photos app. 3. Works without internet. 4. Support the transfer of various data types. |
1. Requires a USB cable. 2. Requires software installation and license. |
| Files App | 1. Ideal for non-media files. 2. Supports iCloud Drive integration. 3. Supports organized folders. |
1. Limited by cloud storage capacity. 2. Upload/download speeds depend on internet connection. |
| Image Capture | 1. Native Mac utility. 2. Fast wired transfer. 3. Allows clearing iPad storage after import. |
1. Requires a USB cable. 2. Interface is basic and lacks library management. |
| Snapdrop | 1. Browser-based. 2. No software or Apple ID needed. 3. Works across different platforms. |
1. Both devices must be on the same network. 2. Slower than AirDrop or wired connections. |
Part 1: How to Transfer Videos from iPad to Mac via iCloud Photos
One of the easiest ways to transfer videos from your iPad to your Mac is through iCloud Photos. If you have iCloud Photos enabled on both your iPad and Mac, your videos will sync automatically across all your devices. Open the Photos app on your Mac, and you'll find the videos from your iPad in the iCloud Photos section.
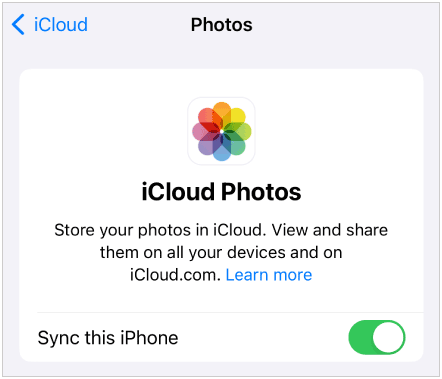
To transfer videos from an iPad to Mac via iCloud Photos:
-
On your iPhone, go to Settings > "Photos" and toggle on "Sync this iPhone".
-
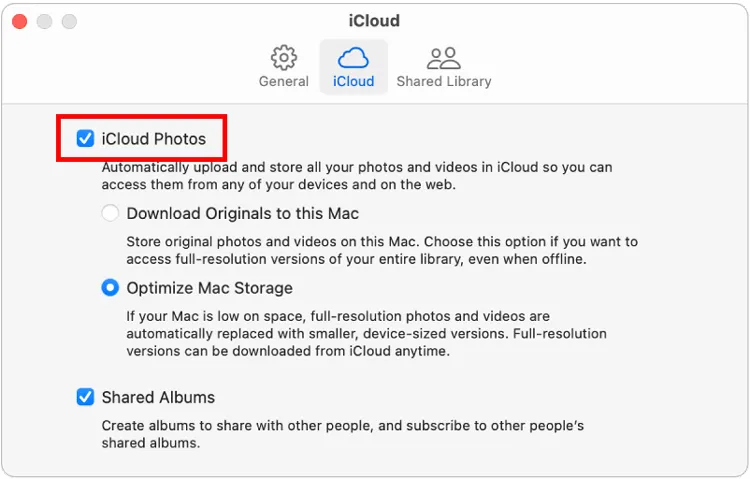
On your Mac, open the Photos app, click "Settings" or "Preferences" in the menu bar, tap "iCloud" tab, and ensure "iCloud Photos" is checked. If you don't want to lose quality, choose "Download Originals to this Mac".
-
Ensure both devices are signed into the same Apple ID and connected to Wi-Fi. Your videos will populate in the Mac Photos library automatically.
Part 2: How to Transfer a Video from iPad to Mac via AirDrop
Another quick method to transfer videos is via AirDrop, a wireless file-sharing feature that allows you to transfer videos directly between your iPad and Mac. However, using AirDrop is not suitable for bulk transfer.
To share a video from an iPad to a MacBook via AirDrop:
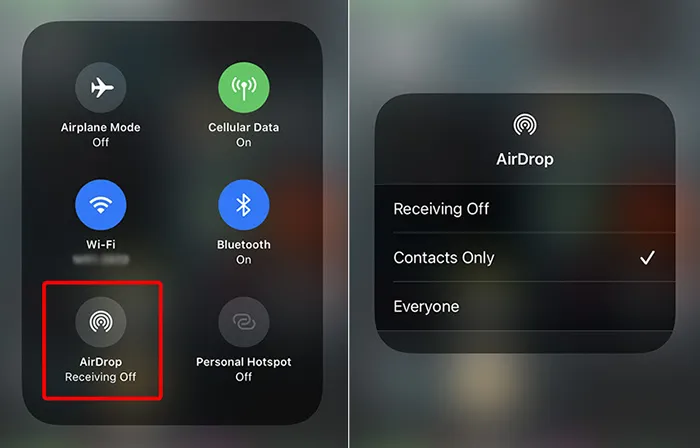
-
On your iPad, swipe down from the top-right corner to open the Control Center and ensure "AirDrop" is turned on. Then set to "Contacts Only" or "Everyone for 10 Minutes".
-
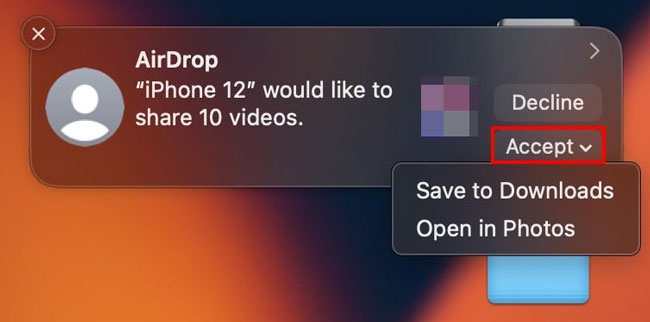
On your Mac, open Finder, select "AirDrop" from the sidebar, and ensure it is discoverable. Next, open the Photos app on your iPad, and select the video you want to transfer.
-
Tap the "Share" icon and select "AirDrop". Choose your Mac from the AirDrop list, and the video will be transferred instantly. Then accept the video file on Mac.
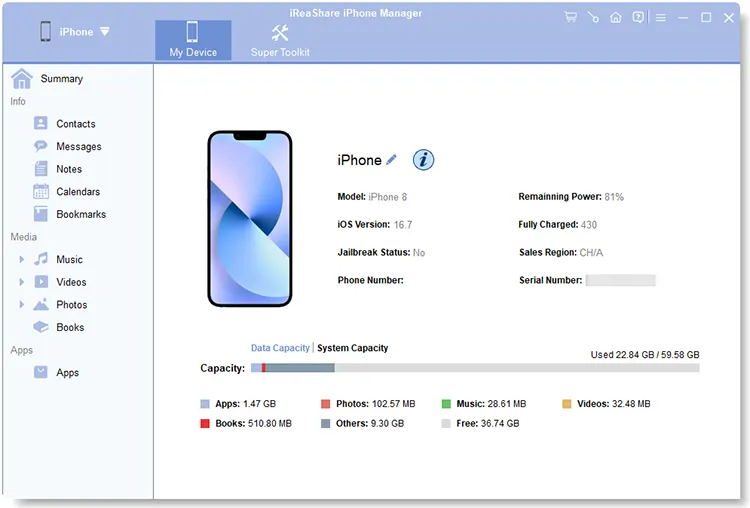
Part 3: How to Transfer Movies from iPad to Mac via iReaShare iPhone Manager
For those who need to manage large libraries or move several movies at once, iReaShare iPhone Manager offers more control and faster wired transfer speeds. It allows you to preview and select your video files on Mac, and then export them to Mac at one go.
Main features of iReaShare iPhone Manager:
* Transfer videos from an iOS device to a computer seamlessly.
* USB connection ensure the video transfer remains the lossless quality.
* Export photos, music, books, and more media files as well.
* Back up iOS data to a Mac computer with 1 click.
* Restore backup data from your computer to your iPad or iPhone.
* Support iOS 5.0 or later, including iPad Pro, iPad Air, iPad mini, iPad, etc.
* Mac and Windows versions are available for download.
Download iReaShare iPhone Manager.
Download for Mac Download for Win
To transfer movies from an iPad to a MacBook Pro via this software:
-
Connect your iPad to your Mac using a USB cable. Then download and install the program on your Mac.
-
Launch it, and it will detect your iPad device. Please choose "Trust" on your iPad. Then the connection will be established.
-
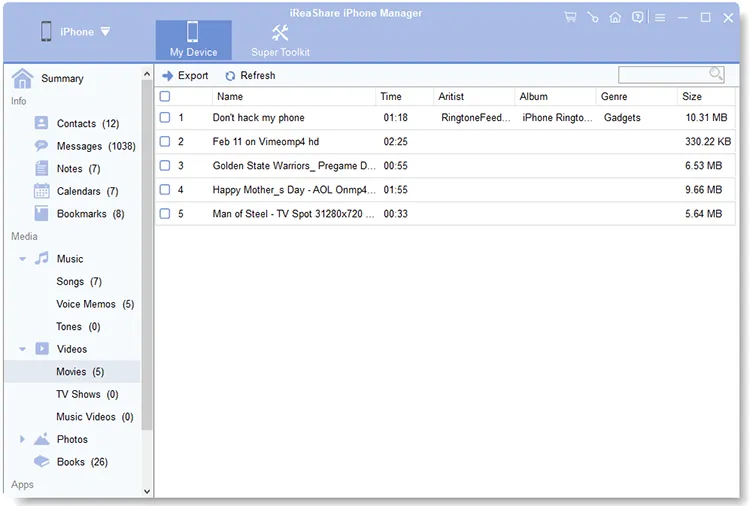
Navigate to the "Videos" tab. Next, select the files you wish to move and click the "Export" button to save them directly to a specific folder on your Mac.
Part 4: How to Get Videos from iPad to Mac via Files App
If your videos are saved in the Files app (such as downloads or documents) rather than the Photos app, you can use iCloud Drive. This method requires you to have adequate storage space on your Apple ID.
To get videos from an iPad to Mac via the Files app:
-
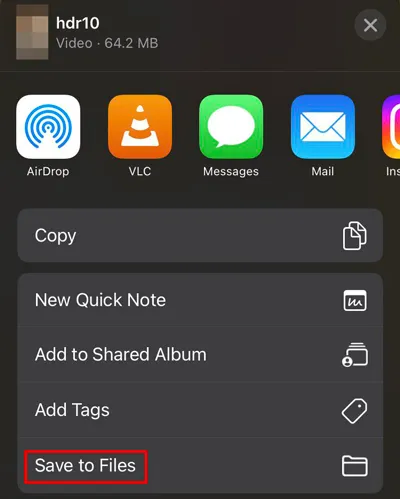
Open the Files app on your iPad and locate the video you want to transfer. Then tap the "Share" icon and choose "Save to Files".
-
Select a location, such as iCloud Drive, so the video syncs to your Mac.
-
On your Mac, open Finder and click on iCloud Drive in the sidebar. Wait for the sync to complete, then drag the video onto your desktop.
Part 5: How to Transfer Movies from iPad to Mac via Image Capture
Image Capture is a "hidden gem" utility pre-installed on every Mac. It is excellent for bulk transfers via cable without the bulkiness of the Photos app. If you prefer USB transfer, this way will be a reliable option.
To transfer a video from an iPad to MacBook Pro via Image Capture:
-
Connect your iPad to your Mac via USB. Then open Image Capture, found in your "Applications" folder or via "Spotlight".
-
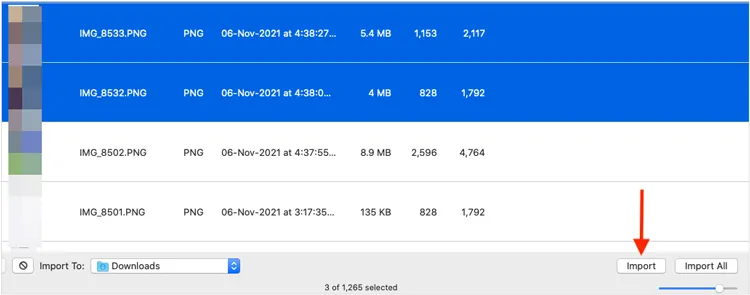
Select your iPad under "Devices". Then choose your desired videos.
-
Click "Import" to transfer the videos from your iPad to your MacBook.
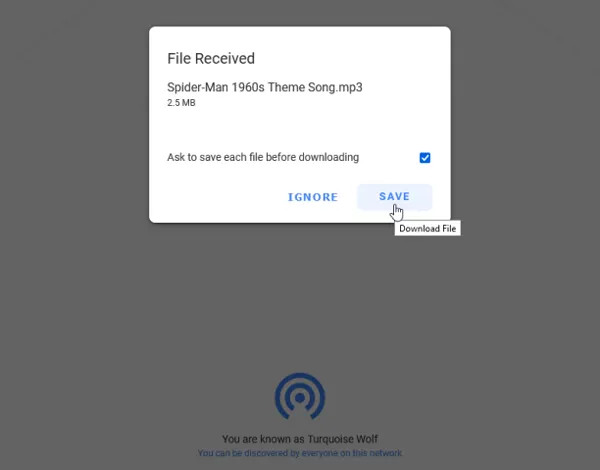
Part 6: How to Send a Video from iPad to Mac via Snapdrop
If you are looking for a browser-based, "AirDrop-style" solution that doesn't require an Apple ID, Snapdrop is a popular web tool. Besides, it doesn't require any setup on either devices.
To send a video from an iPad to Mac via Snapdrop:
-
Open Snapdrop (snapdrop.net) in a web browser on both your iPad and Mac. Ensure both devices are connected to the same Wi-Fi network.
-
On your iPad, tap the video file you want to send and select Snapdrop from the Share sheet.
-
On your Mac, a notification will appear. Click on it to accept the transfer.
Part 7: Q&A About Transferring Videos from iPad to Mac
Q1: Can I AirDrop a long video from my iPad to my Mac?
Yes. AirDrop does not have a formal file size limit. However, extremely long 4K videos can take a long time to "prepare" on the iPad before sending. For files over 5GB, a wired connection (Part 3 or Part 5) is usually more stable.
Q2: Why is my video not transferring to Mac?
Common culprits include:
- Wi-Fi/Bluetooth: AirDrop requires both to be active.
- Storage: Your Mac might not have enough disk space to receive the file.
- Format: If you are using an older Mac, it might not support the High Efficiency (HEVC) format used by newer iPads.
Q3: How can I avoid using storage on my Mac when transferring videos?
If you want to keep your Mac's internal drive clean, you can connect an external hard drive to your Mac and set it as the download destination in Image Capture or iReaShare iPhone Manager. Alternatively, keep the videos in iCloud and use the "Optimize Mac Storage" setting.
Conclusion
Whether you prefer the wireless convenience of AirDrop and iCloud or the speed and reliability of a USB cable, you can find a way you like above. If you want to manage your videos and other iPad data on your Mac without Finder, iReaShare iPhone Manager works. It also allows you to access your iPad data on your computer, including Mac and Windows. Hope you can enjoy your video on the big screen.
Download for Mac Download for Win
Related Articles
How to Transfer Music from iPad to Computer Without Hassle
How to Transfer Contacts from iPhone to iPad Seamlessly (4 Ways)
Best File Manager for iPhone and iPad: 12 iOS File Managers
How to Clear iPad to Sell Step by Step (4 Methods for Data Erasure
