


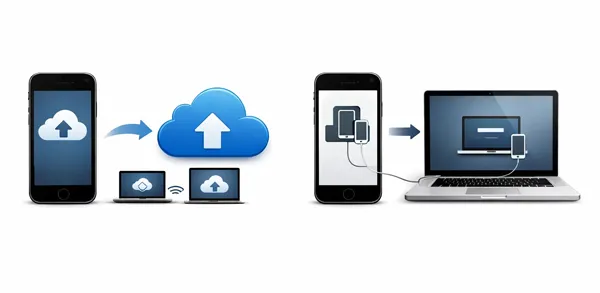
One essential factor for protecting your iPhone data is to back up your iPhone, such as your photos, messages, contacts, videos, documents, etc. Equally important is knowing how to restore that backup when switching devices, recovering from data loss, or troubleshooting issues. Thus, learn how to back up and restore an iPhone from this guide, and avoid data loss on your iPhone.
- Part 1: How to Back Up iPhone to iCloud and Restore iCloud Backup to iPhone
- Part 2: How to Back Up and Restore iPhone via iReaShare iPhone Manager
- Part 3: How to Back Up iPhone to iTunes and Restore iPhone from iTunes Backup
- Part 4: How to Back Up and Restore iPhone with Apple Devices App
- Part 5: How to Back Up and Restore iPhone Files via Google Drive
- Part 6: Q&A About iPhone Backup and Restore
Take a quick look at these backup and restore methods:
| Method | Pros | Cons |
|---|---|---|
| iCloud | 1. Automatic and wireless backups. 2. No computer or cables required. 3. Easy to restore during initial setup. |
1. Requires stable Wi-Fi. 2. Limited free storage (5GB). 3. Requires full device reset to restore. |
| iReaShare iPhone Manager | 1. Supports selective backup and restore. 2. No data overwriting on the device. 3. Works offline without ads. 4. User-friendly interface. |
1. Requires a computer and USB cable. 2. Requires software installation and paid license. |
| iTunes | 1. Large local storage capacity. 2. Completely free to use. 3. Supports encrypted, secure backups. |
1. Dated interface and can be slow. 2. Requires physical cable connection. 3. Overwrites current data during restore. |
| Apple Devices App | 1. Modern, lightweight iTunes replacement. 2. Improved performance on Windows 10/11. |
1. Limited to Windows 10/11 users. |
| Google Drive | 1. Ideal for cross-platform (iOS to Android). 2. Great for Photos, Contacts, and Calendars. |
1. Cannot back up app data or messages. 2. Requires a Google account. 3. Manual setup for individual file types. |
Part 1: How to Back Up iPhone to iCloud and Restore iCloud Backup to iPhone
iCloud is the most convenient method to back up and restore an iPhone as it happens wirelessly and automatically. However, it requires adequate cloud storage space. Otherwise it will not back up all the data you want.
To back up iPhone to iCloud:
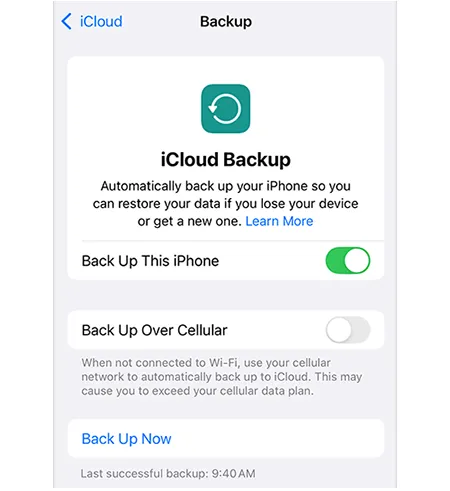
Connect your iPhone to a stable Internet network, and go to Settings > "[Your Name]" > "iCloud" > "iCloud Backup", and tap "Back Up This iPhone".
To restore iCloud backup to iPhone:
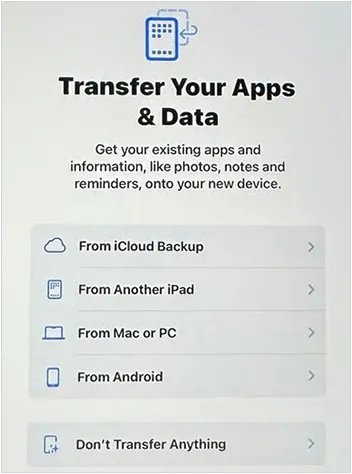
You must first erase your device (Settings > General > Transfer or Reset iPhone > Erase All Content and Settings). During the initial setup, choose "From iCloud Backup" on the "Transfer Your Apps & Data" screen and sign in with your Apple ID. Complete the setup, and your data will be restored to the iPhone.
Part 2: How to Back Up and Restore iPhone via iReaShare iPhone Manager
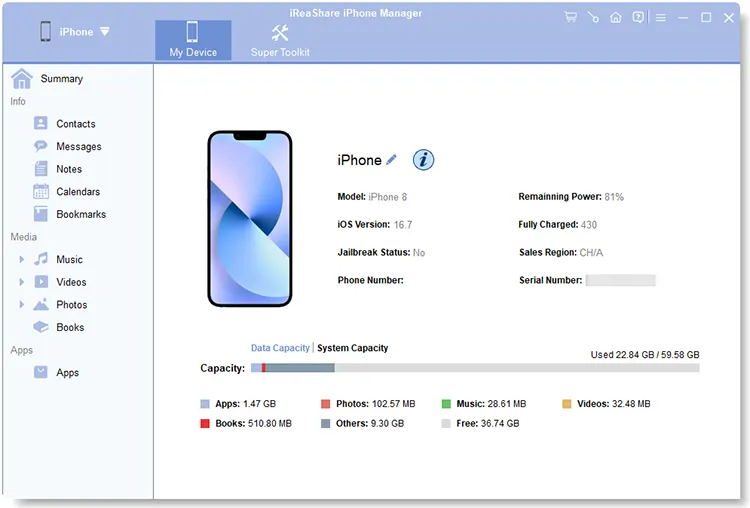
For users who prefer more control than Apple's default tools, iReaShare iPhone Manager offers a streamlined desktop alternative. It enables you to view your iPhone data on a computer, and select and transfer the specific files you want to the PC or Mac. Besides, you can back up various data types at once, and restore them from your computer to your iPhone anytime.
Main features of iReaShare iPhone Manager:
* Transfer your iPhone data to your computer for backup without data loss.
* Support data preview and selection.
* Back up your iPhone data to your PC or Mac at one go without hassle.
* Restore backups from your computer to your iOS device, including iTunes backup files.
* Support the transfer of iPhone contacts, messages, calendars, notes, photos, videos, music, etc.
* Compatible with iOS 5.0 or later, including the latest version.
Download iReaShare iPhone Manager.
Download for Win Download for Mac
To back up iPhone without iTunes:
-
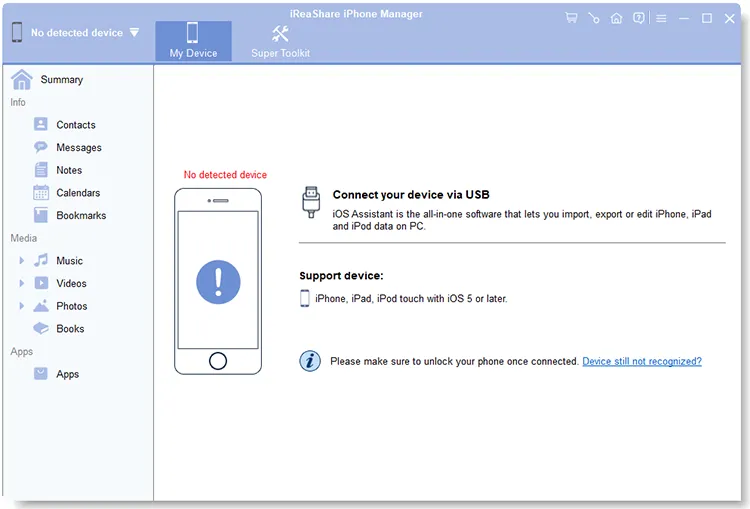
Connect your iPhone to your computer via USB. Then install and launch the iPhone Manager software on your computer.
-
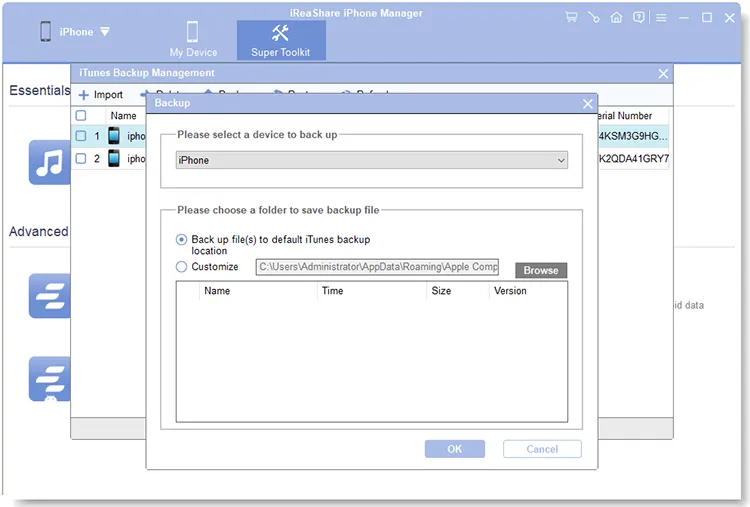
Click "Trust" on the iPhone. Once connected, to back up your iPhone with 1 click, you can go to "Super Toolkit".
-
Hit "iTunes Backup & Restore" on the interface, and choose the "Backup" tab. Then select the connected iPhone. Next, choose a location, and tap on "OK" to start the backup process.
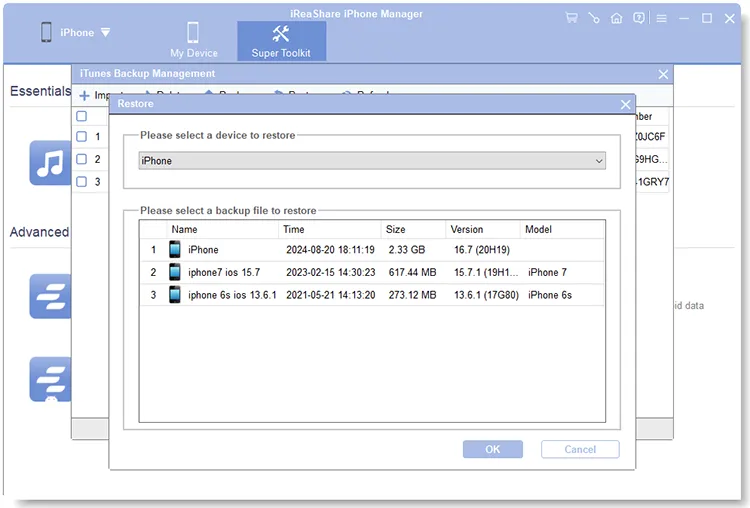
To restore your backup from your computer to your iPhone:
-
Connect your iPhone to your computer, and go to "Super Toolkit" > "iTunes Backup & Restore". Then choose the "Restore" tab.
-
Select the backup file you want to restore, and tap "OK" to restore the data to your iPhone.
You can watch the video to back up and restore your iPhone:
Part 3: How to Back Up iPhone to iTunes and Restore iPhone from iTunes Backup
If you are using an older Windows PC or an older macOS version, iTunes remains the standard local backup tool. Even though it is not updated anymore, you can download the iTunes software from the Apple website.
Here's how to back up iPhone to iTunes:
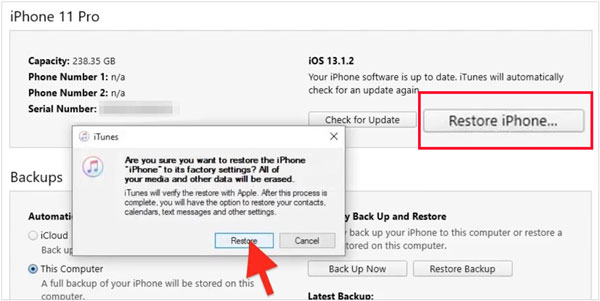
Connect your iPhone to your computer and open iTunes. Click the iPhone device icon in the upper left corner, go to "Summary", choose "This Computer" under "Backups", and click "Back Up Now".
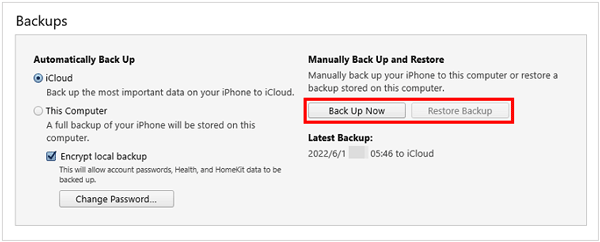
Here's how to restore iPhone from iTunes backup:
In the "Summary" tab, click "Restore Backup...". Select the most recent backup from the list and wait for the process to complete.
Tips: If iTunes cannot back up your iPhone because of an error, you can fix it without effort.
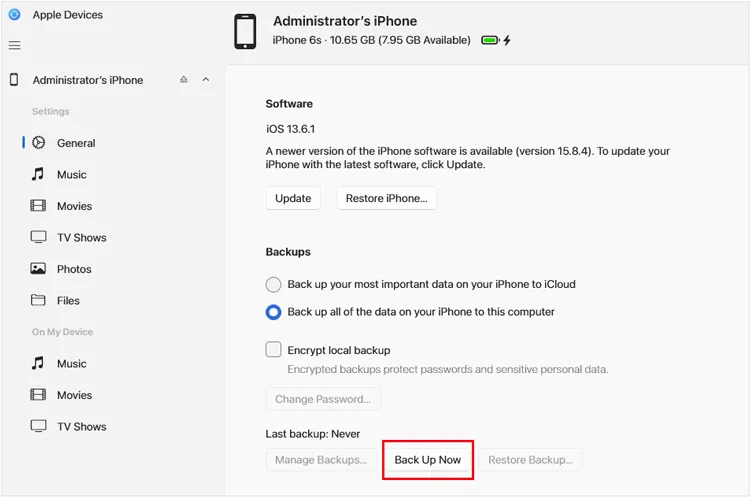
Part 4: How to Back Up and Restore iPhone with Apple Devices App
On Windows 10 and later, Apple has replaced the backup functions of iTunes with the Apple Devices app. You can use it to back up and restore your iPhone without iTunes.
To back up iPhone with the Apple Devices app:
Open the Apple Devices app and connect your phone. Select your device in the sidebar, go to the "General" tab, and select "Back up all of the data on your iPhone to this computer". Click "Back Up Now".
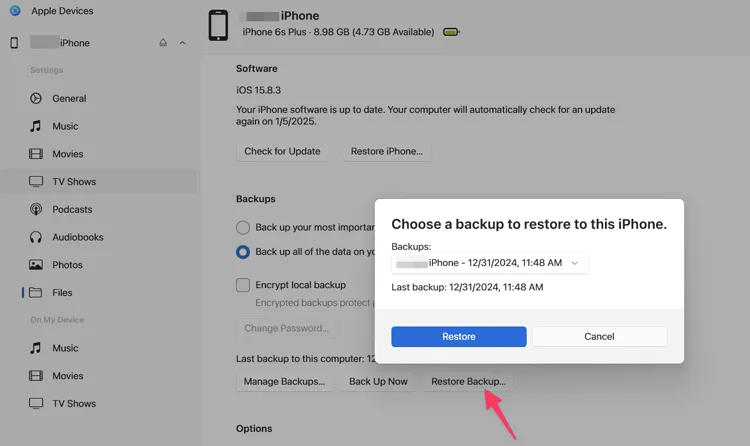
To restore backup data to an iPhone with the Apple Devices app:
From the same "General" tab, click "Restore Backup", choose your file, and confirm.
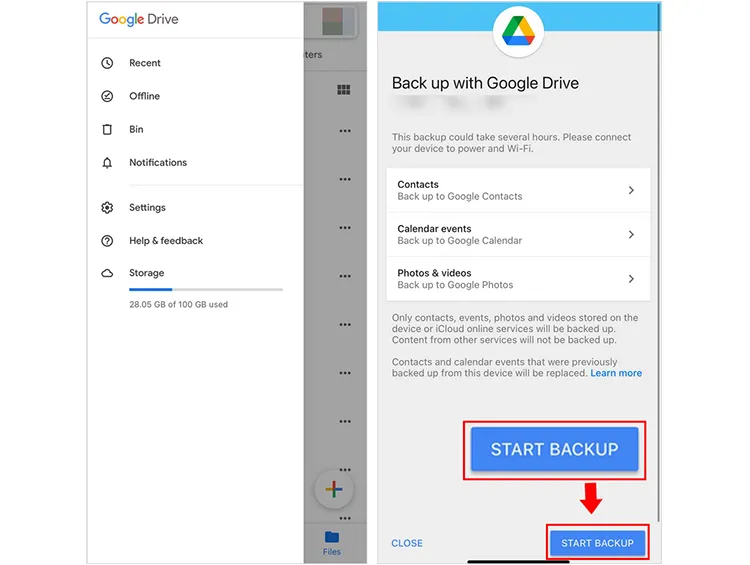
Part 5: How to Back Up and Restore iPhone Files via Google Drive
Google Drive is an excellent option for cross-platform users who only need to save specific files like photos, contacts, and calendars. You can upload your media files from your iPhone to Google Drive as well.
To back up iPhone with Google Drive:
Download Google Drive from the App Store. Open it, tap the "Menu" (three lines) > "Settings" > "Backup". Choose your content and tap "START BACKUP".
To restore iPhone data with Google Drive:
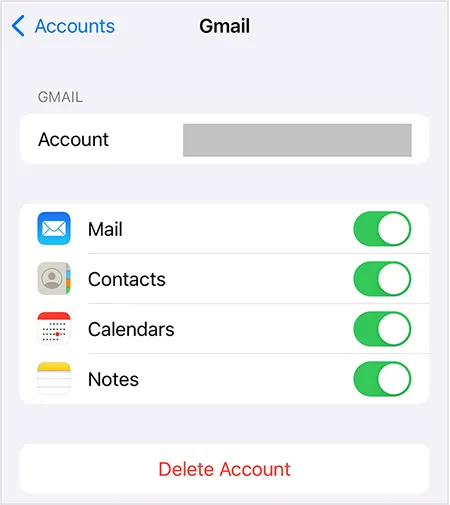
Go to the Settings app on your iPhone, and click "Accounts" to add the same Google Account to your iPhone. Then turn on the data types you want to sync. Then the data you backed up to Google Drive will be synced to this iPhone. By the way, you can download the files that you uploaded to Google Drive to your iPhone for restoration.
Part 6: Q&A About iPhone Backup and Restore
Q1: Can I restore my iPhone from backup without resetting?
Generally, no. Official Apple methods (iCloud/iTunes) require a full factory reset to restore a complete system backup. However, third-party tools like iReaShare iPhone Manager or cloud services like Google Drive allow you to restore backups at once or import specific files without erasing your phone.
Q2: Is it possible if I restore my iPhone and iCloud backup is all back?
Yes. When you restore from an iCloud backup, your settings, app data, and messages are downloaded. Your photos and videos will also begin downloading in the background, though this may take time depending on your internet speed.
Q3: Can I restore data after setup?
You cannot restore a full iCloud or iTunes backup once you have finished the "Hello" setup screens without resetting the phone again. You can, however, sync data like photos, contacts, and notes at any time by signing into iCloud in Settings.
Q4: Can I delete everything on iCloud so that it cannot be recovered?
Yes. Go to Settings > [Your Name] > iCloud > Manage Account Storage. From here, you can delete specific backups and data. Once deleted from the "Recently Deleted" folder in Photos or the "Trash" in iCloud Drive, the data is permanently removed from Apple's servers.
Conclusion
As a fundamental practice for data security, iPhone backup and restore is more significant than many people think. If you want wireless methods, you can use iCloud or Google Drive. For USB options, you can choose iReaShare iPhone Manager, iTunes, and the Apple Devices app. If you want to selectively back up your iPhone data, iReaShare iPhone Manager can do it well.
Download for Win Download for Mac
Related Articles
Android Backup and Restore Without Effort | 4 Proven Solutions
iPhone Stuck in Recovery Mode: How to Fix It (Step-by-Step Guide)
5 Ways to Switch from iPhone to Android Step by Step
Sync iPhone to Mac Effectively and Safely: 6 Syncing Approaches
