When you buy a new iPad, you may want to transfer your data from your old iPad to the new one, such as your photos, videos, music, apps, etc. So, do you know how to transfer data from iPad to iPad? In fact, it's straightforward. Read today's post, and you will understand how to use 5 reliable data transfer methods step by step.

- Part 1: How to Transfer Data from iPad to iPad via iReaShare Phone Transfer
- Part 2: How to Transfer Data from Old iPad to New iPad with iTunes
- Part 3: How to Transfer Data from One iPad to Another with Quick Start
- Part 4: How to Transfer Everything from One iPad to Another via iCloud Backup
- Part 5: How to Transfer Data from One iPad to Another via AirDrop
- Part 6: FAQs About iPad Data Transfer
Part 1: How to Transfer Data from iPad to iPad via iReaShare Phone Transfer
Upgrading to a new iPad often brings a mix of excitement and the inevitable question: how do I move all my important stuff over? If you want to select your desired data types before transferring your data, you will need a flexible transfer program like iReaShare Phone Transfer. It allows you to selectively transfer data types between your iOS devices. Even though you finish the setup on your new iPhone, you don't need to reset the device again.
Main features of iReaShare Phone Transfer:
* Seamlessly transfer data from one iPad to another.
* Allow you to select the data types you want before copying data.
* Support the transfer of contacts, books, calendars, and Safari bookmarks between iPads.
* Enable you to transfer photos, videos, music, and more from iOS to Android.
* Support iOS 5.0 and upper, including iOS 18.
* No ad during the transferring process.
Download iReaShare Phone Transfer.
Download for Win Download for Mac
Here's how to complete the iPad to iPad transfer with this software:
Step 1: Install the iPad data transfer software on your computer, and open it. Then connect both your iPads to the computer with USB.
Step 2: Click "Trust" on both iOS devices. Then the connection will be established. Ensure your new iPad is the "Destination" device. If not, click "Flip".
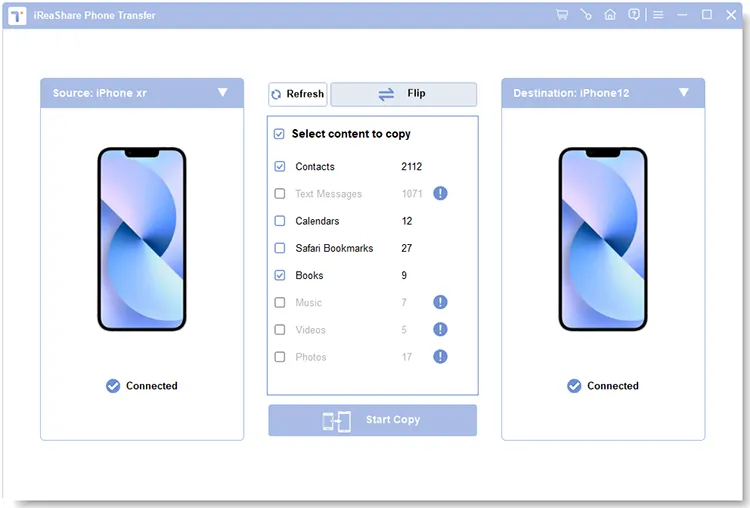
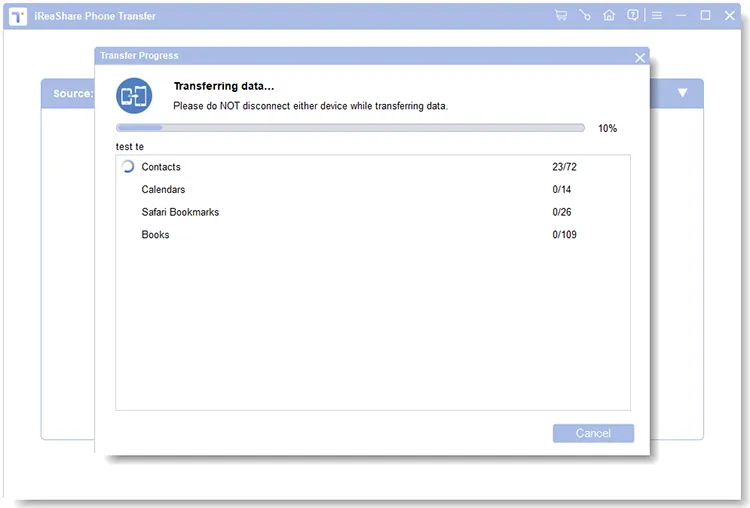
Step 3: Select the data types you want to transfer, and click "Start Copy" to transfer your data from the old iPad to the new iPad.
Watch the video guide to easily transfer data between iPads:
Part 2: How to Transfer Data from Old iPad to New iPad with iTunes
iTunes (or Finder on Macs) provides a reliable method for transferring data by creating a backup of your old iPad and restoring it to your new one. Furthermore, iTunes is compatible with many generations of iOS devices. However, if you want to back up data from a very old iPad running iOS 4.0, the latest iTunes version may fail to do it. In this case, you can download the former version like iTunes 9.2.1, which can support old iOSes.
Here's how to transfer information from one iPad to another via iTunes:
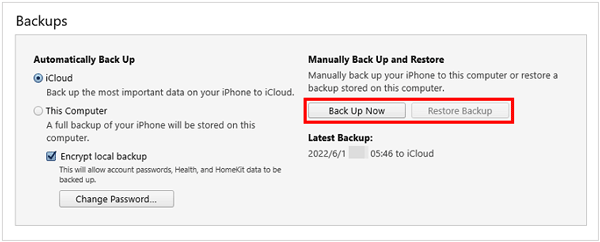
Step 1: Connect your old iPad to your computer using a USB cable, and open iTunes. Then select your iPad when it appears.
Step 2: Choose the "Summary" tab, and locate the "Back Up Now" option. Then click it. Your data on the old iPad will be backed up to your PC.
Step 3: Disconnect your old iPad, and connect your new iPad to the PC via USB. Next, click the iPad icon and go to "Summary".
Step 4: Click "Restore Backup", and select the backup file you want. Then restore the backup data to your new iPad. Wait for the restore process to finish.
Part 3: How to Transfer Data from One iPad to Another with Quick Start
Quick Start is a convenient feature introduced by Apple that allows you to wirelessly transfer data directly from one iOS or iPadOS device to another during the initial setup process. However, this feature works on iPadOS 13 or later. If your old iPad doesn't support it, please use another way.
Guide to switching iPads with Quick Start:
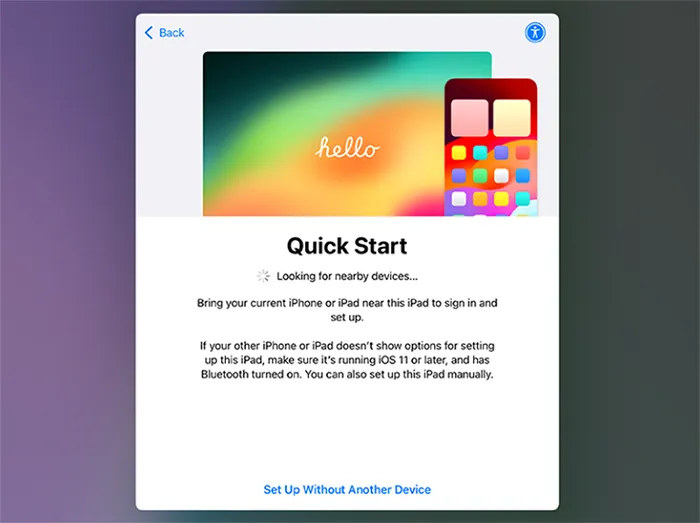
Step 1: Turn on your new iPad and place it near your old iPad. Ensure both iPads have Bluetooth enabled and are connected to Wi-Fi.
Step 2: The Quick Start screen will appear on your old iPad, offering the option to use your Apple ID to set up your new iPad. Tap "Continue" on your old iPad. An animation will appear on your new iPad.
Step 3: Use the camera on your old iPad to scan the animation on your new iPad. If prompted, enter the passcode of your old iPad on your new iPad.
Step 4: Follow the on-screen instructions to set up Face ID or Touch ID and choose how you want to restore your data. Select "Transfer from iPad". Tap "Continue" to begin the data transfer process. Keep both iPads close to each other and connected to power until the transfer is complete.
Part 4: How to Transfer Everything from One iPad to Another via iCloud Backup
iCloud Backup provides a wireless method to back up your old iPad and restore it to your new one, provided you have sufficient iCloud storage. You can transfer everything from your iCloud backup to your new iPad during the setup.
Here's how:
Step 1: Ensure both your iPads are connected to Wi-Fi. On your old iPad, go to Settings > "[Your Name]" > "iCloud" > "iCloud Backup". Toggle "iCloud Backup" on if it's not already enabled.
Step 2: Tap "Back Up Now" and wait for the backup to complete. It's best to do this while your iPad is connected to power and Wi-Fi.
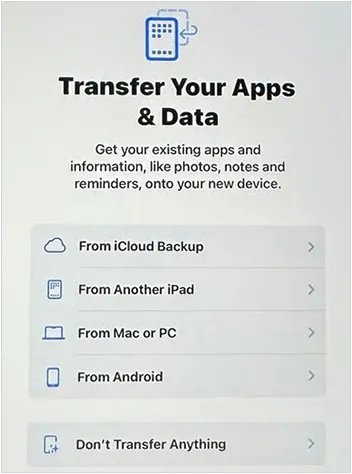
Step 3: Now, you can restore your backup to your new iPad. Please turn on your new iPad and follow the on-screen setup instructions until you reach the "Transfer Your Apps & Data" screen.
Step 4: Select "From iCloud Backup", and sign in with your Apple ID and password.
Step 5: Choose the most recent backup of your old iPad from the list. Wait for the restore process to finish.
Part 5: How to Transfer Data from One iPad to Another via AirDrop
AirDrop offers a convenient way to wirelessly transfer individual files and small amounts of data, such as photos, videos, documents, and contacts, directly between nearby Apple devices. If you want to transfer specific files from one iPad to another, you can use AirDrop.
Here are the steps:
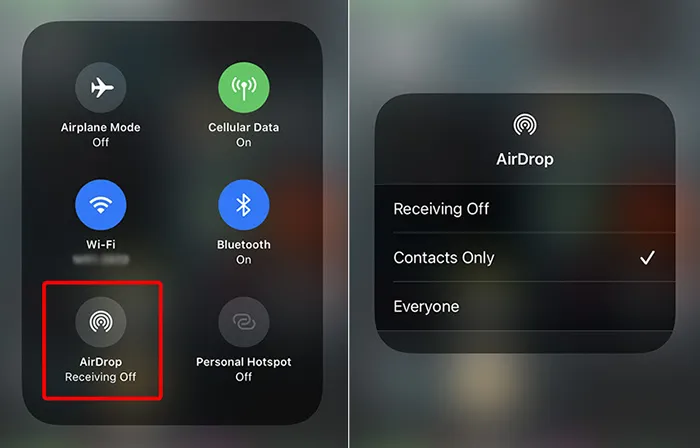
Step 1: Swipe down from the top-right corner of the screen (or swipe up from the bottom on older iPads) to open "Control Center".
Step 2: Tap and hold the Wi-Fi or Bluetooth card in the top-left corner, and Tap the "AirDrop" button and choose either "Contacts Only" or "Everyone" (temporarily setting it to "Everyone" can be useful for a one-time transfer). Ensure both iPads are discoverable.
Step 3: Open the app containing the data you want to transfer on your source iPad, and select the items you wish to share.
Step 4: Tap the "Share" icon, look for the AirDrop option in the share sheet, and tap it. Your target iPad should appear as a recipient. Tap its name.
Step 5: A notification will appear on your new iPad asking if you want to accept the incoming items. Tap "Accept". The transferred data will be saved in the corresponding app on your destination iPad.
Part 6: FAQs About iPad Data Transfer
Q1: Will my apps and app data transfer to my new iPad?
Yes, generally, your apps will transfer to your new iPad, and in most cases, the app data associated with them will also transfer. However, the specifics can depend on the method you use for the transfer.
Q2: Can I transfer only selected data (like contacts or messages)?
Yes, but not with Apple's built-in tools. You would need the transfer software like iReaShare Phone Transfer to selectively transfer certain types of data.
Q3: What if I don't have enough iCloud storage to back up my iPad?
Apple temporarily gives you free extra iCloud storage to help with the transfer when setting up a new device. Otherwise, you can buy more iCloud storage, or use a computer to create a local backup.
Conclusion
Maybe you think that transferring data between iPads is a stressful process, but now, you can use 5 effective methods to complete the data transfer, and access your data on your new iPad without trouble. Additionally, when you finish your setup or want to transfer data to the iPad that stores many files, you can use iReaShare Phone Transfer. This tool can transfer your data without overwriting your existing data.
Download for Win Download for Mac
Related Articles
Accurate Guide: How to Remove Apple ID from iPad Without Password
How to Transfer Data from iPhone to Android: 5 Powerful Solutions
How to Switch iPhones with 4 Reliable Methods (Guide in 2025)
How to Import Contacts to iPhone from Different Locations (Full Guide)