


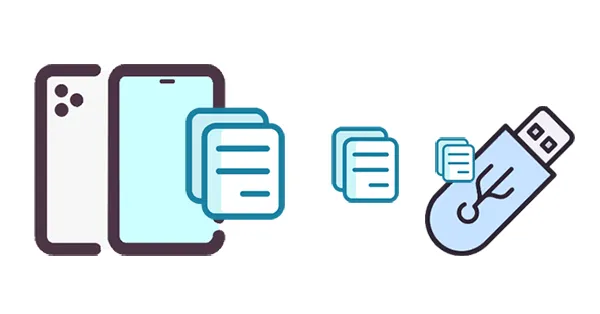
You want to transfer files from your iPhone or iPad to a flash drive for backup, right? That's a great decision, but you need to know useful ways first. Though the Apple ecosystem is closed to a large extent, you can transfer files from an iPhone or iPad to a flash drive with some practical tools. These proven approaches are provided in the following, so you can utilize them without trouble.
- Part 1: How to Transfer Files from iPhone/iPad to Flash Drive via iPhone Manager
- Part 2: How to Transfer Files from iPhone/iPad to Pendrive via iCloud
- Part 3: How to Transfer Data from iPhone to Pendrive via USB Adapter
- Part 4: How to Move Files from iPhone/iPad to Flash Drive via iTunes
- Part 5: How to Transfer Files from iPhone to USB Stick via Photos App
- Part 6: FAQs About Transferring Files from iPhone to USB
Part 1: How to Transfer Files from iPhone/iPad to Flash Drive via iPhone Manager
If you want to efficiently move files from an iPhone or iPad to a USB stick, you can use iReaShare iPhone Manager, a comprehensive data transfer and management tool for iOS users. With it, you can view your iOS files like contacts, text messages, photos, documents, videos, and more, on your computer, and then select and export them to your flash drive.
Main features of iReaShare iPhone Manager:
* Help you transfer your files from an iPhone/iPad to an external storage device on a computer.
* Allow you to easily preview your iPhone data before transferring it.
* Transfer files from an iPhone or iPad to a PC or MacBook.
* Back up your iOS data to your external USB drive or computer with ease.
* Import files from a computer or a USB drive to your iOS device.
* Save your iOS files in accessible file formats.
* Support iOS 6.0 and later, including iOS 26, compatible with iPhone 17 Pro Max/17 Pro/17/Air/16/15/14/13/12/11/X, iPad Pro, iPad mini, iPad Air, etc.
Download the iPhone Manager software.
Download for Win Download for Mac
Here's how to move files from an iPhone to a flash drive with this software:
Step 1: Download and install iReaShare iPhone Manager on your computer, and launch it. Then link your iPhone/iPad to your computer with a USB cable and click "Trust" on the iOS device.
Step 2: Your iOS device will be recognized by the program. Next, plug your pendrive into your computer.
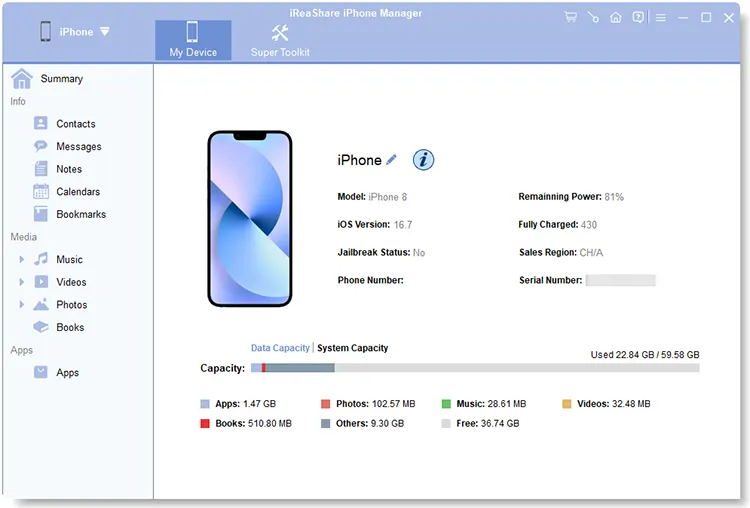
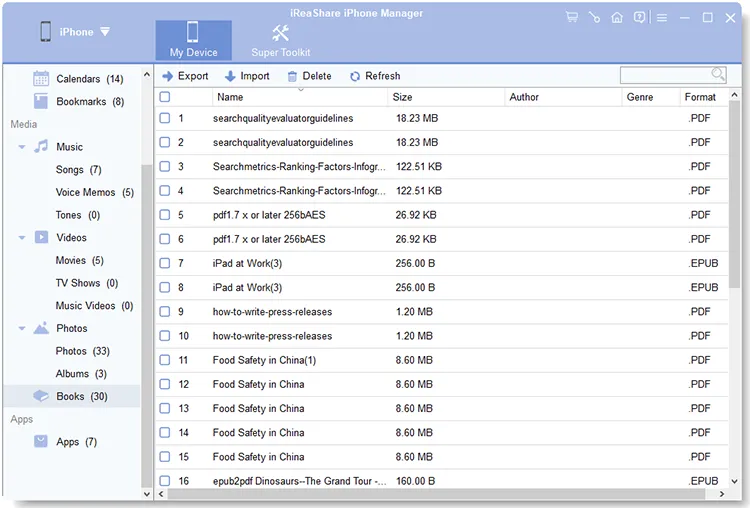
Step 3: Select a category on the interface, and view your iOS files. Then opt for the content you want to transfer, and click "Export". Then select your USB drive as the destination. Your files will be saved to the USB drive.
Part 2: How to Transfer Files from iPhone/iPad to Pendrive via iCloud
iCloud can serve as an intermediary for transferring files, especially for documents and certain media types. This method is convenient if you regularly use iCloud for syncing.
Use iCloud to save files from an iPad or iPhone to a memory stick:
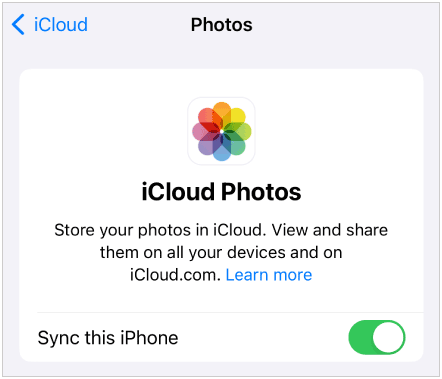
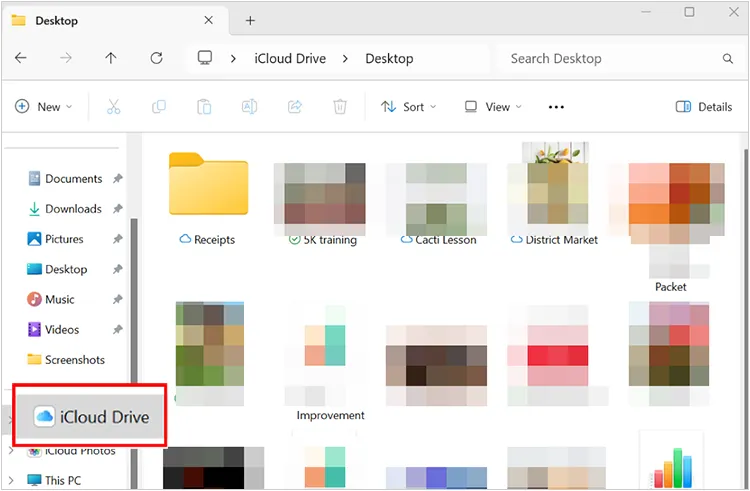
Step 1: Ensure your files are synced to iCloud. For photos, make sure iCloud Photos is enabled in Settings > your Apple ID > "iCloud" > "Photos". For documents, ensure they are saved in iCloud Drive.
Step 2: On your computer, open a web browser and go to iCloud.com. Then sign in with your Apple ID.
Step 3: Access the relevant iCloud service, and select the files you wish to transfer.
Step 4: Click the "Download" icon (usually a cloud with a downward arrow). Then your files will be saved on your computer.
Step 5: Plug your flash drive into your computer, and move the downloaded files to the flash drive.
Part 3: How to Transfer Data from iPhone to Pendrive via USB Adapter
For a direct, computer-free transfer, a Lightning to USB Camera Adapter (also known as a Lightning to USB 3 Camera Adapter for newer iPads) is an excellent solution. This allows you to connect a flash drive directly to your iPhone or iPad.
Here's copy files from an iPad or iPhone to a flash drive:
Step 1: Ensure your flash drive is formatted correctly for iOS (FAT32 or exFAT are generally compatible).
Step 2: Plug the Lightning to USB adapter into your iPhone/iPad's Lightning port. Then connect your flash drive to the USB port on the adapter.
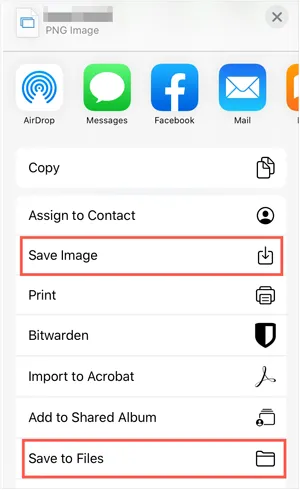
Step 3: Open the Files app on your iPhone/iPad. Under "Locations", you should see your flash drive appear.
Step 4: Navigate to the files you want to transfer within the Files app or other apps. Select the files, tap the "Share" icon, and choose "Save to Files". At last, select your flash drive as the destination and tap "Save".
Part 4: How to Move Files from iPhone/iPad to Flash Drive via iTunes
While iTunes is primarily for media management and device backups, you can use it to transfer certain files, particularly documents associated with specific apps that support File Sharing.
Here are the steps you can follow:
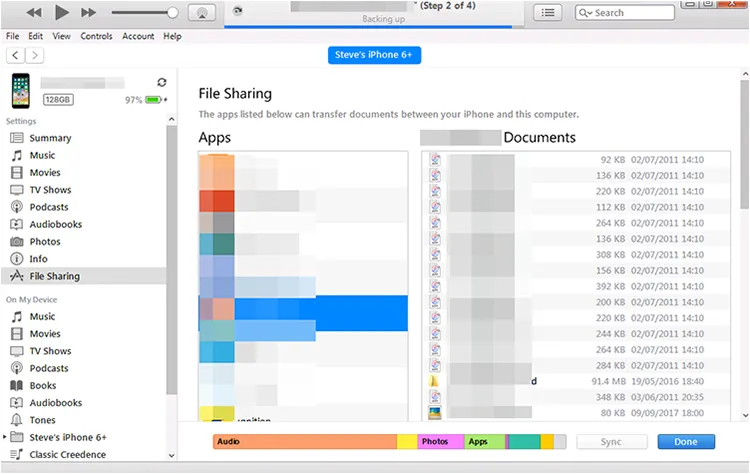
Step 1: Connect your iPhone/iPad to your computer using a USB cable. Then open iTunes on your PC.
Step 2: Select your device in iTunes. Then click on "File Sharing" in the sidebar.
Step 3: You'll see a list of apps that support file sharing. Select the app containing the files you want to transfer. Next, select the files you wish to move from the "Documents" list.
Step 4: Click "Save To..." and choose a location on your computer. Plug your flash drive into your computer and drag the saved files from your computer's chosen location to the flash drive.
Tips: If your iTunes cannot back up your iPhone or iPad, you can repair it with simple solutions.
Part 5: How to Transfer Files from iPhone to USB Stick via Photos App
The Photos app on your PC can help you transfer videos from your iPad/iPhone to your flash drive. However, you cannot transfer other files with this method. By the way, if your computer is Mac, you can use Image Capture to import your photos to your Mac, and then move them to the external USB drive.
Here's the guide:
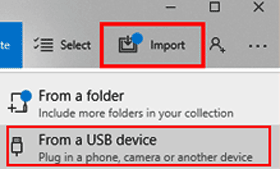
Step 1: Connect your iOS device to your PC with USB, and open the Photos app on your PC by clicking "Search" and entering "Photos".
Step 2: Tap "Import" > "From a USB device" or "From a connected device" and choose your iOS device. Then the Photos app will scan your iPhone videos and photos.
Step 3: Select the videos and photos you want to transfer, and click "Import". Then the transfer process will begin. Once finished, your iOS files are stored on your computer.
Step 4: Insert your thumb drive into the computer, open the "Pictures" folder on your PC, and go to "This PC" to open your thumb drive. Next, drag and drop the files to the USB drive.
Part 6: FAQs About Transferring Files from iPhone to USB
Q1: How do I allow USB transfer on my iPhone?
On an iPhone, "allowing USB transfer" generally refers to a few key things, primarily related to security and the iOS Files app:
- "Trust This Computer" Prompt: This is the most common and fundamental step. When you connect your iPhone to a new computer (Mac or PC) or certain USB accessories (like some flash drives via an adapter) for the first time, your iPhone will display an alert asking like this, and you need to tap "Trust".
- "USB Accessories" Setting (Allow Access When Locked): This setting enhances security by controlling whether USB accessories can connect and transfer data when your iPhone is locked and hasn't been unlocked for a while (typically an hour).
Q2: What file formats can be transferred to a USB from iPhone?
You can transfer most common file types, such as:
- Photos and Videos (JPG, PNG, MOV, MP4, etc.)
- Documents (PDF, DOCX, TXT, etc.)
- Audio files (MP3, M4A)
- App-specific files (varies by app)
However, keep in mind that some apps may restrict file access or store files in proprietary formats that may not transfer easily.
Q3: Why can't I see my USB drive on my iPhone?
iPhones usually don't recognize external drives by default. You may need to use a specialized app like Files, or a third-party app that allows external drive support. Make sure the USB drive is formatted in a format supported by iPhone (typically exFAT or FAT32). NTFS drives are usually not supported on iPhone. Additionally, some drives may need extra power to work, so ensure the USB device is compatible and has a power source if necessary.
Conclusion
Now, you can effortlessly transfer your files from your iPhone or iPad to a USB drive. Which way is the best depends on your preferences and requirements. For instance, if you want to preview your iOS files before transfrring them, or even manage them on your computer, you can choose iReaShare iPhone Manager, which offers multiple features for file transfer and organization. If you want don't want to use a USB cable, you can utilize iCloud, uploading and downloading your files with Wi-Fi.
Download for Win Download for Mac
Related Articles
Solved: How to Sync Contacts from iPhone to Mac
How to Directly Access iPhone Files on PC
Easily Move Files from iPhone to Android Phone
Swiftly Transfer Music from iPhone to Mac (6 Ways)
