


TL;DR:
To erase all content and settings on an iPhone running iOS 15 or up, open Settings > General > Transfer or Reset iPhone > Erase All Content and Settings, then tap Continue and enter your device passcode and Apple ID password. If your reset button is grayed out, locked, or you require 100% unrecoverable data destruction for privacy, use iReaShare iPhone Data Eraser to permanently overwrite and wipe all files beyond data recovery software.
Whether you are preparing to trade in, sell, give away, or fix severe system glitches on your iPhone, knowing how to erase all content and settings on iPhone correctly is critical. A proper factory wipe removes personal photos, messages, app accounts, and passwords, keeping your private identity safe from buyers or third parties.
However, Apple's built-in reset feature destroys hardware encryption keys but may leave deep storage blocks un-overwritten. Additionally, active Screen Time controls, forgotten Apple ID passwords, or system crashes can cause the reset button to freeze or become grayed out. This comprehensive guide covers essential pre-erasure steps, 4 reliable methods to wipe your iOS device, and troubleshooting fixes for reset failures.
Part 1. What to Do Before Erasing All Content and Settings on iPhone/iPad?
Erasing your device is permanent and irreversible. Before initiating the wipe process, follow this 5-step pre-reset checklist to protect your data and avoid lockouts:
Step 1. Back Up Essential Files
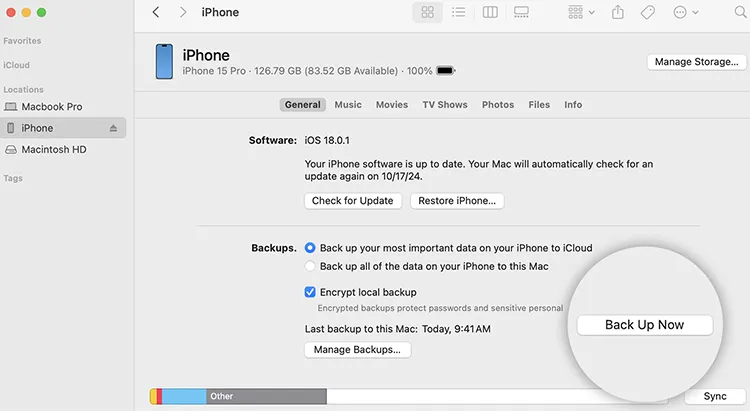
Prevents permanent loss of photos, contacts, notes, and app records. Perform an iCloud backup via Settings > [Your Name] > iCloud Backup or create a local iPhone backup via iTunes/Finder.
Step 2. Unpair Apple Watch
Creates an updated backup of your Apple Watch and safely removes the Activation Lock pairing. Open the Watch app on your iPhone, select your watch, and tap Unpair Apple Watch.
Step 3. Turn Off Find My & Sign Out of Apple ID
Removes iCloud Activation Lock so the next owner can activate the device seamlessly. Go to Settings > [Your Name] > Find My, toggle it OFF, then return to your profile and tap Sign Out.
Step 4. Deregister iMessage & FaceTime
Ensures text messages and calls route properly if you switch to a non-iOS device. Go to Settings > Messages and toggle off iMessage; then go to Settings > FaceTime and toggle it off.
Step 5. Manage eSIM and Cellular Plans
When prompted during the erase process, select Delete eSIM if selling or trading in the phone, or select Keep eSIM if resetting the phone for personal reuse.
Part 2. 4 Proven Ways to Erase All Content and Settings on iPhone/iPad
Depending on your technical scenario—whether your iPhone is working normally, locked out, or experiencing system restrictions—choose the method below that best fits your situation.
Method 1: Erase All Content and Settings via Built-in iOS Settings
If your iPhone is fully functional and running iOS 15 or later, you can utilize Apple's built-in transfer and reset workflow.
Note: If Stolen Device Protection is enabled, you may be required to complete Face ID/Touch ID authentication or wait out a 1-hour security delay before executing a reset away from familiar locations.
Steps for iOS 15 or up:
- Open the Settings app on your iPhone or iPad.
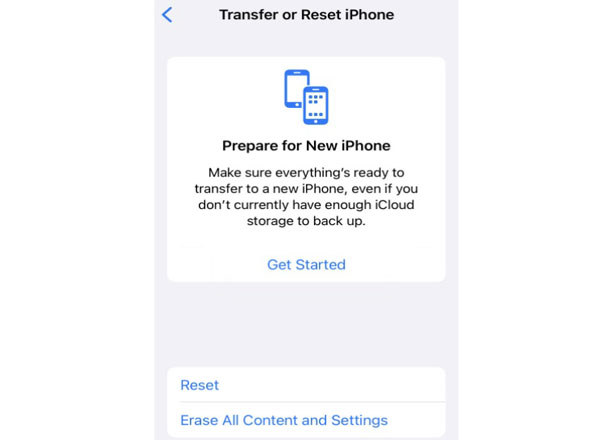
- Tap General, then scroll down and tap Transfer or Reset iPhone.
- Select Erase All Content and Settings at the bottom of the screen.
- Review the summary screen displaying items to be removed (Apps & Data, Apple ID, Find My, Wallet items). Tap Continue.
- Enter your lock screen passcode and Screen Time passcode (if prompted).
- Enter your Apple ID password to turn off Activation Lock and sign out of iCloud.
- Choose whether to keep or remove your eSIM plan, then tap Erase iPhone to confirm.
Method 2: Permanently Wipe iPhone Data via iReaShare iPhone Data Eraser [100% Unrecoverable]
While standard iOS resets destroy the file allocation lookup tables, advanced forensic and commercial data recovery software can sometimes reassemble deleted data fragments from flash storage. If you want guaranteed privacy, or if your iPhone reset button is grayed out or frozen, iReaShare iPhone Data Eraser provides deep, professional-grade data destruction.
iReaShare iPhone Data Eraser utilizes military-grade overwriting algorithms (including zero-filling and DoD 5220.22-M sanitization standards) to overwrite existing and deleted storage blocks, rendering data 100% unrecoverable.
Key Advantages of iReaShare iPhone Data Eraser:
- Complete & Permanent Data Sanitization: Overwrites photos, SMS, call history, audios, WhatsApp chats, safari logs, system cache and more with zero chance of recovery.
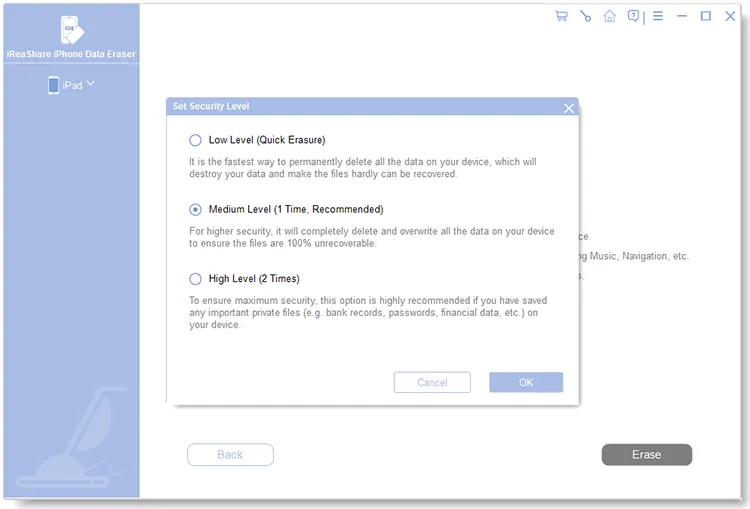
- 3 Flexible Wiping Standards: Choose Low Level (fast wipe), Medium Level (DoD 5220.22-M double-overwrite standard), or High Level (US DoD 5220.22-M 3-pass overwrite).
- Selective & Junk Data Removal: Allows selective wiping of private records, cache, or deleted files without destroying system operating files when needed.
- Full iOS Compatibility: Fully compatible with iOS 27/26 and all iPhone models including iPhone 18/17/16/15/14 and iPads.
Download and launch iReaShare iPhone Data Eraser on your Windows PC or Mac below, and have a try now.
Download for Win Download for Mac
How to Erase All Content and Settings via iReaShare iPhone Data Eraser:
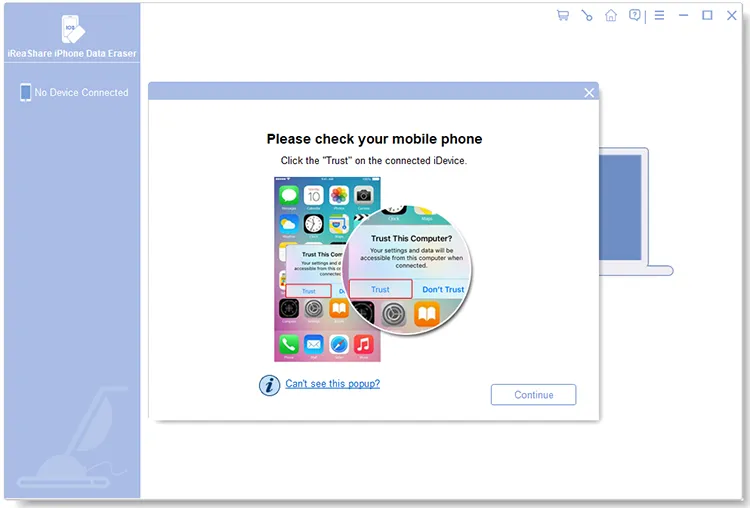
Step 1. Connect iPhone: Connect your iPhone or iPad to the computer using an official Lightning or USB-C cable and tap Trust This Computer on your device screen.
Step 2. Select Security Level: Choose Erase All Data mode on the main interface, then select your preferred security level (Low, Medium, or High). Type "delete" in the prompt box to confirm your action, then click the Erase button.
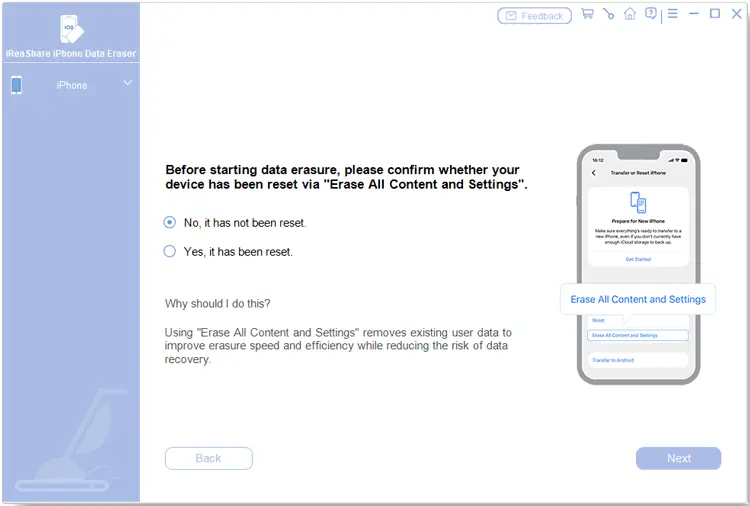
Step 3. Erase All Content and Settings: Make sure your iPhone has been reset via Erase All Content and Settings. If not, follow the onscreen prompts to reset your iPhone. Please DO NOT unplug your phone during the whole process.
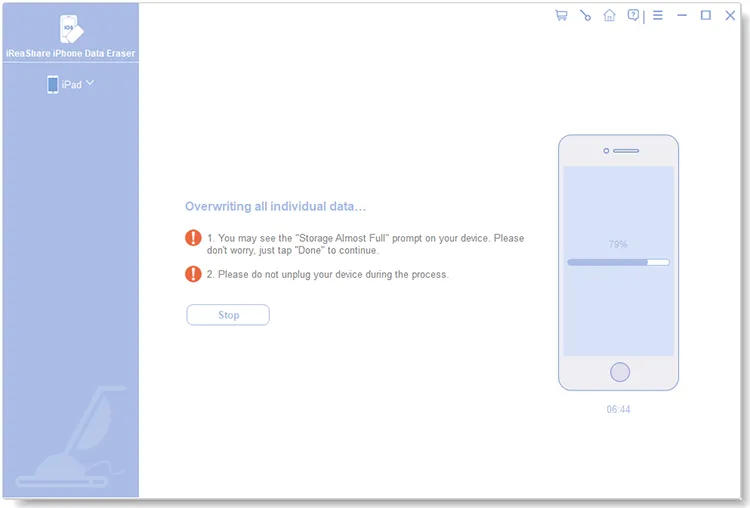
Step 4. Overwrite Your iPhone Data: After restarting and setting up your iPhone, your iPhone will be recognized automatically and start deep storage overwriting and return your iPhone to a clean slate.
Video Guide:
See the step-by-step guide to eraser iPhone with iReaShare iPhone Data Eraser.
Method 3: Factory Wipe iPhone via iTunes, Finder, or Apple Devices App
If your iPhone screen is unresponsive or frozen on an Apple logo, resetting through a desktop computer using Recovery Mode is an effective solution.
- macOS Catalina or later: Use Finder.
- Windows 10/11: Use the Apple Devices app or iTunes.
- macOS Mojave or older / Windows 7/8: Use iTunes.
Steps to Factory Reset via Computer:
- Connect your iPhone to your computer using a USB cable.
- Open Finder, Apple Devices app, or iTunes.
- Put your iPhone into Recovery Mode:
- iPhone 8 or later (including iPhone 18/17/16/15): Press and quickly release Volume Up, press and quickly release Volume Down, then press and hold the Side button until the Recovery Mode screen (computer icon) appears.
- iPhone 7 / 7 Plus: Press and hold the Volume Down and Power buttons simultaneously until the recovery screen appears.
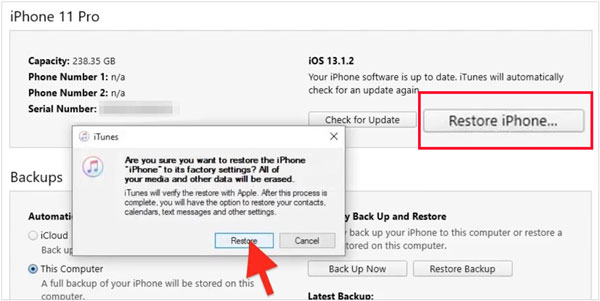
- A pop-up prompt will appear on your computer screen stating that there is a problem with the iPhone. Select Restore.
- Confirm the restore action. The computer will download the latest iOS firmware and erase all content and settings on the device.
Method 4: Remote Erase All Content and Settings via iCloud Find My
If your iPhone is lost, stolen, or inaccessible, Apple allows you to send a remote wipe command using any web browser connected to iCloud.
Steps for Remote iCloud Erasure:
- Open a web browser and navigate to iCloud.com/find.
- Sign in with your Apple ID credentials.
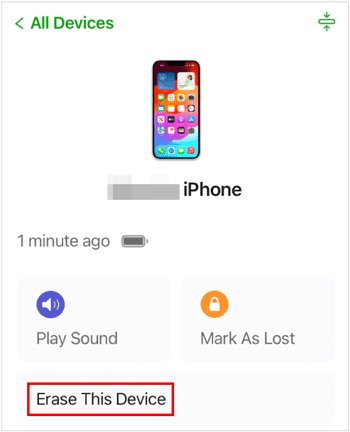
- Click on All Devices at the top and select the specific iPhone or iPad you wish to reset.
- Click Erase This Device (or Erase iPhone).
- Enter your Apple ID password and answer security questions or 2FA codes if prompted.
- Once the target device connects to a Wi-Fi or cellular network, the remote erasure process begins automatically.
Troubleshooting: Why Is "Erase All Content and Settings" Grayed Out or Not Working?
When tapping "Erase All Content and Settings", you may encounter scenarios where the button is grayed out, unresponsive, or fails to verify. Follow these step-by-step solutions to fix each root cause:
Fix 1. Disable Screen Time Restrictions
Reason: Active parental controls or restrictions block factory resets.
Solution: Go to Settings > Screen Time > Content & Privacy Restrictions and toggle the switch to OFF.
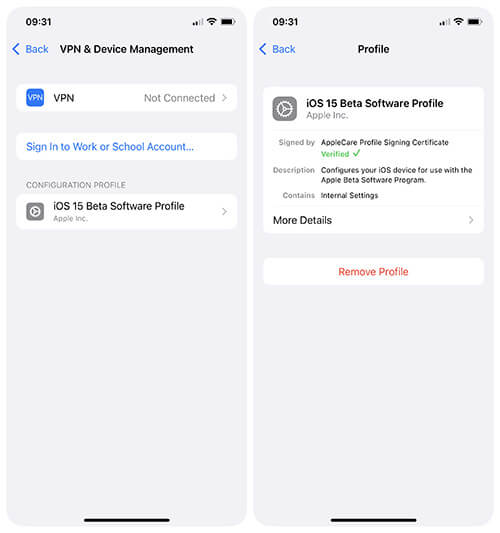
Fix 2. Remove MDM and Corporate Profiles
Reason: Mobile Device Management (MDM) profiles installed by employers or schools lock system security features.
Solution: Go to Settings > General > VPN & Device Management, select the management profile, and tap Remove Management or Remove Profile.
Fix 3. Fix Network Connection or Server Errors
Reason: iPhone fails to contact Apple servers to disable Find My and verify credentials.
Solution: Switch to a stable Wi-Fi network, turn off active VPN connections, or check Apple System Status.
Fix 4. Bypass Stolen Device Protection Security Delay
Reason: iOS security enforces a 1-hour wait timer when attempting security operations in unfamiliar locations.
Solution: Perform biometric authentication (Face ID/Touch ID) or wait out the 1-hour countdown timer in an authorized location.
Fix 5. Bypass iOS System Freezes or Grayed-Out Buttons
Reason: System cache corruption or software bugs freeze the native reset interface.
Solution: Use iReaShare iPhone Data Eraser on a computer to bypass iOS screen glitches and execute a direct, complete storage wipe.
FAQs on How to Erase All Content and Settings on an iPhone/iPad
Q1. Does "Erase All Content and Settings" delete everything permanently?
On modern iPhones, the built-in "Erase All Content and Settings" option deletes the Master Key stored in Effaceable Storage, rendering existing data encrypted and inaccessible. However, residual traces may remain in raw flash memory blocks until overwritten. To achieve 100% unrecoverable, hardware-level erasure, using a specialized overwriting tool like iReaShare iPhone Data Eraser is recommended. See more >>
Q2. What is the difference between "Reset All Settings" and "Erase All Content and Settings"?
Reset All Settings resets network preferences, Wi-Fi passwords, Bluetooth pairings, privacy permissions, and home screen layouts without deleting media, apps, or personal data. Erase All Content and Settings wipes all personal files, apps, user accounts, and returns the device to factory out-of-box condition.
Q3. Can I erase my iPhone if I forgot my Apple ID password or screen passcode?
If you forgot your lock screen passcode or Apple ID password, built-in Settings will block the reset. You can bypass this restriction by putting your iPhone into Recovery Mode via iTunes/Finder, or by connecting to desktop software like iReaShare iPhone Data Eraser to perform a direct wipe.
Q4. Will erasing my iPhone remove Activation Lock?
Yes, if you enter your Apple ID password during the standard erasure prompt in Settings or sign out of iCloud before resetting, Activation Lock is turned off automatically. If you erase via iTunes without signing out, Activation Lock will remain active and require your Apple ID credentials upon restart.
Q5. How long does it take to erase all content and settings on an iPhone?
For modern iPhones (iPhone 8 through iPhone 18 series), the built-in erasure process usually takes between 2 to 10 minutes depending on device storage size and whether a full local backup is initiated before resetting.
Conclusion
Mastering how to erase all content and settings on iPhone ensures your personal information, photos, banking apps, and login credentials stay protected when passing your phone to a new owner. While Apple's native Settings app, iTunes, and iCloud provide convenient reset paths, system restrictions or residual data recovery risks can cause hesitation.
For users seeking guaranteed data destruction, deep storage sanitation compliant with DoD standards, or a quick solution when reset buttons fail, iReaShare iPhone Data Eraser stands out as the most reliable professional solution. Always back up your critical files prior to performing any wipe to protect your valuable data.
Download for Win Download for Mac
Related Articles:
How to Delete Everything on iPhone Effectively in 4 Ways (Secure Guide)
iDevice Fails to Restart? Follow 3 Effective Approaches
iPhone Stuck in Recovery Mode: How to Fix It (Step-by-Step Guide)
How to Delete All Contacts on iPhone with 4 Trustworthy Methods