


TL;DR:
The fastest and most stable method to transfer photos from an iPhone to a flash drive is using a dedicated desktop manager like iReaShare iPhone Manager, which bypasses Windows MTP driver crashes. Alternatively, for computer-free transfers, you can connect a native USB-C flash drive directly to an iPhone 17/16/15 series, or use a Lightning-to-USB adapter for older models via the iOS Files app.
Running out of local storage is an inevitable challenge for iPhone users, especially with 48MP ProRAW photos and 4K Dolby Vision videos consuming gigabytes of space. While expanding cloud storage incurs recurring subscription fees, transferring photos from an iPhone to a physical USB flash drive offers a secure, one-time-cost backup solution.
To ensure a flawless migration without data corruption or quality loss, this comprehensive guide covers 6 proven technical methods, complete with troubleshooting steps for common system compatibility errors.
- Part 1: How to Transfer Photos from iPhone to Flash Drive via iReaShare iPhone Manager
- Part 2: How to Transfer Pictures from iPhone to Flash Drive Using iCloud
- Part 3: How to Transfer Photos from iPhone to Flash Drive on Windows via File Explorer
- Part 4: How to Transfer Photos from iPhone to USB Stick via Photos App
- Part 5: How to Import Photos from iPhone to USB Stick via Apple Devices App / iTunes
- Part 6: How to Transfer Photos from iPhone to Flash Drive without Computer via USB-C or Adapter
- Part 7: Frequently Asked Questions
Part 1: How to Transfer Photos from iPhone to Flash Drive via iReaShare iPhone Manager
When executing bulk transfers of high-resolution images, native OS tools often freeze due to iOS media encryption and Windows driver instabilities. iReaShare iPhone Manager solves this by utilizing a high-speed data parsing engine that facilitates seamless, 1-click batch exports directly to an attached USB flash drive, external HDD, or SSD without data loss.
Key Features & Advantages of iReaShare iPhone Manager:
- Intelligent File Parsing: Categorizes photos by dynamic albums (Camera Roll, Live Photos, Panoramas, Screenshots) with full metadata preservation (EXIF data, GPS tags, timestamps).
- Lossless High-Speed Exporting: Transfers over 1,000+ uncompressed HEIC, JPEG, and ProRAW files in under a minute without quality compression.
- Bi-directional Storage Control: Allows previewing, selective sorting, and bulk-deletion of unwanted system assets to instantly reclaim iPhone flash memory.
- Comprehensive Data Ecosystem: Beyond image formats, it supports structural migration of 4K videos, contact cards (VCF/CSV), SMS text threads, notes, and calendar data.
- Universal Hardware Compatibility: Full architectural optimization for the latest iOS versions and older iterations. Supports iPhone 17, 16, 15, 14, 13, 12, 11, X, XR, iPad Pro/Air/mini, and Windows 11/10/8/7.
Download this professional iOS data manager - iReaShare iPhone Manager below:
Download for Win Download for Mac
Step-by-Step Guide to Export Photos from iPhone to a USB Stick:
Step 1. Initialize the Software Ecosystem
Download and run iReaShare iPhone Manager on your desktop PC or Mac.
Step 2. Connect Hardware and Establish Secure Trust Authorization
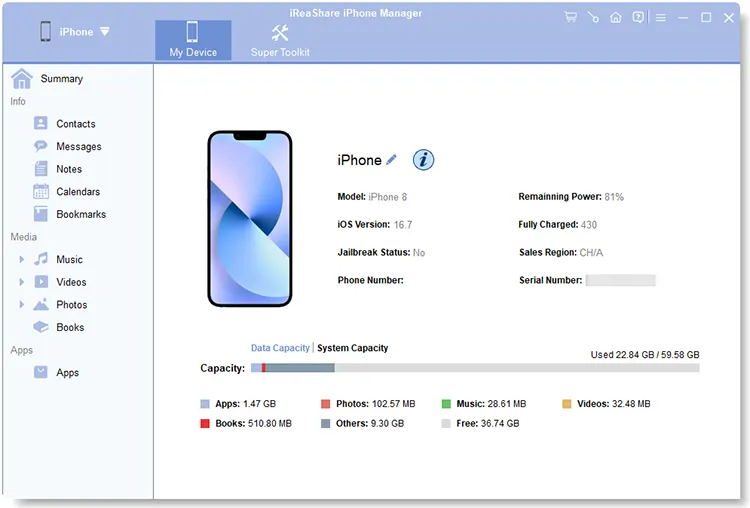
Connect your iPhone via an official USB cable and tap "Trust" when the security prompt appears. Concurrently, plug your target flash drive (formatted to exFAT or NTFS for cross-platform compatibility) into an open USB port. The program will immediately detect the device and map its structural directory.
Step 3. Execute Selective or Batch Photo Exportation
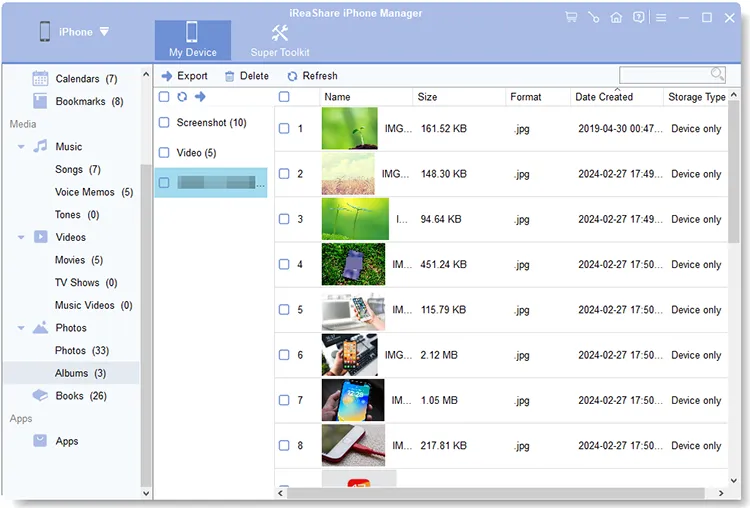
Navigate to the Photos category in the left sidebar directory. Browse the dynamically populated thumbnail gallery and select the images you intend to archive. Click the Export button on the top contextual taskbar, set your external flash drive directory as the target path, and initiate the rapid transfer protocol.
Video Guide:
Watch the video tutorial to Transfer Photos from iPhone to Flash Drive via iReaShare iPhone Manager below.
Bonus: Need to migrate media files from a different ecosystem? Read this technical brief on how to copy Android photos to a Windows 10/11 PC effortlessly.
Part 2: How to Transfer Pictures from iPhone to Flash Drive Using iCloud
If your physical iPhone is unavailable or you prefer cloud-to-hardware archiving, Apple iCloud Photos can act as an intermediary storage bridge. Note that iCloud only provides 5GB of free tier storage, so large media libraries require a premium iCloud+ subscription.
Step 1: On your iOS device, navigate to Settings > [Your Apple ID Profile] > iCloud > Photos, and toggle on Sync this iPhone.
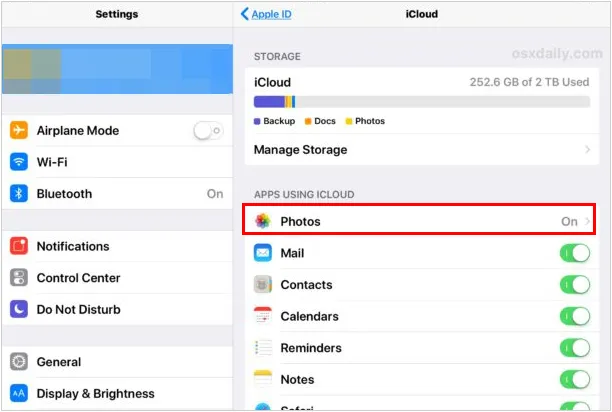
Step 2: Ensure the phone is connected to a stable Wi-Fi network. Wait for the background daemon to finish uploading uncompressed originals to the cloud server.
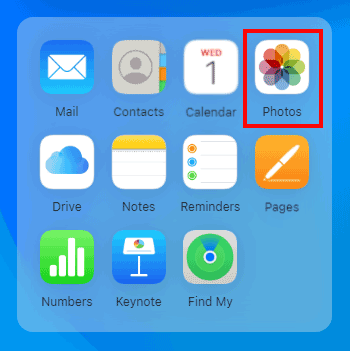
Step 3: Open your desktop browser, navigate to iCloud.com, and sign in with your Apple ID credentials. Open the Photos web application.
Step 4: Select specific pictures by holding down Ctrl (Windows) or Command (Mac). Click the cloud download icon (select "Unmodified Original" to preserve EXIF data). Once downloaded to your local storage, insert your flash drive and drag-and-drop the files from your default Downloads folder into the external drive directory.
Read also: Cross-platform users can reference this implementation guide to move photos from a Mac computer to an Android device using 5 flexible alternatives.
Part 3: How to Transfer Photos from iPhone to Flash Drive on Windows via File Explorer
Windows File Explorer treats the iPhone as a digital camera subsystem using Windows Portable Devices (WPD) via the MTP protocol. This native method requires no auxiliary software installations but is highly susceptible to transfer timeouts and error loops.
Step 1: Plug your iPhone into the Windows PC via a data-capable cable. Unlock the iOS lock screen and tap Trust. Connect your USB flash drive to another hardware port.
Step 2: Launch This PC. Under the "Devices and drives" section, double-click your recognized iPhone asset.
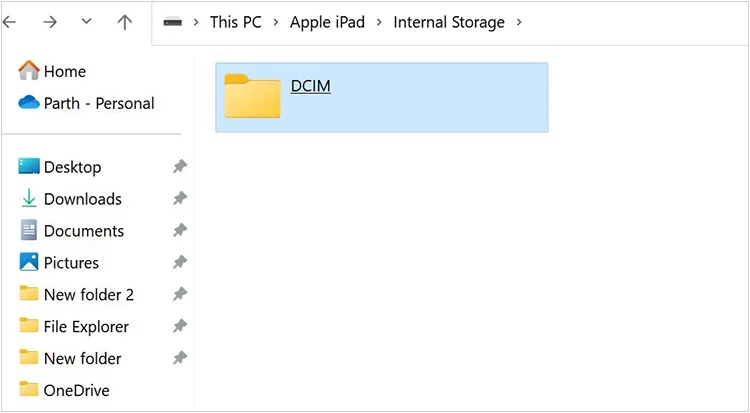
Step 3: Drill down through the nested directory path: Internal Storage > DCIM. Open the indexed folder clusters (e.g., 100APPLE, 101APPLE). Select your target images, copy them, and paste them into a newly provisioned folder on your attached USB drive.
Troubleshooting Warning:
Transferring hundreds of files via File Explorer frequently triggers the notorious Windows error: "A device attached to the system is not functioning" (Error 0x80070141) or "The device is unreachable".
This occurs because Windows fails to convert HEIC files to JPEG on the fly. To prevent this crash, navigate to iPhone Settings > Photos > Transfer to Mac or PC and change the setting from "Automatic" to "Keep Originals", or use iReaShare iPhone Manager to handle bulk data streams smoothly.
Part 4: How to Transfer Photos from iPhone to USB Stick via Photos App
Desktop operating systems feature built-in media ingestion suites called the Photos App. This structural utility provides safer importing mechanics than raw file dragging.
On macOS Ecosystem (Sonoma/Sequoia/Ventura)
Step 1: Hook your iPhone up to your Mac via a USB or Thunderbolt cable. Open the native Photos application.
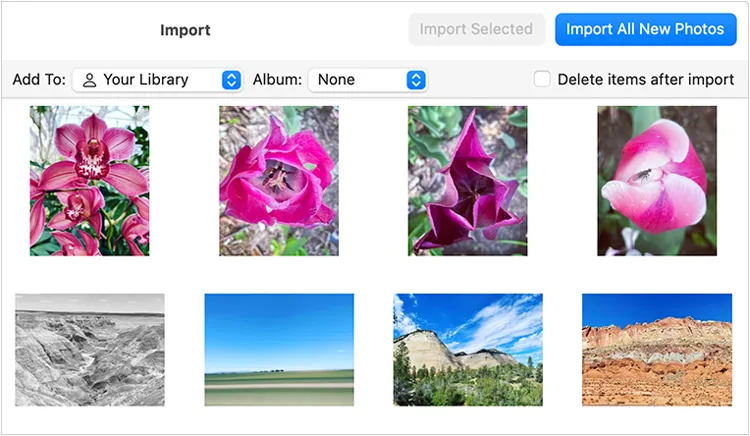
Step 2: Locate your iPhone under the left sidebar menu's "Devices" index. Select the target path or filter by new items. Click Import Selected or Import All New Photos.
Step 3: Mount your external flash drive. In the Photos App, select the newly imported images, click File > Export > Export Unmodified Original For Photos, and select the mounted flash drive as the export destination to maintain live-photo bundles.
On Windows OS (Windows 11/10)
Step 1: Interface your iPhone with the desktop and grant device permissions. Connect your USB flash drive.
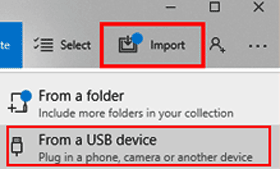
Step 2: Click the Windows Start menu and open the Microsoft Photos app. Click the Import icon located in the upper right quadrant, then select From a connected device.
Step 3: The system indexer will scan the iOS DCIM storage. Configure your destination parameters within the app to point directly to your USB stick directory, select the media components, and execute Import.
Part 5: How to Import Photos from iPhone to USB Stick via Apple Devices App / iTunes
On modern Windows 11 ecosystems, Apple has deprecated traditional iTunes functionalities, splitting them into dedicated lightweight apps. Media syncing protocols are now driven by the Apple Devices app, though legacy Windows installations still utilize iTunes.
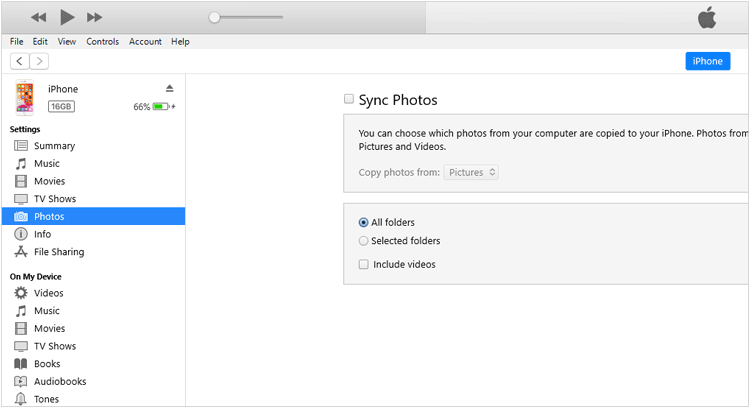
Step 1: Install the latest iteration of the Apple Devices App (or iTunes) from the Microsoft Store. Connect the iPhone via USB cable and provide passcode authorization.
Step 2: Click the iPhone device node displayed on the sidebar interface navigation panel.
Step 3: Under the settings branch, choose the Photos configuration checkmark, toggle Sync photos to your device from, and map a designated staging folder on your PC. Click Apply to sync the pipeline archive locally.
Step 4: Attach your target USB stick, then drag the contents of that staging folder directly onto the root folder of the flash drive.
Part 6: How to Transfer Photos from iPhone to Flash Drive without Computer via USB-C or Adapter
For iPhone 15, 16, 17, and newer generations equipped with hardware USB-C ports, you can bypass computers entirely. These models support direct OTG connections with standard USB-C flash drives formatted in exFAT or FAT32 (APFS is also supported for macOS environments, but NTFS will be read-only on iOS).
Step 1: Connect a dual USB-C flash drive directly into the iPhone port. (If you are utilizing an older iPhone with a Lightning connector, you must use an official Apple Lightning to USB 3 Camera Adapter coupled with an external power source connected to the adapter's lightning port).
Step 2: Launch the native iOS Photos App. Tap Select and mark the specific photos or video files destined for external storage migration.
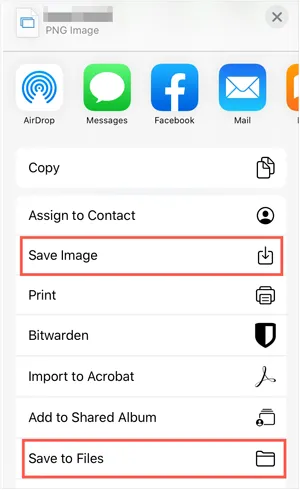
Step 3: Tap the Share sheet icon (the box with an upward arrow), scroll down through the action menu options, and choose Save to Files.
Step 4: Tap the back navigation path to reach the root "Browse" page, select your attached flash drive identifier from the storage locations list, choose a target directory folder, and hit Save. The background file engine will write the assets directly into the flash drive sectors.
Part 7: Frequently Asked Questions
Q1: What is the best file system format for an iPhone flash drive?
Direct Answer: The ideal file system format is exFAT. While iOS natively reads and writes to both exFAT and FAT32, FAT32 imposes a strict 4GB individual file size limit, which will cause transfers to fail when exporting long 4K videos. Avoid NTFS formatting, as iOS treats NTFS as read-only, preventing you from moving photos from your iPhone onto the drive.
Q2: Why is my iPhone not detecting or recognizing the connected flash drive?
Direct Answer: This issue typically stems from hardware power limitations or incorrect formatting. Older iPhone models with Lightning ports often cannot supply enough current to power standard USB flash drives; you must use an official Apple Lightning to USB 3 Camera Adapter connected to an external power source. For newer USB-C models (iPhone 17/16/15), ensure the drive is formatted to exFAT and pushed firmly into the port past any protective phone cases.
Q3: How do I fix the Windows error "A device attached to the system is not functioning" (Error 0x80070141)?
Direct Answer: This hard error occurs because the native Windows MTP driver crashes when the iPhone tries to transcode HEIC files to JPEG on the fly during transfer. You can resolve this by navigating to iPhone Settings > Photos > Transfer to Mac or PC and checking Keep Originals. Alternatively, using a dedicated management tool like iReaShare iPhone Manager bypasses the unstable Windows native driver entirely, eliminating transfer crashes.
Q4: Will transferring photos to a flash drive reduce image quality or lose Live Photos?
Direct Answer: Traditional drag-and-drop through Windows File Explorer often strips out metadata and splits Live Photos into separate static JPEGs and short video clips. To maintain 100% uncompressed quality for HEIC, JPEG, and ProRAW files while preserving complete EXIF data (GPS tags, camera settings, timestamps), it is highly recommended to use a professional tool like iReaShare iPhone Manager, which handles live assets as unified, lossless files.
Conclusion
Exporting your photo library to an external flash drive is an excellent way to reclaim device memory and safeguard personal data. While direct OTG transfers are useful for a handful of quick files on the go, they lack deep folder organizing capabilities.
For large-scale data transfers, iReaShare iPhone Manager provides the safest, fastest, and most structured desktop transfer pipeline. It eliminates system error crashes, preserves pristine image quality, and handles complex media assets effortlessly.
Download for Win Download for Mac
Related Articles
Solved: How to Transfer Photos from iPad to Computer in 5 Ways
How to Access iPhone Photos on PC Without Trouble (Solved)
How to Transfer Files from iPhone to Flash Drive
How to Transfer Photos from iPad to Flash Drive (4 Solutions)