


"Hello, everyone! Can someone explain to me how can I transfer files from my iPhone which are located in "On my iPhone" section to my MacOS by using cable? It seems that I am not able to see any files located in "On my iPhone" via Finder."
- From Reddit
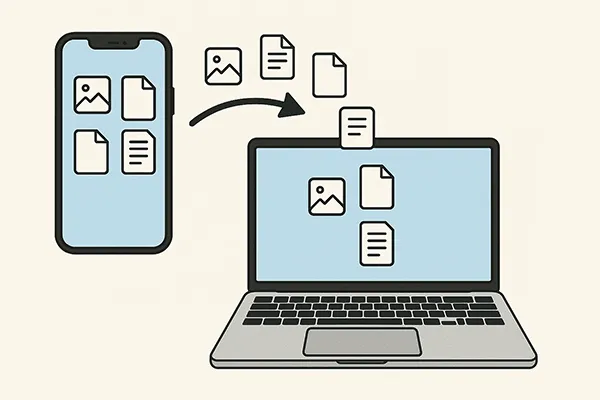
Want to transfer files from iPhone to Mac? It's a common task for almost all iPhone and Mac users. In fact, you can easily move your iPhone files to Mac. Learn about 6 effective methods in this guide, and then you will know all the steps and transfer your files without trouble.
- Part 1: How to Transfer Files from iPhone to Mac via iReaShare iPhone Manager
- Part 2: How to Transfer Data from iPhone to MacBook via Finder
- Part 3: How to Transfer Files from iPhone to Mac via AirDrop
- Part 4: How to Upload Files from iPhone to Mac via iCloud Drive
- Part 5: How to Move Files from iPhone to Mac via Google Drive
- Part 6: How to Send Files from iPhone to Mac via Email
- Part 7: FAQs About File Transfer Between Mac and iPhone
Take a quick look at the 6 methods:
| Feature/Method | iReaShare iPhone Manager | Finder | AirDrop | iCloud Drive | Google Drive | |
|---|---|---|---|---|---|---|
| Connection | USB cable | USB cable (or Wi-Fi sync once set up) | Wireless (Wi-Fi & Bluetooth) | Wireless (Internet connection) | Wireless (Internet connection) | Wireless (Internet connection) |
| File Size Limit | Unlimited (Depends on Mac storage) | Unlimited (Depends on Mac storage) | No official limit, but large files (over 2-5GB or many files) can fail or be slow. | 50GB per file (though some users report larger success); overall storage depends on plan (5GB free). | 5TB per file; overall storage depends on plan (15GB free). | ~20-25MB per email (varies by provider) |
| Speed | Fast (USB) | Fast (USB) | Medium to Fast (depends on distance, interference) | Medium to Slow (depends on internet speed) | Medium to Slow (depends on internet speed) | Slow (depends on internet speed and attachment size) |
| Ease of Use | Medium (requires software installation) | Easy (built-in, intuitive for Apple users) | Very Easy (intuitive, quick) | Easy (seamless once set up) | Easy (requires app/account setup) | Easy (universal, but limited for large files) |
| Requires Setup? | No, only download & install | macOS Catalina+ (built-in) | Yes (enable Wi-Fi & Bluetooth) | Yes (enable iCloud Drive on both devices, same Apple ID) | Yes (Google account, app download) | Yes (email account setup) |
| Cross-Platform? | Yes (often available for Windows too) | No (Apple ecosystem only) | No (Apple ecosystem only) | Yes (Windows app, web access) | Yes (web, apps for all major OS) | Yes (universal across all platforms) |
| Storage Dependency | Mac's storage | Mac's storage | Devices' temporary storage | iCloud storage (can be upgraded) | Google Drive storage (can be upgraded) | Email server storage (usually limited) |
| Use Case | Large volume transfers, backup, specific data types | Specific app data, syncing entire libraries, device backup | Quick sharing of photos, documents, links between nearby devices | Syncing documents, photos across all Apple devices, access from anywhere | Cross-platform file sharing, collaboration, large file storage | Small documents, a few photos, quick sharing without dedicated apps |
| Pros | Comprehensive data management, often includes backup/restore features | Native, reliable, good for app-specific file sharing | Wireless, fast for small files, no login required | Seamless integration, automatic syncing, access from any Apple device | Cross-platform, generous free storage, good for collaboration | Simple, universal, no special software needed for small files |
| Cons | Requires to install on Mac, free trial with limited features | Limited to app-shared files (not entire file system) | Proximity required, can fail for very large transfers | Requires internet, limited free storage, primarily Apple ecosystem | Requires internet, not fully integrated with Apple ecosystem like iCloud | Very limited file size, not suitable for many files or large data |
Part 1: How to Transfer Files Between iPhone and Mac via iReaShare iPhone Manager
As a comprehensive tool, iReaShare iPhone Manager can transfer files from iPhone to Mac and vice versa, and enables you to manage your iPhone data on your Mac with ease. With it, you can transfer your photos, videos, music, contacts, messages, calendars, and more. You can selectively move your files, and save them in accessible file formats, like HTML, XML, CSV, VCF, etc.
Main features of this iPhone Manager software:
* Directly transfer files from iPhone or iPad to Mac.
* Import files from a computer to an iOS device.
* Enable you to export music, photos, videos, contacts, text messages, notes, and more.
* Allow you to select your desired files before transferring them.
* Back up various data from an iOS device to a computer.
* Restore data from backups to iPhone/iPad.
* Support iOS 5.0 and later, including the latest.
Download iReaShare iPhone Manager.
Download for Mac Download for Win
To transfer files from iPhone to Mac with this software:
-
Install iReaShare iPhone Manager on your Mac, and launch it. Then connect your iPhone to Mac with a USB cable.
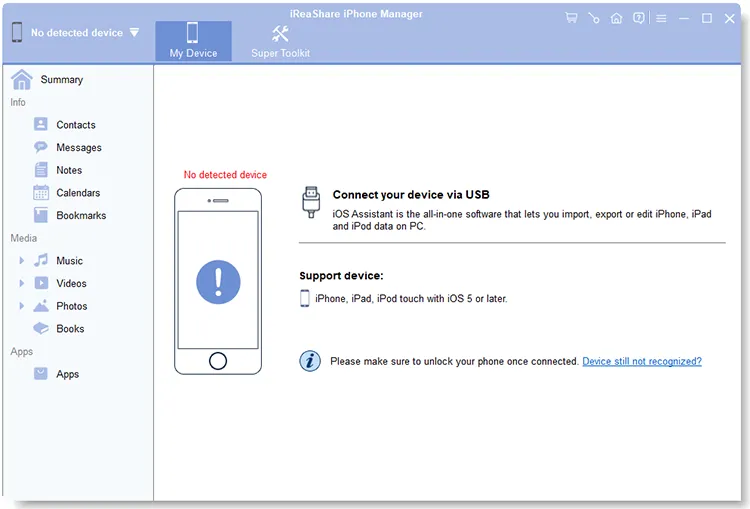
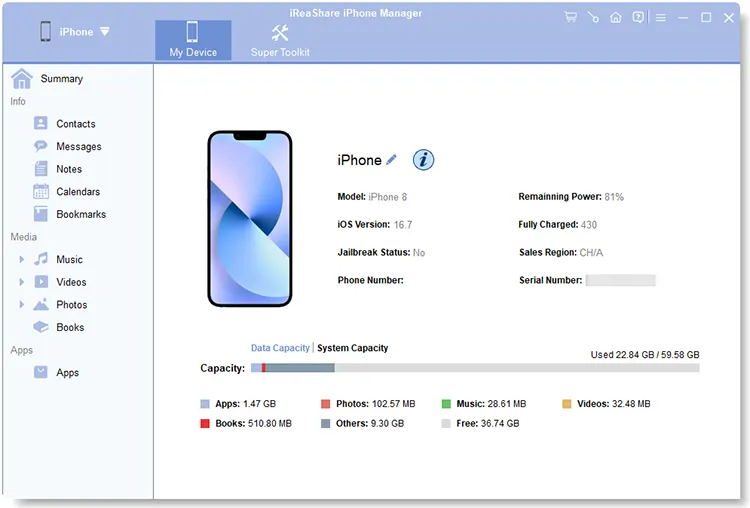
-
Choose "Trust" on your smartphone when it prompts "Trust This Computer?". Then the software will recognize your device swiftly, and you can see your device information on the connected interface.
-
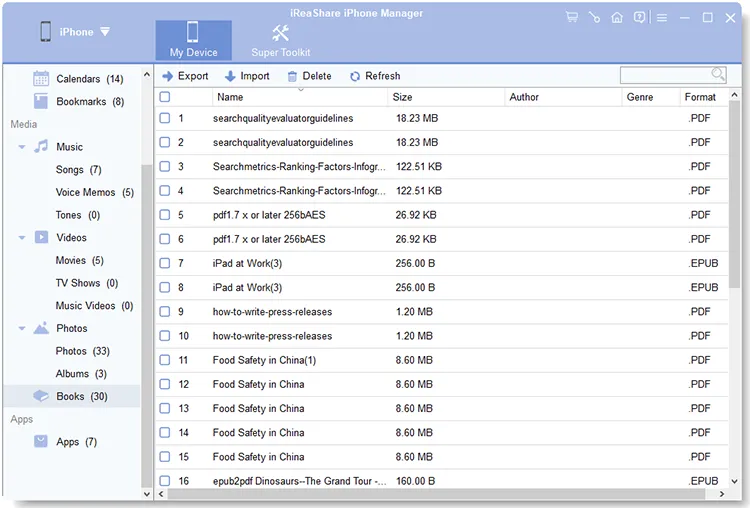
Choose a file type you want, and check the specific files. Then click "Export" to save them to your Mac.
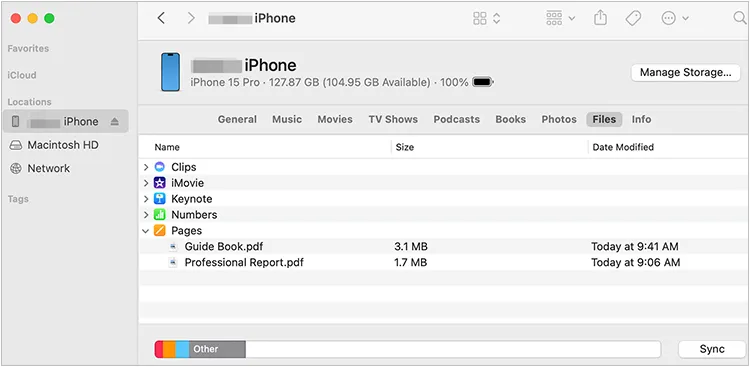
Part 2: How to Transfer Data from iPhone to MacBook via Finder
For Macs running macOS Catalina or later, Finder is the primary tool for managing and transferring files between your iPhone and Mac. It replaces the functions previously handled by iTunes.
To transfer data from an iPhone to MacBook with Finder:
-
Connect your iPhone to your MacBook using a USB cable, and open a new Finder window on your Mac.
-
In the Finder sidebar, under "Locations", click on your iPhone. Then you may need to click "Trust" on your iPhone.
-
In the Finder window, click the "Files" tab at the top. This will show you a list of apps on your iPhone that can share files.
-
Click the triangle next to an app to see its shared files. Select the files you want to transfer and drag them to a folder on your Mac. By the way, if you want to import files from Mac to your iPhone, you can drag files from your Mac directly into the desired app's folder within the Finder window.
Tips: It's easy to sync contacts from an iPhone to Mac. Get 5 solutions here.
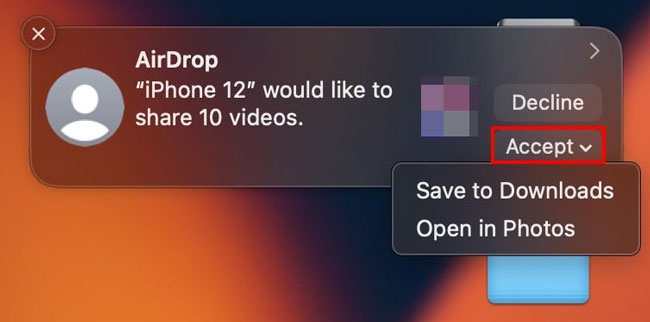
Part 3: How to Transfer Files from iPhone to Mac via AirDrop
AirDrop is a convenient wireless method for quickly sharing files between Apple devices that are in close proximity. It uses a combination of Wi-Fi and Bluetooth, which is convenient for sending small files.
Use AirDrop to transfer files from an iPhone to Mac:
-
Swipe down from the top-right corner (or up from the bottom for older iPhones) to open "Control Center".
-
Press and hold the network settings card (Wi-Fi, Bluetooth, Cellular). Choose "Contacts Only" or "Everyone" depending on your preference and whether your Mac is in your contacts.
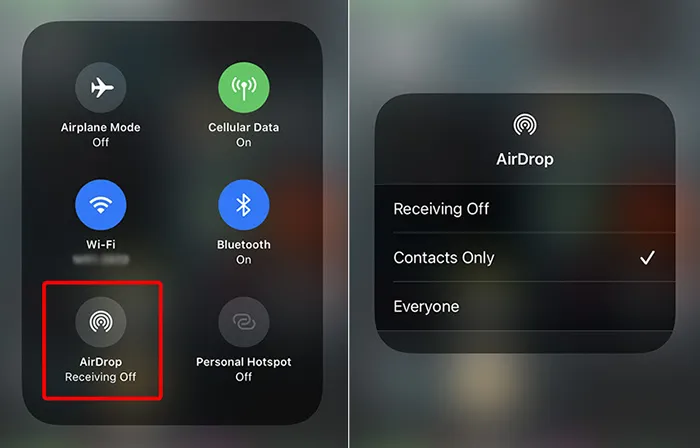
-
To enable AirDrop on Mac, please open Finder, click "Go" > "AirDrop", and click "Allow me to be discovered by" and choose "Contacts Only" or "Everyone". Ensure Wi-Fi and Bluetooth are enabled on both devices.
-
Open the app containing the file(s) you want to share on your iPhone, and select the files. Then click "Share" > "AirDrop", and tap your Mac's name.
-
On your Mac, a notification will appear asking if you want to accept the incoming files. Click "Accept". Transferred files will typically appear in your Mac's "Downloads" folder.
Part 4: How to Upload Files from iPhone to Mac via iCloud Drive
iCloud Drive provides a cloud-based solution to sync and access your files across all your Apple devices, including your iPhone and Mac. You can upload your files from your iPhone to iCloud Drive and then download on your Mac.
Here's how:
-
On your iPhone, go to Settings > "[Your Name]" > "iCloud", scroll down, and tap "iCloud Drive". Make sure "Sync this iPhone" (or "iCloud Drive") is turned on. You can also enable individual apps to store data in iCloud.
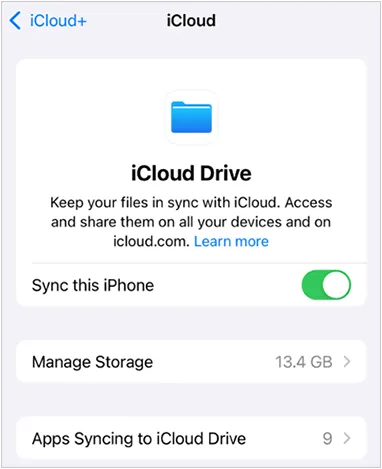
-
To upload files to iCloud Drive from iPhone, please open the Files app on your iPhone, navigate to the location of the files you want to upload, select the files and tap the "Move" button (folder icon), and choose "iCloud Drive" as the destination.
-
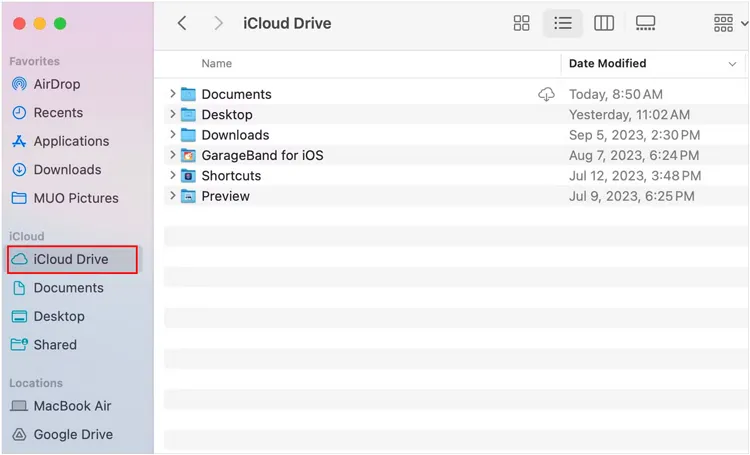
On your Mac, ensure you are signed in to the same Apple ID as your iPhone. Next, open Finder, and click "iCloud Drive" in the sidebar. Your uploaded files will appear here, and you can drag them to any local folder on your Mac.
Part 5: How to Move Files from iPhone to Mac via Google Drive
For those who use Google's ecosystem or need to transfer files cross-platform, Google Drive is an excellent cloud storage option. It supports iOS, macOS, Android OS, Windows OS, ChromeOS, and Linux, so you can use it on most devices.
Move files from iPhone to Mac with Google Drive:
-
Download and install the Google Drive app from the App Store on your iPhone. Open the app and sign in with your Google Account.
-
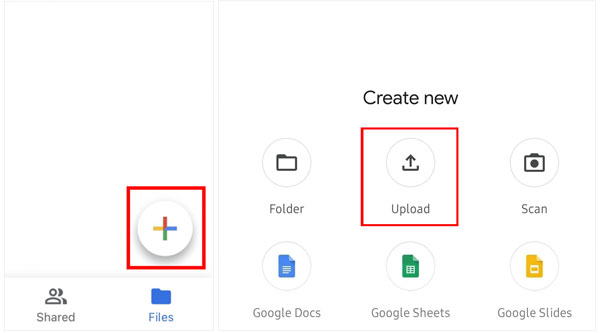
Tap the "+" icon (plus sign), choose "Upload" to select your files from your iPhone. Then upload them to Google Drive.
-
On your Mac, open a web browser and go to drive.google.com and sign in with your Google Account. Alternatively, if you have Google Drive for Desktop installed, you can access your synced files directly through Finder.
-
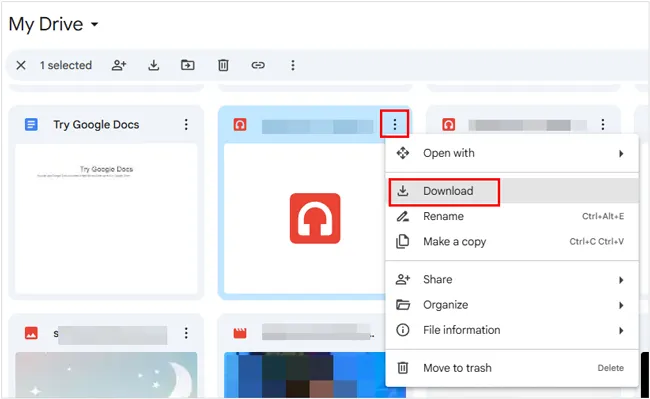
Finally, locate the uploaded files and download them to your Mac.
Part 6: How to Send Files from iPhone to Mac via Email
For smaller files or documents, sending them via email is a quick and simple solution. As long as you have an email account, you can send and receive emails by yourself on your different devices. However, in general, you can send files within 50 MB at a time.
Send files from iPhone to Mac with email:
-
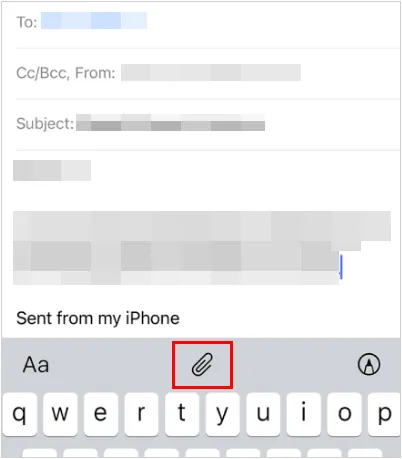
Open the Mail app on your iPhone. Tap to compose a new email. Touch the area that you want to insert your files, choose "<" on the keyboard, and click the "Attach" icon (like a paperclip).
-
Select the files you want to attach from your photos, documents, or other locations. Keep in mind that email providers often have size limits for attachments. Enter your own email address as the recipient and send the email.
-
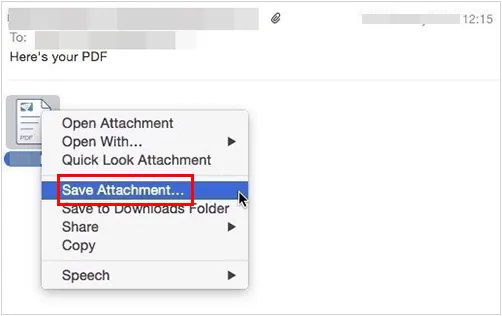
On your Mac, open your email client or webmail. Then open the email you just sent to yourself. Now, download the attachments to your Mac.
Part 7: FAQs About File Transfer Between Mac and iPhone
Q1: Are there any other apps for file transfer between iPhone and Mac?
Yes, in addition to the apps and tools above, you can use Send Anywhere, SHAREit, etc. However, these apps is free to use, but there are some ads when you use them.
Q2: Can I still use iTunes to transfer files from my iPhone to Mac?
Only on macOS Mojave and earlier. Newer macOS versions use Finder instead.
Q3: Why is AirDrop not working between my Mac and iPhone?
If AirDrop doesn't work between your Mac and iPhone, please check:
- Bluetooth and Wi-Fi are enabled.
- Devices are close to each other.
- AirDrop is set to receive files from Everyone or Contacts.
- Both devices are unlocked and not in sleep mode.
Conclusion
With various methods available, transferring files from your iPhone to your Mac is a straightforward process. If you intend to send your important files offline, you can use iReaShare iPhone Manager. You can use USB to export your files securely. Anyway, every method has its pros and cons, so please choose one that best suits your needs.
Download for Mac Download for Win
Related Articles
How to Sync Messages from iPhone to Mac (Full Steps and Schematics)
How to Transfer Files from iPhone to Android (New Guide)
How to Transfer Files from iPhone to Flash Drive (6 Functional Methods)
How to Access iPhone Files on PC Without Effort [5 Methods]
