


Selling your old iPhone can be a great way to upgrade to the latest model while making some extra cash. However, before you hand over your device to a new owner, it's crucial to ensure that all your personal data is completely erased. Now, we're going to explore how to erase iPhone data for selling with 3 effective methods. By the way, please remember to back up your important data before erasing.
Part 1: Why Do You Need to Erase iPhone Data for Selling?
When you decide to sell your iPhone, it's not just about removing apps or clearing your browsing history. Your iPhone stores a lot of sensitive data, including messages, photos, emails, and even personal documents. This information could be misused if not properly erased.
Your iPhone might store login credentials for your social media, banking apps, or email. Without erasing this data, someone could potentially gain access to your accounts, leading to identity theft or financial loss. Besides, erasing your iPhone's data ensures that the new owner will start with a clean slate. It also helps prevent any potential issues related to Apple ID or iCloud accounts, which can be tricky to remove.
Part 2: How to Erase iPhone Data for Selling
Now that we understand the importance of erasing iPhone data before selling it, let's explore how to do it effectively. The following provides three ways to wipe your iPhone clean before selling it, each with its advantages.
| Method | Pros (Advantages) | Cons (Disadvantages) |
|---|---|---|
| Via Settings |
1. Apple's built-in method. |
1. Standard overwrite is often a single pass; some advanced recovery tools *might* retrieve fragments. 2. You must be able to navigate the Settings app. |
| Via iReaShare iPhone Data Eraser | 1. Offers multiple levels (e.g., High) to overwrite data 1-2 times, making recovery virtually impossible. 2. Ensures the device is completely clean, often beyond standard factory reset. 3. Supports all data types. |
1. Requires a license purchase. 2. Must download and run software on a Mac or PC. 3. Multi-pass overwrites take more time. |
| Via Apple Devices/Finder | 1. Can restore your iPhone to factory settings. 2. Can remove the activation lock if the phone is inaccessible. |
1. Needs a computer 2. You can't visually confirm the process on the device itself. 3. A little complicated when you need to enter the recovery mode. |
2.1 Erase iPhone via Settings
One of the easiest ways to erase all the data on your iPhone is by using the built-in "Reset" feature found in the Settings app. This method is free and simple. Make sure you back up any important data to iCloud or a computer before erasing everything. This is an irreversible action, and once completed, all data will be lost.
Steps to erase iPhone data via Settings:
-
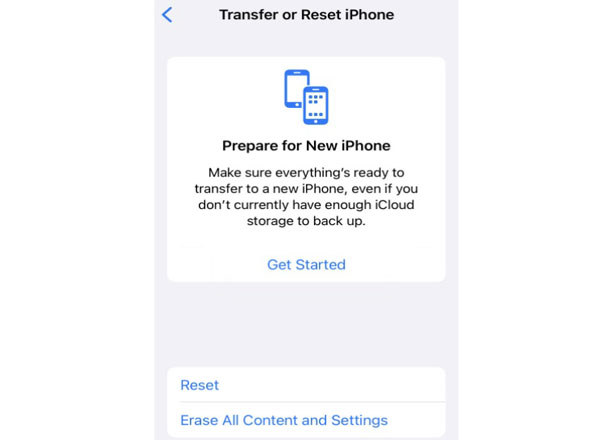
Open the Settings app on your iPhone. Scroll down and tap "General". Then find and tap "Transfer or Reset iPhone".
-
Choose "Erase All Content and Settings". If prompted, enter your passcode.
-
Tap the "Continue" icon to start the process.
Tips: You can clear your iPad to sell with 4 methods. Open it to get detailed steps.
2.2 Wipe iPhone Data via iReaShare iPhone Data Eraser
While a standard erase is sufficient for most, a dedicated erasure tool like iReaShare iPhone Data Eraser is often used for an extra layer of security. This tool offers different erasing levels, which can overwrite the data after wiping, ensuring it is 100% unrecoverable by data recovery software. This is often preferred by those selling a phone with extremely sensitive data.
Main features of iReaShare iPhone Data Eraser:
* Erase everything from an iPhone or iPad.
* Overwrite deleted data from iPhone or iPad completely.
* Wipe all types of data on iOS devices, such as contacts, photos, videos, files, apps, accounts, passwords, etc.
* Provide 3 levels for erasing: Low, Medium, and High.
* Compatible with iOS devices running iOS 5.0 or later, including iPhone 17/Air, iPhone 16/15/14/13/12/11/X/8/7, iPad Air, iPad mini, iPad Pro, etc.
Download the iPhone Data Eraser software on your PC.
Steps to wipe iPhone data with iReaShare iPhone Data Eraser:
-
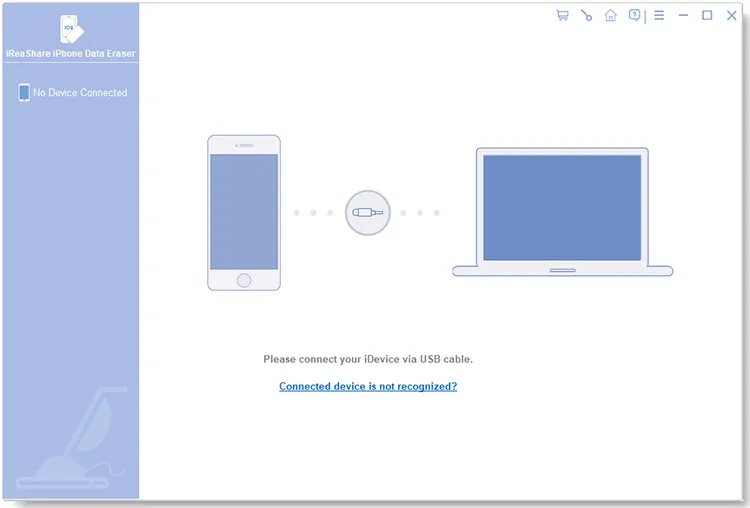
Download and install the software on your Windows computer. Then connect your iPhone to your computer using a USB cable, launch the program, and click "Trust" on your iPhone. After connecting, click "Erase".
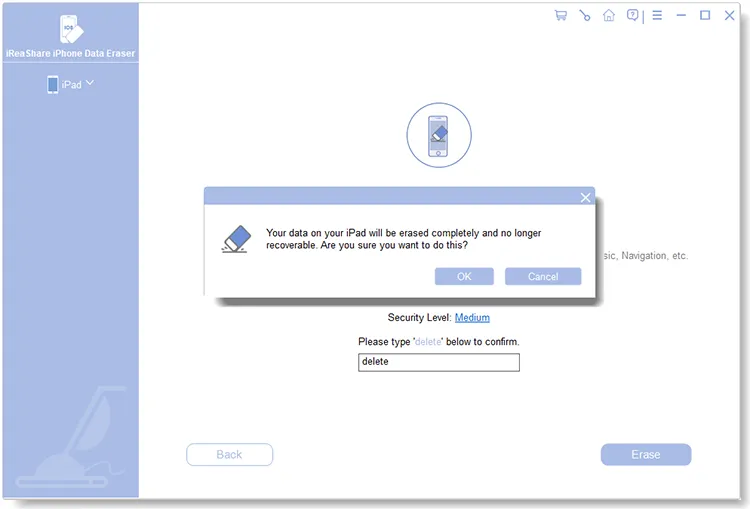
-
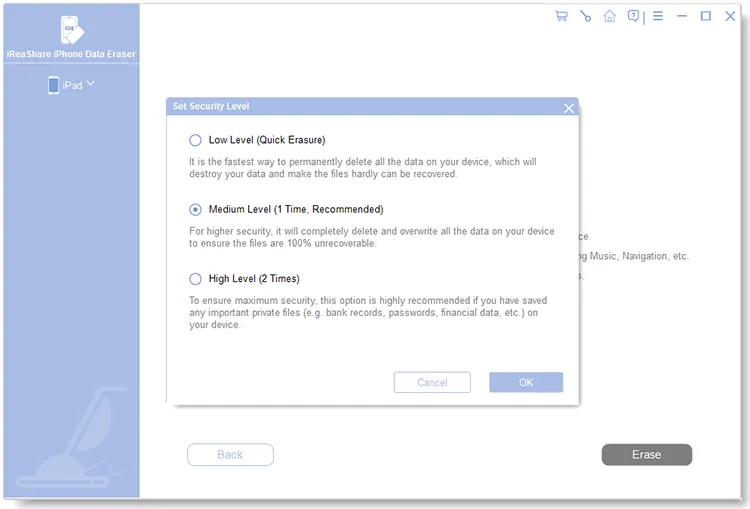
Click "Medium" next to "Security Level", and choose select a level you want. Then tap "OK".
-
Now, type "delete" to confirm, click "Erase", and choose "OK" on the popup.
You can watch the video tutorial to wipe your iPhone easily:
2.3 Erase iPhone via Apple Devices or Finder
Another simple method to erase your iPhone data is through Apple Devices on Windows or Finder on macOS. This method is useful to restore your iPhone to the original state, so all your data will be removed.
Steps to erase iPhone data via Apple Devices or Finder:
-
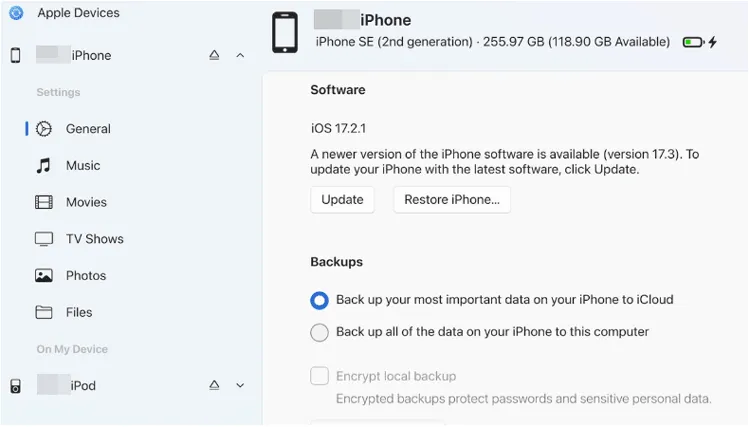
Download and install the Apple Devices app on your Windows computer, or launch Finder on your Mac.
-
Connect your iPhone to your computer with a USB cable, and click the iPhone icon. Then choose "General".
-
Click "Restore iPhone", and tap "Restore" for the confirmation. The program will delete all your data from your iPhone.
Part 3: Q&A About Erasing iPhone for Selling
Q1: Is it safe to sell an iPhone after erasing?
Yes, it is generally safe to sell an iPhone after you've properly erased it. The iPhone's operating system uses strong encryption for all user data by default. When you use the "Erase All Content and Settings" feature, the device securely deletes the encryption keys that make your data readable.
Without those keys, the underlying encrypted data is cryptographically inaccessible and effectively destroyed, making it virtually impossible for the next owner to recover your personal information. But if you saved very important data on your iPhone, it would be more secure to use iReaShare iPhone Data Eraser to overwrite your deleted data.
Q2: Can someone access my data after I erase my iPhone?
In almost all practical cases, no, someone cannot access your data after you properly erase your iPhone. When you erase all the content and settings on your iPhone, the process will instantly and securely delete the encryption key that is required to decrypt the data. The underlying encrypted data may technically still be on the device for a moment, but without the key, it is rendered into a useless, unreadable mess.
Conclusion
Regardless of which method you choose, the goal is the same: to ensure that your personal information is completely and permanently removed from the iPhone before it leaves your hands.
Completing the standard Settings erase and signing out of your Apple ID is the bare minimum and most common procedure. For maximum security, a professional data-wiping tool like iReaShare iPhone Data Eraser is the safest bet. Taking these essential steps ensures a smooth transition for the buyer and, more importantly, secures your digital life.
Related Articles
How to Permanently Delete Photos from iPhone via Hassle-free Methods
How to Delete All Contacts on iPhone with 4 Trustworthy Methods
Xiaomi 17 vs iPhone 17: Is Xiaomi Better Than iPhone? (Full Comparison)
How to Factory Reset Android Phones Readily | A Complete Tutorial
