


TL;DR:
Looking for the best way to back up notes on iPhone and keep your important information safe? Whether you prefer iCloud synchronization, a local computer backup, or Gmail, there are several easy ways to protect your notes without relying on a single storage option. Here's a quick look at the best methods:
- iCloud Notes Sync: Automatically sync notes across Apple devices without manual backups.
- iCloud Backup: Back up your iPhone's data and settings for future device restoration.
- iReaShare iPhone Manager: Export selected iPhone notes to a PC or Mac and keep a separate local copy.
- iTunes/Finder: Create a free local iPhone backup on Windows or Mac.
- Gmail: Sync supported notes with your Google account without installing extra software.
Your iPhone Notes app is probably holding more important things than you think, from work ideas and to-do lists to travel plans and personal reminders. So, what happens if your iPhone suddenly breaks, gets lost, or you accidentally delete a note you really need? That's why it's worth knowing how to back up notes on iPhone before something goes wrong.
In this guide, we'll walk you through several easy ways to back up your iPhone notes, explain the pros and cons of each method, and help you find the one that works best for you.
Part 1. How to Back Up Notes on iPhone to iCloud
If you use an iPhone, iCloud is probably the easiest place to start when backing up your notes. Apple offers two ways to protect your Notes data: iCloud Notes synchronization and iCloud Backup. Although they sound similar, they work a little differently. The first keeps your notes synced across Apple devices, while the second saves a backup of your iPhone's data that you can use when setting up or restoring a device. Here's how to use both methods.
Method 1. Turn On iCloud Notes Sync
This is the simplest option if you want your iPhone notes to sync automatically without manually backing them up. Once enabled, notes stored in iCloud will be available on other Apple devices signed in to the same Apple Account.
Follow these steps:
Step 1. Open the "Settings" app on your iPhone.
Step 2. Tap your Apple Account name at the top of the screen. Then, select "iCloud".
Step 3. Under Saved to iCloud, tap "See All" if necessary. Find and tap "Notes".
Step 4. Turn on "Sync this iPhone" (or the "Notes" toggle on some iOS versions).

Once enabled, your iPhone notes stored in iCloud will automatically sync to your iCloud account. You can access them on other Apple devices using the same Apple Account.
- Automatically syncs notes without requiring manual backups.
- Make notes accessible across supported Apple devices.
- It doesn't require installing additional software.
- Convenient for users who regularly create and edit notes.
- Use available iCloud storage, which is shared with other data.
- Require an internet connection to sync changes.
- Accidentally deleting a synced note may also delete it across connected devices.
- Notes stored under Gmail or On My iPhone won't automatically move to iCloud.
Method 2. Back Up Your iPhone Using iCloud Backup
Unlike Notes synchronization, iCloud Backup creates a backup of your iPhone's device data and settings. This is useful if you want to protect more than just your notes, especially before switching to a new iPhone or performing a factory reset.
Here's how to back up all notes on iPhone:
Step 1. Open the "Settings" app on your iPhone.
Step 2. Tap your Apple Account name at the top, Then, select "iCloud".
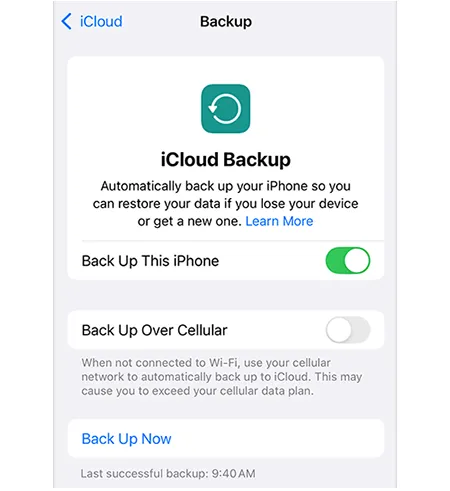
Step 3. Tap "iCloud Backup", then turn on "Back Up This iPhone".
Step 4. Tap "Back Up Now" to start a manual backup. Keep your iPhone connected to Wi-Fi until the backup is complete.
- Back up more than just Notes, including supported app data and device settings.
- Support automatic backups when the required conditions are met.
- Useful when restoring an iPhone or setting up a replacement device.
- It doesn't require connecting your iPhone to a computer.
- Require sufficient available iCloud storage.
- Restoring a backup generally involves restoring device data rather than simply opening individual note files.
- Notes already synced with iCloud are generally stored separately and aren't duplicated in the device backup.
- Doesn't provide an easy way to browse or export individual notes.
Part 2. How to Back Up Notes on iPhone Without iCloud
Not everyone wants to use iCloud. You may have limited cloud storage, prefer keeping personal information locally, or simply want a separate copy of your notes on a computer.
Fortunately, there are several alternatives. Below are three ways to learn how to back up notes on iPhone without iCloud.
2.1 Using iReaShare iPhone Manager
If you're looking for how to back up notes on iPhone to a computer, iReaShare iPhone Manager is a third-party iOS data management tool worth considering. It allows you to transfer and manage various types of data between your iPhone, iPad, and computer, including notes, contacts, messages, photos, videos, and music.
For users who want to save iPhone notes to a PC or Mac, the software can help export notes to a computer and create a separate local copy without relying entirely on iCloud synchronization. It also supports data preview, selective transfer, and iOS data backup and restoration, making it a convenient option for users who prefer managing and backing up their iPhone data directly from a computer.
Key Features:
* One-click backup of iPhone notes to PC/Mac.
* Transfer data from an iPhone, iPad, or iPod touch to a computer.
* Import files from a computer to an iOS device.
* Back up iPhone data to a computer without using iTunes.
* Restore saved backups to an iOS device.
* Preview detailed data and selectively choose the files you want to transfer or back up.
* Support a wide range of iOS versions, including iOS 27.
* Work with various iOS devices, including iPhone Duo, iPhone 18 Pro Max, and iPhone 18 Pro.
* Compatible with Windows 11/10/8/7 and macOS X 10.9 or later.
Download for Win Download for Mac
How to Back Up iPhone Notes to PC/Mac Using iReaShare iPhone Manager:
-
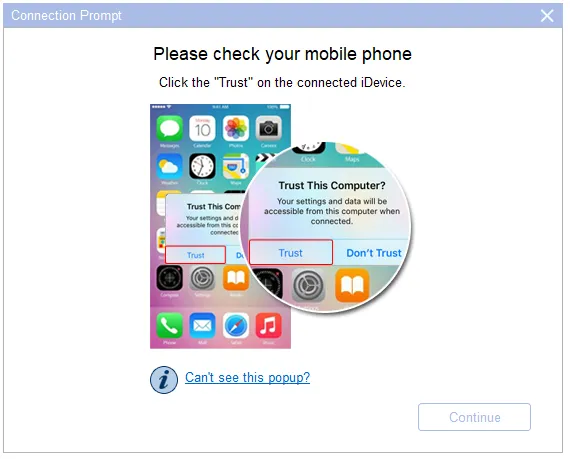
Download, install, and launch iReaShare iPhone Manager on your PC/Mac. Connect your iPhone to the computer using a USB cable, unlock your device, and tap "Trust" when the "Trust This Computer" prompt appears.
-
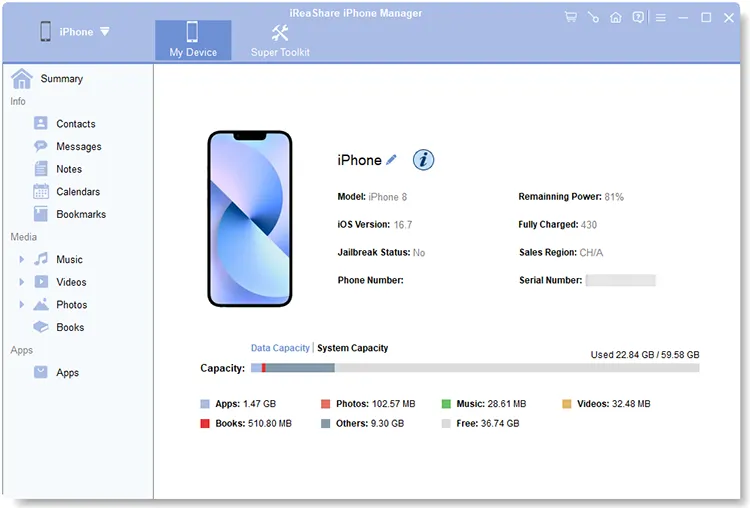
Once the software detects your iPhone, it will display the available data categories. Click "Notes" in the left sidebar to view your saved notes, then select the ones you want to back up.
-
After selecting the notes, click "Export" in the top menu. Choose a destination folder on your computer and save the selected notes locally.

Here's the video guide:
- Support exporting iPhone notes and other data to a computer.
- Provide a convenient desktop-based alternative to cloud synchronization.
- Support selective data preview and transfer.
- Allow users to manage multiple types of iOS data in one place.
- Support both Windows and Mac computers.
- Can back up and restore iOS data without relying entirely on iTunes.
- Require downloading and installing desktop software.
- Require a USB connection to connect the iPhone to a computer.
- Some advanced features may require a paid license.
- Primarily focuses on data transfer and management rather than dedicated note backup.
- Notes export formats and compatibility may vary depending on the iOS version and device.
2.2 Using iTunes/Finder
If you don't want to install third-party software, Apple's iTunes and Finder provide another way to back up your iPhone to a computer. This method is particularly useful if you want to create a local device backup instead of relying on cloud storage.
On Windows, you can use the Apple Devices app or iTunes, depending on your setup. On macOS Catalina and later, Finder handles iPhone backups.
How do I back up my iPhone Notes without iCloud?
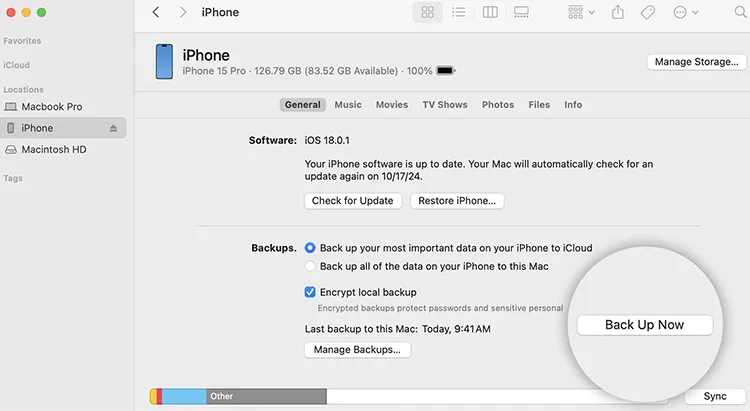
Step 1. Use a USB cable to connect your iPhone to your Windows PC or Mac. Unlock your device and tap "Trust This Computer" if prompted.
Step 2. Open iTunes or Finder.
- On Windows, open the Apple Devices app or iTunes, depending on the software available on your computer.
- On a Mac running macOS Catalina or later, open Finder.
Step 3. Find your connected device in the software interface. In Finder, select your iPhone from the sidebar. In iTunes, click the device icon.
Step 4. Under the "Backup" section, select the option to back up your iPhone to this computer or Mac. If you want additional protection for sensitive information, consider enabling "Encrypted Local Backup" and setting a password you can safely retain.
Step 5. Click "Back Up Now" and wait for the process to finish. The time required depends on how much data is stored on your iPhone.
- Use Apple's built-in backup tools.
- It doesn't require an additional paid backup application.
- Creates a local backup on your Windows PC or Mac.
- Encrypted backups can include additional sensitive information.
- Useful before updating iOS or changing devices.
- Doesn't provide an easy way to browse individual backed-up notes.
- iCloud-synchronized notes are not necessarily included in the local device backup.
- Restoring a full backup may replace existing device data.
- Require sufficient storage space on your computer.
- Not the most convenient option if you only want to export a few notes.
2.3 Using Gmail
You can back up your iPhone notes to Gmail by adding your Google account to your iPhone and enabling Notes synchronization. This is a convenient way to keep your notes associated with your Gmail account without installing additional software.
However, keep in mind that Gmail synchronization is not the same as a complete iPhone Notes backup. It only syncs notes stored under the Google account, not necessarily all notes saved in iCloud or under the On My iPhone folder.
Here is how to back up notes on iPhone to Gmail:
Step 1. Open "Settings" on your iPhone.
Step 2. Scroll down and tap "Apps" > "Notes" (on some iOS versions, go directly to "Notes").
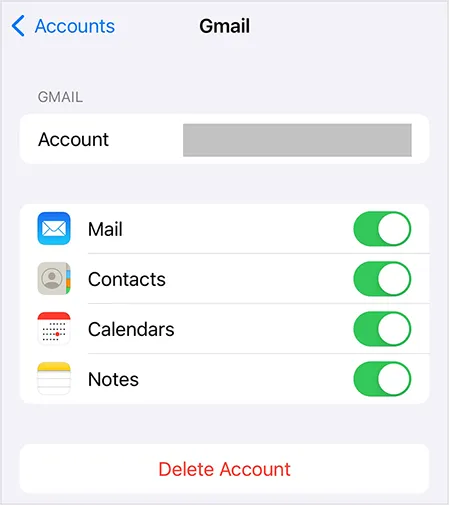
Step 3. Tap "Notes Accounts" or "Accounts". Then, select "Add Account" and choose "Google".
Step 4. Enter your Gmail address and password, then complete the sign-in process.
Step 5. After adding your Google account, select it from the account list and turn on the "Notes" toggle.
- Easy to set up by adding a Google account to your iPhone.
- Automatically syncs supported notes with your Gmail account.
- No additional desktop software is required.
- Allow you to access synchronized notes across supported devices.
- Convenient for users who already use Google services.
- Does not automatically sync existing iCloud or On My iPhone notes.
- Only supports notes stored under the connected Google account.
- Does not provide a complete backup of all iPhone Notes data.
- Some formatting, attachments, or note features may not transfer perfectly.
- Deleting synchronized notes on one device may also remove them from the Google account.
Part 3. FAQs on iPhone Notes Backup
Q1. How to find my notes backup on iPhone?
Open the Notes app on your iPhone and tap All iCloud under Folders to view notes synced with iCloud. Alternatively, visit iCloud.com, sign in with your Apple Account, and select Notes to access your synchronized notes.
Q2. How to restore iPhone notes from backup?
If you backed up your iPhone using iTunes, you can restore the backup to recover your notes. To restore notes from an iCloud backup, erase your iPhone first. During setup, go to "Apps & Data" and select "Restore from iCloud Backup".
Q3. Can you share iPhone notes via Messages?
Yes. Open the note you want to share, tap the "Share" icon, select "Messages", choose a contact, and tap "Send".
Summary
Backing up your iPhone notes doesn't have to be complicated. You can use iCloud to sync notes automatically, create a full iPhone backup, or choose alternatives like Gmail, iTunes/Finder, and iReaShare iPhone Manager to keep local copies on your computer. Each method has its own advantages and limitations, so the best choice depends on whether you want automatic syncing or more control over your files.
If you prefer managing and transferring supported iPhone data on a PC or Mac, iReaShare iPhone Manager is worth considering. Whichever method you choose, make sure your important notes are backed up in more than one place so you can access them when you need them most.
Download for Win Download for Mac
Related Articles
How to Back Up iPhone Without iCloud (5 Proven Approaches)
How to Back Up iPhone to iCloud: Complete Backup Guide 2026
How to Recover Deleted Notes on iPhone (With or Without Backup)
Effortlessly Back Up Messages to iCloud on iPhone (New Guide)