


When you decide to dispose of, sell, or repurpose an old hard drive, it is essential to overwrite the hard drive, ensuring your sensitive data cannot be recovered. General deletion is not enough, since it only remove the pointers to the data, leaving the actual information on the drive and susceptible to recovery by specialized software. However, fret not, you can get 5 effective methods to overwrite your HDD completely. Let's get started.
- Part 1: Overwrite Hard Drive Completely via iReaShare Data Wipe
- Part 2: Overwrite Hard Drive on Windows 11 via Diskpart
- Part 3: Overwrite Hard Drive with CCleaner
- Part 4: Overwrite Hard Drive on Windows PC via DBAN
- Part 5: Overwrite Hard Drive on Windows with ShredOS
- Part 6: FAQs About Overwriting Hard Drive
Take a quick look at the pros and cons of these methods:
| Method | Pros | Cons |
|---|---|---|
| iReaShare Data Wipe |
1. Overwrite a hard drive completely |
1. Requires software installation 2. Not all features are available for free |
| Diskpart | 1. Built-in to Windows, so no extra software is needed 2. A free and effective command-line tool |
1. Command-line interface may be intimidating for some users 2. Can only wipe non-system drives while running from the OS |
| CCleaner | 1. Very easy to use with a simple, graphical interface 2. Can wipe free space or the entire drive |
1. Primarily known as a cleaning tool, not a dedicated data-wiping utility 2. Requires software installation |
| DBAN | 1. Extremely secure as it runs outside the OS 2. Free and open-source |
1. Requires creating a bootable USB/CD 2. Text-based interface can be difficult to use 3. Doesn't support modern hardware like SSDs |
| ShredOS | 1. Secure to use, and runs outside the OS 2. Effective in wiping a hard drive |
1. Requires creating a bootable USB 2. May have a steeper learning curve than simple software |
Part 1: Overwrite Hard Drive Completely via iReaShare Data Wipe
iReaShare Data Wipe is a specialized software utility designed for securely and permanently erasing all data from a storage device. Its primary function is to write a series of random data, zeros, or ones over the entire disk space, making the original data unrecoverable. Thus, you can use it to overwrite your hard drive with ease.
Main features of iReaShare Data Wipe:
* Completely ovewrite a hard drive to prevent data from recovery.
* Allow you to wipe the free space on your hard drive as well.
* Shred specific files and folders without removing other files.
* Wipe SD cards, USB drives, external hard drives, and other storage devices.
* Support Windows 11/10/8/7.
Download iReaShare Data Wipe.
Here's how to overwrite a hard drive on a PC with this software:
-
Download and install iReaShare Data Wipe on your computer. Then launch the application and choose "Drive Wiper" on the left menu.
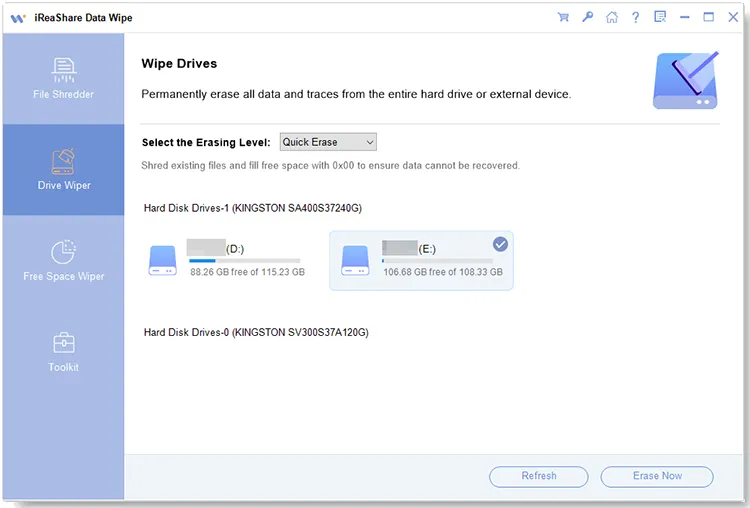
-
Select the hard drive you wish to wipe from the list of detected devices. Then select a wiping method: "Quick Erase" or "Deep Erase".
-
After that, click "Erase" and choose "OK" on the popup. Then the software will initiate the data wipe.
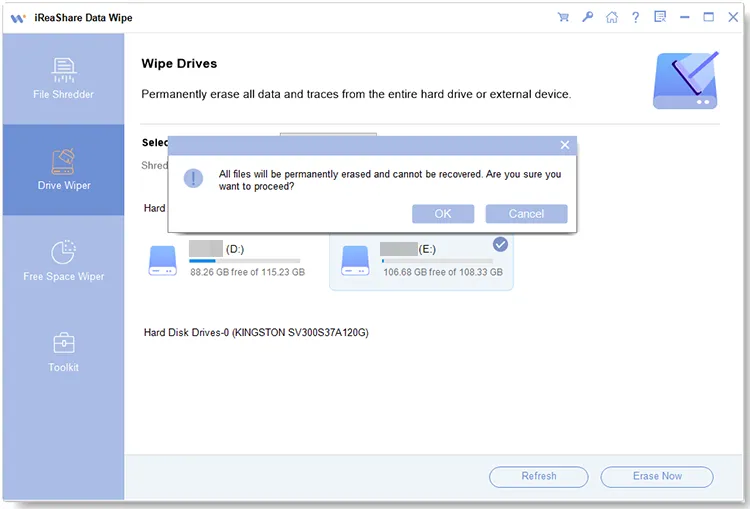
Notes: A single pass of zeros (Quick Erase) is often sufficient for most users, but for maximum security, you can choose a multi-pass method (Deep Erase).
Part 2: Overwrite Hard Drive on Windows 11 via Diskpart
For Windows users, the built-in Diskpart utility provides a powerful command-line method to securely wipe a hard drive. Using the clean all command within Diskpart will write zeros to every sector of the selected disk, effectively overwriting all data.
Here's how to overwrite a hard drive on Windows 11/10:
-
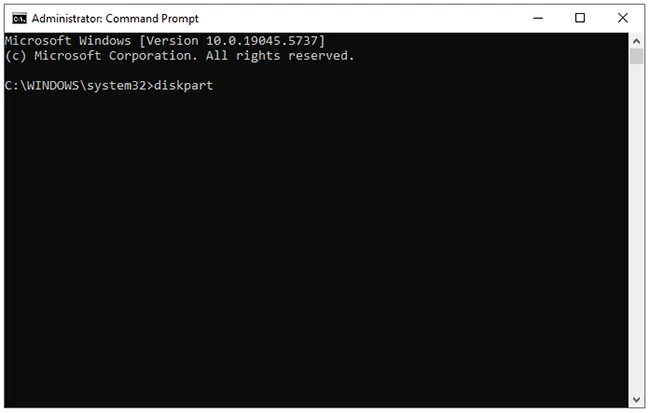
Open the Command Prompt as an administrator. You can do this by searching for "cmd", right-clicking the result, and selecting "Run as administrator".
-
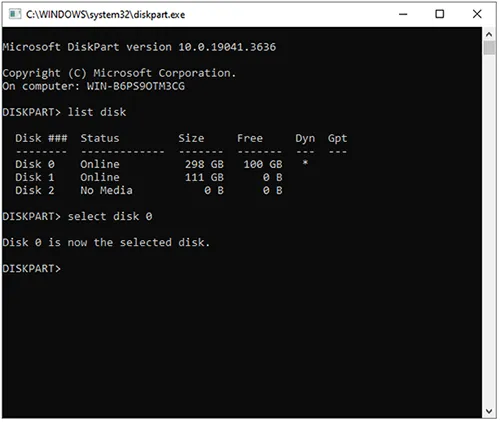
Type "diskpart" and hit "Enter". This will open the "Diskpart" environment. Type "list disk" and press "Enter". This command will display a list of all disks connected to your computer. Carefully note the disk number you want to wipe.
-
Type "select disk [number]" (e.g., select disk 1) and press "Enter". This will select the target disk.
-
Input "clean all" and press "Enter". This is the command that initiates the secure wipe. It will write zeros across the entire disk. This process will take a long time to complete. Once the process is finished, type "exit" to close the Diskpart utility.
Tips: You can completely destroy your hard drive if you don't need your hard drive anymore. The physical destruction is the highest level of privacy security.
Part 3: Overwrite Hard Drive with CCleaner
CCleaner is a popular utility known for cleaning up temporary files and optimizing system performance. It also includes a useful tool for securely wiping data from a drive. Its "Drive Wiper" feature can be used to overwrite free space or the entire disk.
To wipe a hard drive with CCleaner:
-
Install and open CCleaner on your PC. Then navigate to the "Tools" section.
-
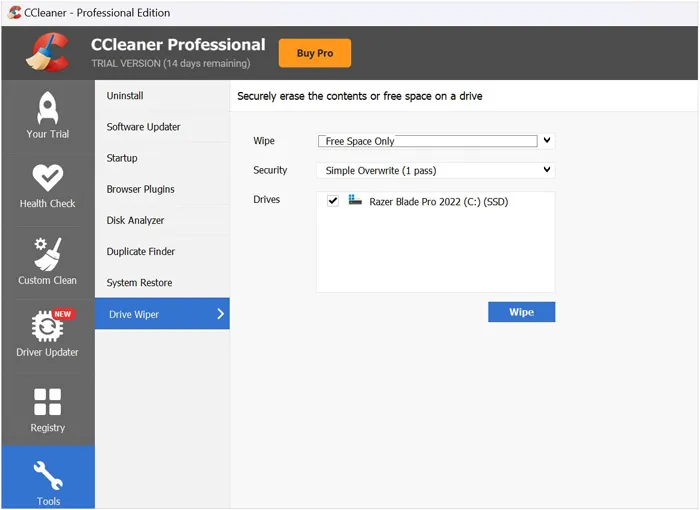
Click on the "Drive Wiper" option, and choose the drive you want to wipe from the "Drive" dropdown menu.
-
Under the "Wipe" section, select whether you want to wipe "Free Space Only" or "Entire Drive (All Data Will Be Erased)". For a complete overwrite, choose the latter.
-
Select a security level, and click "Wipe" to begin the process. A warning will appear to confirm your action.
Part 4: Overwrite Hard Drive on Windows PC via DBAN
For the most thorough and secure data wiping, a bootable solution is often the best choice. DBAN (Darik's Boot and Nuke) is a classic, free, and open-source tool that can be used to securely erase hard drives. Because it runs from a bootable USB or CD, it operates outside of the operating system, allowing it to wipe the drive that contains your Windows installation.
Here's how:
-
Obtain the DBAN ISO file from its website. Then use a tool like Rufus or YUMI to burn the DBAN ISO onto a USB drive or a CD.
-
Restart your computer and access the BIOS or UEFI settings (usually by pressing F2, F10, or Delete during startup). Change the boot order to boot from the USB or CD.
-
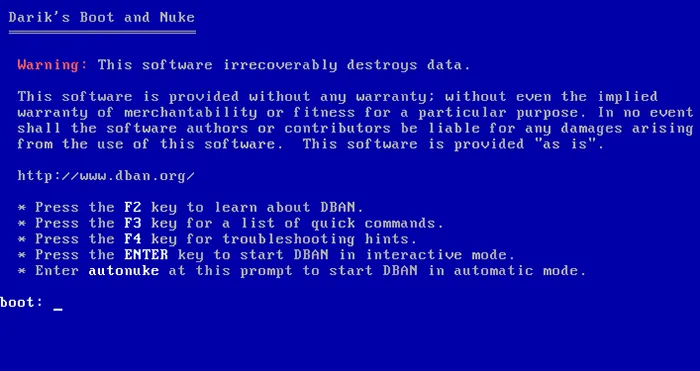
Once DBAN loads, you will be presented with a text-based interface. You can use the autonuke command for a quick, automated wipe or select a specific drive and a more advanced wiping method manually.
-
Follow the on-screen prompts to begin the secure data erasure. The process can take several hours depending on the size of the drive.
Part 5: Overwrite Hard Drive on Windows with ShredOS
ShredOS is another open-source bootable solution for securely wiping and overwriting data on a hard drive. It is a Linux-based operating system designed for a single purpose: data shredding. It is considered a successor to DBAN, offering a more user-friendly interface and support for modern hardware.
To overwrite a hard drive with ShredOS:
-
Download the ShredOS ISO file from GitHub. Then use a tool like Rufus to create a bootable USB drive with the ShredOS ISO.
-
As with DBAN, restart your computer and configure the boot order in the BIOS/UEFI to boot from the newly created USB.
-
The system will boot into a graphical interface where you can easily select the drive you want to wipe.
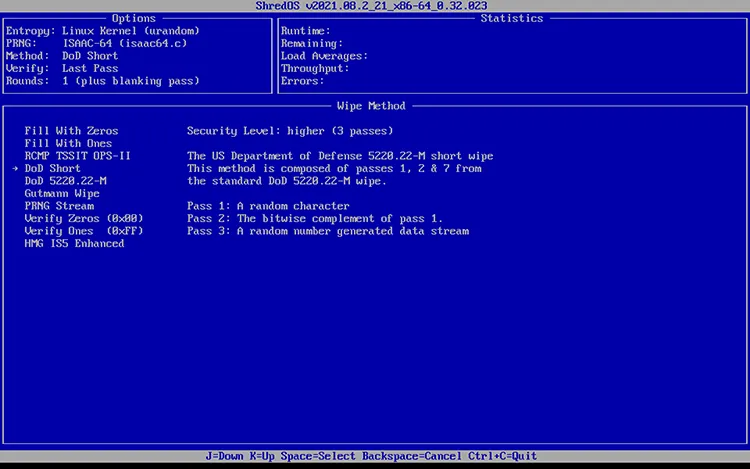
-
ShredOS provides a variety of data sanitization methods, from a quick single pass to more rigorous, multi-pass options.
-
Once the algorithm is selected, confirm your choice to begin the secure overwrite process. ShredOS will provide a progress bar and status updates as it works.
Part 6: FAQs About Overwriting Hard Drive
Q1: Can I overwrite a hard drive on a Windows PC with factory reset?
Not exactly, a factory reset on Windows does not fully overwrite (wipe) your hard drive. Here's the difference:
What a Windows Factory Reset Does
- Restores the system to a "like-new" state.
- Removes your installed apps and personal files (depending on the reset option you choose).
- Reinstalls Windows from a recovery partition or cloud.
However, a standard reset only deletes file references and reinstalls Windows. The data can still be recovered with special software because it's not securely overwritten. In Windows 10/11, there's an option called "Remove everything" > "Change settings" > "Clean data?". If you turn on "Clean data", Windows will overwrite the drive with random data, making recovery much harder.
But note: even this isn't as thorough as a multi-pass wipe with dedicated tools.
Q2: Can data be recovered from a wiped hard drive?
Generally, no, data cannot be recovered from a hard drive that has been properly and securely wiped. When a drive is "wiped" using a secure method like a multi-pass overwrite or the ATA Secure Erase command for SSDs, the original data is overwritten with new data, typically random binary patterns or zeros. This process makes the original data unreadable and unrecoverable by standard data recovery tools.
Q3: How many times should I overwrite a hard drive?
For modern hard disk drives (HDDs), a single pass is sufficient to securely overwrite the data. While older standards recommended multiple passes, modern research and official guidelines from organizations like the U.S. National Institute of Standards and Technology (NIST) state that one pass is enough to prevent data recovery, even with advanced laboratory techniques.
Conclusion
Securely overwriting a hard drive is a critical step in protecting your privacy and preventing data theft. You can choose the open-source software like DBAN and ShredOS to wipe and overwrite your hard drive. However, they are not user-friendly enough. To simplify the overwriting process, iReaShare Data Wipe provides a better option, which allows you to overwrite all your data on your hard drive with simple clicks.
Related Articles
How to Completely Wipe PC Before Selling Windows 11/10/8/7
How to Clear a Pen Drive Securely: 4 Effective Approaches
How to Clean Disk Using CMD Without Effort (Solved)
How to Factory Reset Windows 7 Safely with 4 Methods
