


Formatting an SD card is a fundamental skill for anyone using cameras, smartphones, or computers. Whether you are clearing out old files to make room for new memories or fixing a "Card Error" message, knowing how to properly format an SD card ensures its longevity and performance. Now, learn about the formatting methods in the following.
Part 1: How to Format SD Card on Android Device via Settings
If you use your SD card as expanded storage for your phone, formatting it directly on the device is often the most reliable method. Once formatted, the card will be empty and ready to use again.
To format an SD card on Android:
-
Ensure you have installed your SD card on your Android phone or tablet. Then open the Settings app on the Android device.
-
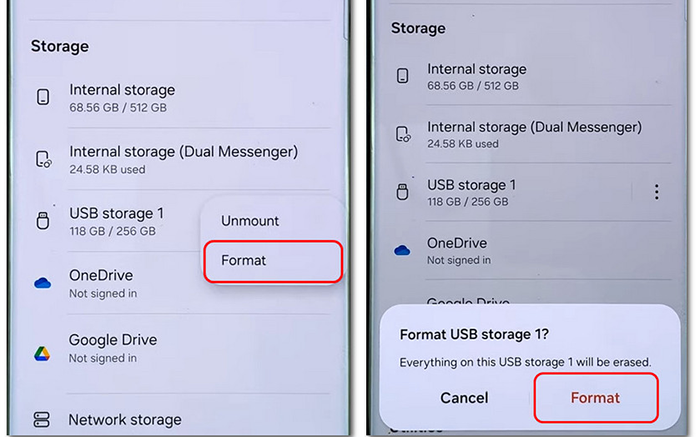
Navigate to "Storage" or "Device Care" > "Storage". Then tap on the SD card.
-
Select the three-dot menu (or "Storage Settings") and tap "Format". Next, confirm by selecting "Format" again. Note that this will erase all data on the card.
Part 2: How to Format SD Card on PC
Windows offers several ways to handle formatting, ranging from quick shortcuts to specialized software.
2.1 Via File Explorer
File Explorer is the quickest and easiest way to format an SD card on a Windows computer. As long as you connect your memory card to your PC, you can format the card on the computer directly.
Here's how:
-
Use a card reader to link your SD card to your PC if needed. Then the computer will detect the external storage device.
-
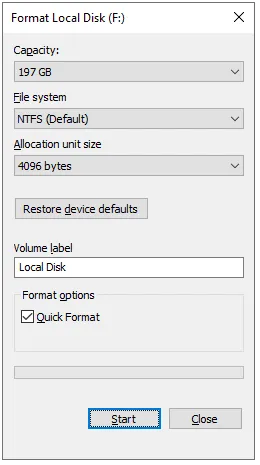
Open "This PC", and right-click your SD. Then select "Format".
-
Choose a suitable file system (FAT32 for cards 32GB or smaller, exFAT for larger) and click "Start". The SD card will be formatted successfully.
2.2 Via Disk Management
If the SD card doesn't appear in File Explorer, Disk Management can help. Disk Management is especially useful for repairing damaged or inaccessible SD card partitions.
To format an SD Card via Disk Management:
-
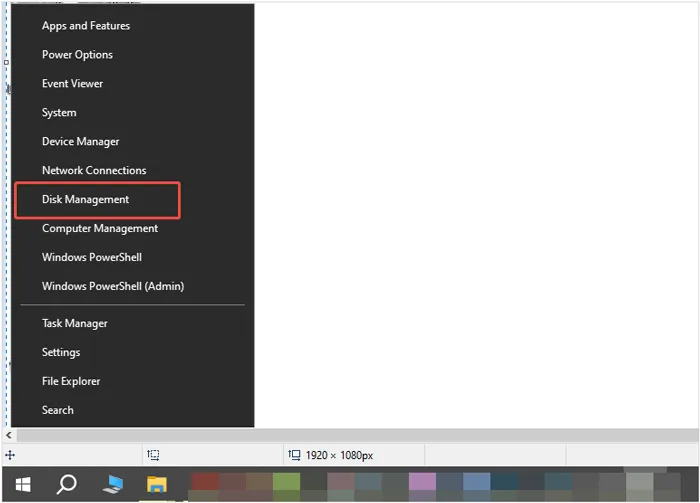
Right-click the "Start" button and select "Disk Management". Locate your SD card in the list of drives.
-
Right-click the partition and select "Format...".
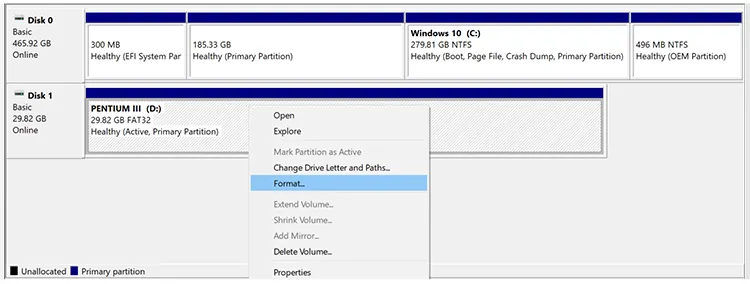
-
Follow the prompts to assign a volume label and file system.
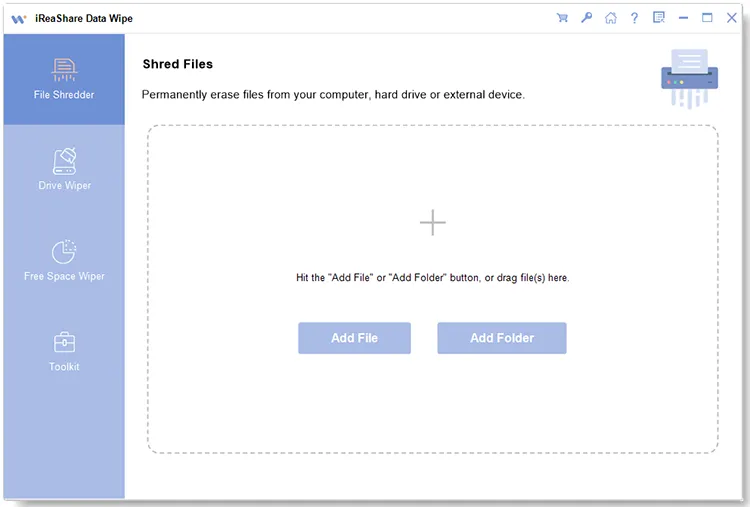
2.3 Via iReaShare Data Wipe
For those who need to ensure data is unrecoverable, a specialized tool called iReaShare Data Wipe provides a deeper "shredding" process. Unlike a standard format, these tools overwrite the sectors multiple times to protect your privacy. If you want to sell or give away your SD card, this tool will be particularly necessary.
Main features of iReaShare Data Wipe:
* Wipe an SD card completely, including existing and deleted data.
* Provides two erasing levels: Quick Erase and Deep Erase.
* Erase hard disks, USB drives, and other external storage devices as well.
* Allow you to select files or folders before starting the process.
* Offer three modes: File Shredder, Drive Wiper, and Free Space Wiper.
* Support all kinds of file types, such as images, videos, audio files, documents, passwords, recordings, etc.
Download iReaShare Data Wipe.
To completely format your SD card with this software:
-
Install and launch the software on your Windows computer. Then insert the SD card into the PC with a card reader.
-
Choose the "Drive Wiper" mode on the left panel, and then select your card from the device list.
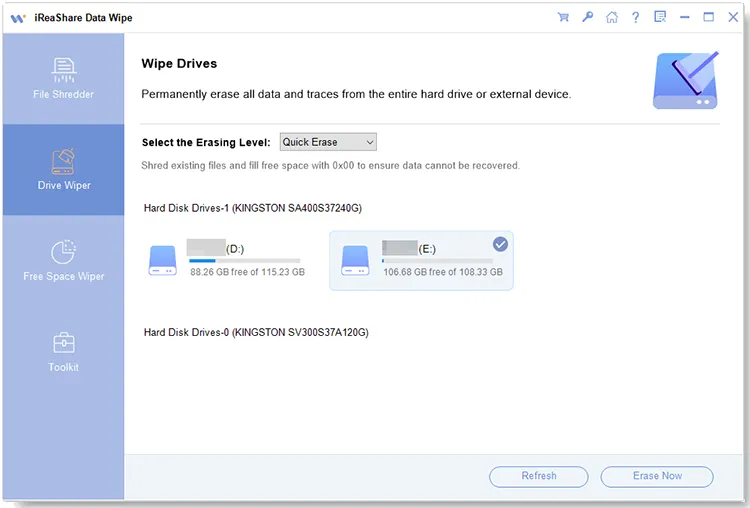
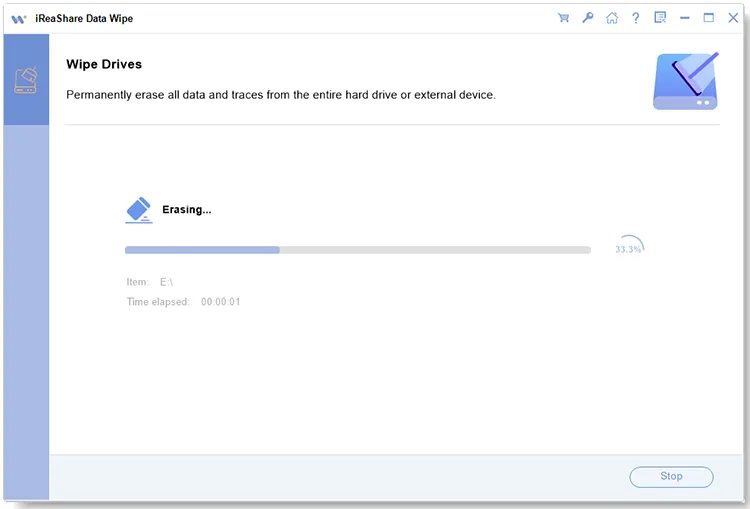
-
Opt for the desired wiping level, and click "Erase Now" > "OK" to start the process. Then all the data on your SD card will be erased.
2.4 Via SD Memory Card Formatter
The SD Association provides its own official tool called "SD Memory Card Formatter". It is specifically designed to optimize SD, SDHC, and SDXC cards according to official standards, which can sometimes fix cards that Windows' built-in tools cannot.
Here are the steps:
-
Download and install SD Memory Card Formatter on your computer. Then run it on the desktop.
-
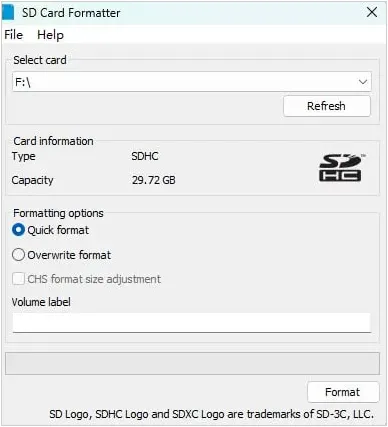
Insert your SD, SDHC, or SDXC card into the computer's built-in slot or an external USB card reader. Next, click the dropdown menu under "Select card" and choose the drive letter corresponding to your SD card.
-
Choose a formatting option: "Quick format" or "Overwrite format". Then click the "Format" button at the bottom of the window. A warning dialogue box will appear stating that all data will be erased. Click "Yes" to proceed.
-
Wait for the progress bar to complete. Once finished, a "Formatting Task Complete" message will appear, displaying the card's capacity and the file system used. Then you can safely remove your card from the computer.
Part 3: How to Format SD Card on Mac via Disk Utility
Mac users can manage their external storage through a built-in tool called Disk Utility to format an SD card. This tool can erase all the data at once, so you still need to back up your important data stored on the memory card first.
Here's the guide:
-
Connect your SD card to your Mac. Next, open Finder, go to "Applications" > "Utilities", and launch "Disk Utility".
-
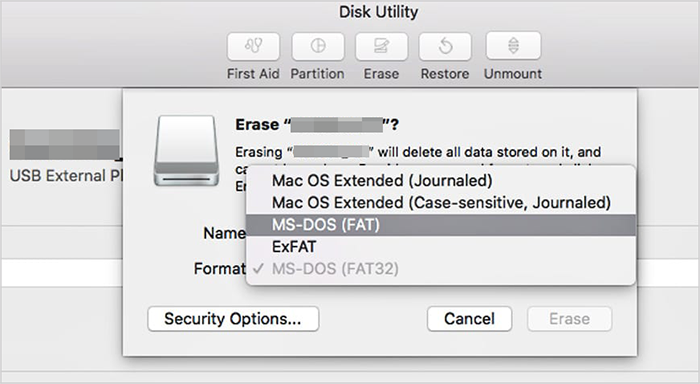
Select the SD card from the list on the left, and click the "Erase" button at the top.
-
Choose a name for the card and select a format (usually ExFAT for modern cards). Then hit "Erase" to complete the process.
Part 4: How to Format SD Card on Camera
Formatting an SD card directly within your camera is the most reliable method to ensure the file system is perfectly compatible with the device's hardware. While the exact menu layout varies by brand (Canon, Sony, Nikon, etc.), the general workflow remains consistent.
Here's how:
-
Place the SD card into the designated slot and power on the camera.
-
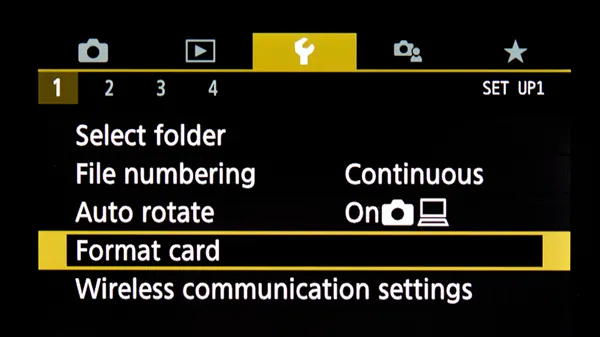
Press the "Menu" button on the back or top of the camera body. Look for an icon that looks like a wrench, gear, or toolbox. This is typically where system-level tools are stored.
-
Scroll through the tabs until you see "Format" or "Format card", and confirm the action. A progress bar may appear. Do not turn off the camera or remove the card until the screen confirms the format is complete.
Tips: Never format a card if your battery is low. If the camera powers off during the process, it can corrupt the SD card or damage the camera's firmware.
Part 5: Q&A About Formatting an SD Card
Q1: Why is my SD card saying it needs to be formatted?
This usually happens if the file system has become corrupted, the card was pulled out while writing data, or the card is in a format the current device doesn't recognize (e.g., a Linux-formatted card in a Windows PC).
Q2: Is it good to always format an SD card?
It is a "best practice" to format a card whenever you move it to a new device (like moving a card from a Sony camera to a Canon camera). However, frequent formatting isn't necessary for daily use unless you are experiencing slow speeds or errors.
Q3: What if I accidentally format my SD card?
Stop using the card immediately. Do not take new photos or save new files to it. You can often recover your files using data recovery software (like Data Recovery, Recuva, or PhotoRec), provided the data sectors haven't been overwritten yet.
Conclusion
Formatting an SD card is a simple yet essential maintenance task. Whether you prefer the built-in simplicity of Android and Mac or the robust options on Windows, the key is to always back up your data before hitting that final "Format" button. By following these steps, you can keep your storage devices running smoothly and error-free.
If you also want to wipe other storage devices like flash drives, external hard disks, etc., and ensure your data is unrecoverable, iReaShare Data Wipe can meet your needs. It can even wipe the free space without erasing your existing data.
Related Articles
How to Move Photos to SD Card on Android Device (Solved)
How to Format Hard Drive on Windows 11/10 PC Effectively
Solved: How to Erase Data from Sony XQD Card Permanently
How to Make SSD Data Unrecoverable | Ensure Data Irretrievability
