


When you want to shred PowerPoint files from your PC, how can you do it? If you simply move them to the recycle bin, that's often not enough. Your files can be easily restored. To permanently shred your PowerPoint files, we've provided 4 methods with detailed steps. You can follow one of them to wipe your PPT files completely.
- Part 1: Permanently Shred PowerPoint Files on PC via iReaShare Data Wipe
- Part 2: Remove Microsoft PowerPoint Files by Resetting Computer
- Part 3: Shred Microsoft PowerPoint Files with PowerShell Command
- Part 4: Wipe PowerPoint Files on PC with Disk Cleanup
- Part 5: Q&A About Shredding PowerPoint Files
Compare these 4 methods' pros and cons:
| Method | Pros | Cons |
|---|---|---|
| 1. iReaShare Data Wipe | 1. Uses multi-pass algorithms (e.g., DoD) for guaranteed permanent destruction. 2. Allows precise selection of specific files/folders. 3. Wipe hard drives on PCs and external drives. |
1. A paid software app. 2. Needs to install a program on a PC. 3. Doesn't have a Mac version. |
| 2. Resetting Computer | 1. Wipes the entire drive, ideal for selling or donating a PC. 2. Windows offers a "Fully clean the drive" option for secure, comprehensive wiping. |
1. Destroys all data, applications, and settings on the primary drive. 2. The secure cleaning process can take many hours. 3. Cannot be used to wipe only a single file. |
| 3. PowerShell Command | 1. Uses standard Windows tools; no extra installation needed. 2. The script can be modified for more/fewer passes. 3. Can be scripted to target specific files/locations. |
1. User must be comfortable with the command line and scripting. 2. Incorrect execution can potentially damage other files or the system. 3. Slower for many files than dedicated software. |
| 4. Disk Cleanup | 1. Simple, one-click operation via Windows GUI. 2. Standard Windows tool, quickly clears deleted files. |
1. Primarily a simple deletion; not a true multi-pass shredder. 2. Only securely deletes files already in the Recycle Bin. 3. Less reliable against sophisticated data recovery tools. |
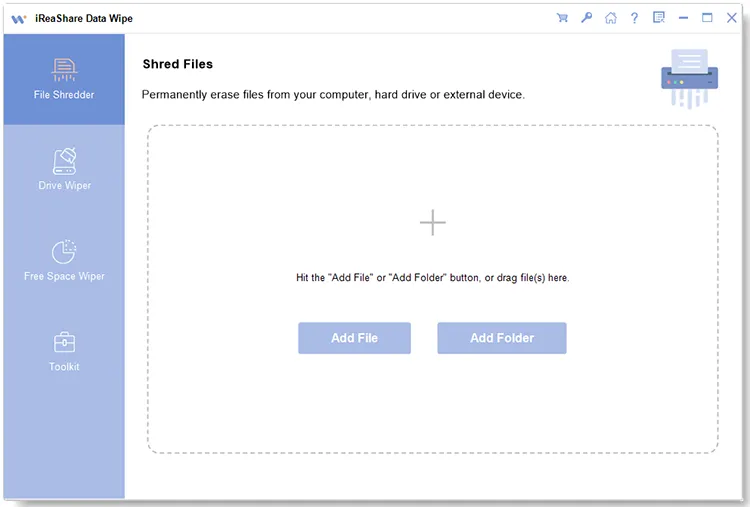
Part 1: Permanently Shred PowerPoint Files on PC via iReaShare Data Wipe
One of the most effective ways to permanently delete files from your PC is by using a specialized data-wiping tool like iReaShare Data Wipe. This software employs sophisticated algorithms to overwrite the file's data multiple times, making it impossible for anyone to retrieve it. Besides, it allows you to selectively files and folders for data erasure, and wipe a whole hard drive at once.
Main features of iReaShare Data Wipe:
* Permanently shred PowerPoint and other files from a Windows PC.
* Help you wipe your external SD card, USB flash drive and other storage devices.
* Wipe SSD on a Windows PC with ease.
* Overwrite deleted data up to 3 times with the standard of US DoD 5220.22-M(E).
* Erase all types of files, like documents, pictures, videos, audio files, bookmarks, installed apps, etc.
* Support Windows 11/10/8/7.
Download iReaShare Data Wipe.
Here's how to shred the Microsoft PowerPoint files on a PC:
-
Obtain and install the iReaShare Data Wipe software on your PC. Then launch it.
-
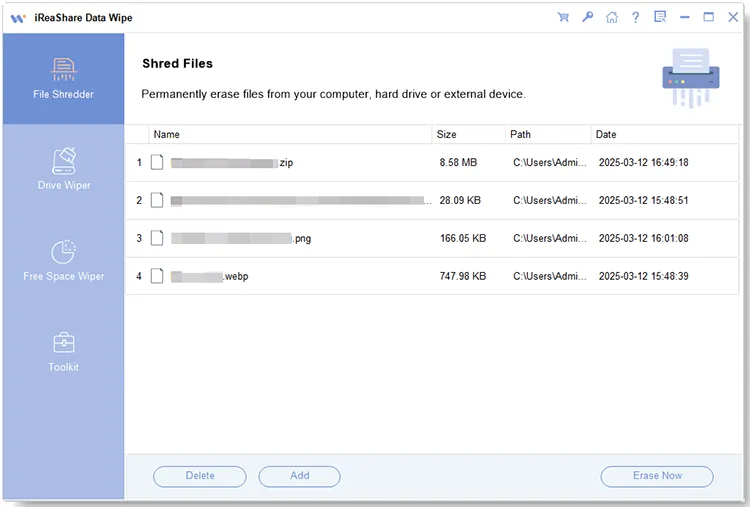
Choose the "File Shredder" tab, and click "Add File" to select your PowerPoint files.
-
Once added, click "Erase Now" at the bottom. Then choose "OK" on the popup. The software will start to erase the selected PowerPoint files.
Part 2: Remove Microsoft PowerPoint Files by Resetting Computer
Emptying the recycle bin is not enough. If you want to permanently remove your PowerPoint files from your computer, you need to reset the device. However, it will wipe all the data at once. If you don't want to lose your useful files, please back up your files first.
To delete PowerPoint presentation completely from a computer:
-
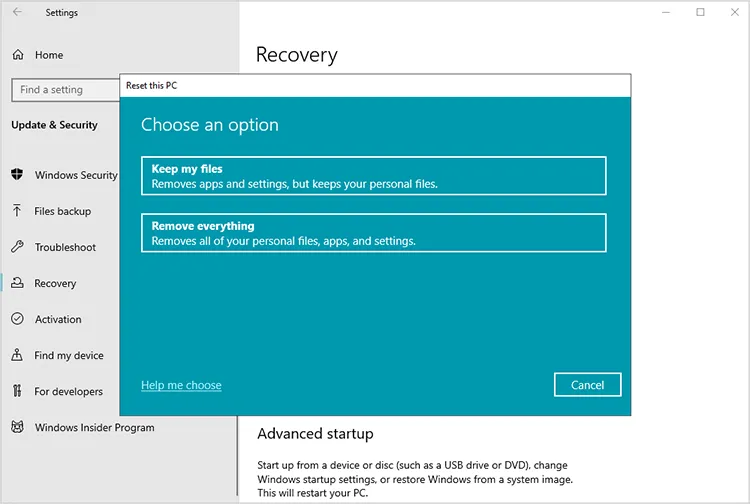
Click "Start" and choose "Settings" > "Update & Security" (or "System" in Windows 11) > "Recovery". Under the "Reset this PC" section, click "Get started".
-
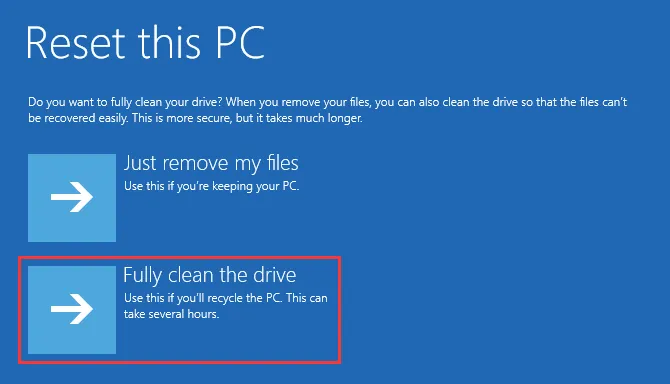
You will be given two choices: Keep my files and Remove everything. Please select "Remove everything". On the next screen, you will be asked, "How would you like to reinstall Windows?" You can select "Cloud download" or "Local reinstall".
-
Then, select "Do you want to clean the drives too?" and choose "Fully clean the drive" (or the equivalent option for maximum security). Follow the final prompts to begin the reset process. This will take a significant amount of time.
Part 3: Shred Microsoft PowerPoint Files with PowerShell Command
For users comfortable with the command line, Windows PowerShell can be used to execute a script that securely overwrites a file's content. This provides a free, built-in way to shred a file without installing third-party software.
Here are the steps:
-
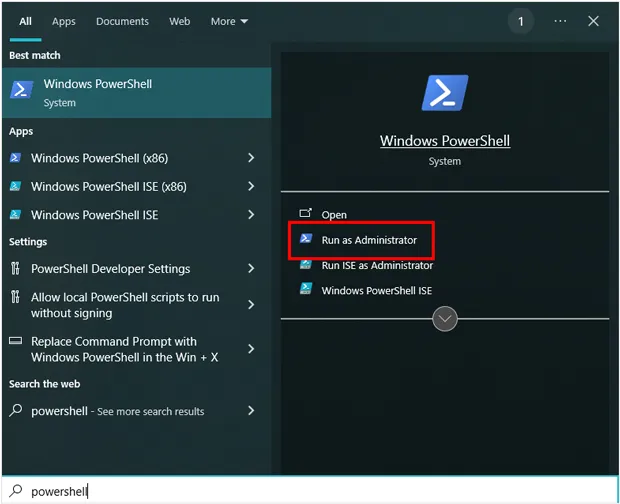
Type PowerShell in the search bar, right-click on it, and select "Run as Administrator". To delete your PowerPoint file, use the Remove-Item command with the full path of the file. For example: Remove-Item "C:\Users\YourUsername\Documents\presentation.pptx".
-
This will move the file to the Recycle Bin, but it won't shred the data permanently. To ensure that the file is deleted securely and cannot be recovered, you can write a script to overwrite the file with random data before removing it. Here's an example of such a script:
$filePath = "C:\Users\YourUsername\Documents\presentation.pptx"
$file = Get-Item $filePath
$length = $file.Length
$randomData = New-Object byte[] $length
(New-Object Random).NextBytes($randomData)
[System.IO.File]::WriteAllBytes($filePath, $randomData)
Remove-Item $filePath -Force -
Run the script in PowerShell. This will overwrite the file with random data and then delete it, making it unrecoverable.
Part 4: Wipe PowerPoint Files on PC with Disk Cleanup
While primarily designed to free up disk space, the Windows Disk Cleanup utility includes an option to securely wipe the contents of the Recycle Bin, ensuring that files previously deleted (but not yet shredded) are less likely to be recovered. This method is best used as a complementary step to other shredding methods.
To wipe PowerPoint files on a PC with Disk Cleanup:
-
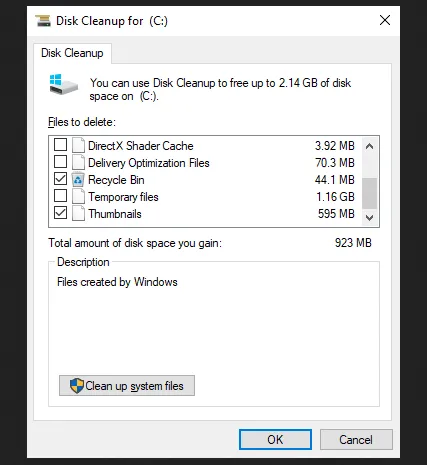
Ensure the PowerPoint files you wish to wipe are moved to the Recycle Bin. Search for "Disk Cleanup" and open the application.
-
Choose the drive where the files are located (usually the C: drive) and click "OK". Wait for the utility to scan. In the list of "Files to delete", ensure that "Recycle Bin" is checked.
-
For a deeper clean, click the "Clean up system files" button. After the second scan, check the box for "Recycle Bin" again.
-
Click "OK" to permanently delete the files in the Recycle Bin. While this is not a multi-pass shredder, it securely deletes the files from the operating system's perspective and is often sufficient for most users.
Part 5: Q&A About Shredding PowerPoint Files
Q1: Can I shred a PowerPoint file on the cloud (e.g., Google Drive, OneDrive)?
Shredding works best with files stored locally on your computer. If the file is in the cloud, you can delete it, but once it's deleted, it may still be recoverable from the cloud provider's backup or trash folder. To ensure permanent deletion, you should also empty the Trash or Recycle Bin in the cloud service or use the service's data management options for secure deletion.
Q2: Can shredded PowerPoint files be recovered?
Once a file is shredded, it is designed to be unrecoverable by conventional means. Advanced forensic tools may still be able to recover data from a disk, but in practice, file shredding tools, such as iReaShare Data Wipe, make this nearly impossible. Overwriting data multiple times ensures that even if the file is recovered, it cannot be read.
Q3: How do I ensure that a PowerPoint file is securely shredded?
To ensure a file is securely shredded:
- Use a trusted file-shredding tool that overwrites data multiple times (at least 1-3 passes).
- Double-check the files selected for shredding.
- Use file-shredding software with military-grade encryption or compliance to standards like DoD 5220.22-M (Department of Defense) for highly sensitive data.
Conclusion
The simple act of hitting the "Delete" key does not remove your digital footprint. To achieve true data security for sensitive PowerPoint files, you must use a method that overwrites the original data sector on your hard drive.
For the highest level of security and ease of use, a dedicated data wiping utility iReaShare Data Wipe is recommended. With it, you can safely remove your files with simple clicks. Then nobody can recover your files. Also, other methods are effective, but they are not as easy as using an eraser tool.
Related Articles
How to Wipe an External Hard Drive on Windows 11/10 PC (Solved)
How to Make SSD Data Unrecoverable | Ensure Data Irretrievability
Solved: How to Factory Reset Windows 7 Safely with 4 MethodsDisk Cleanup Not Deleting Files: Find Out Reasons and Fix It
