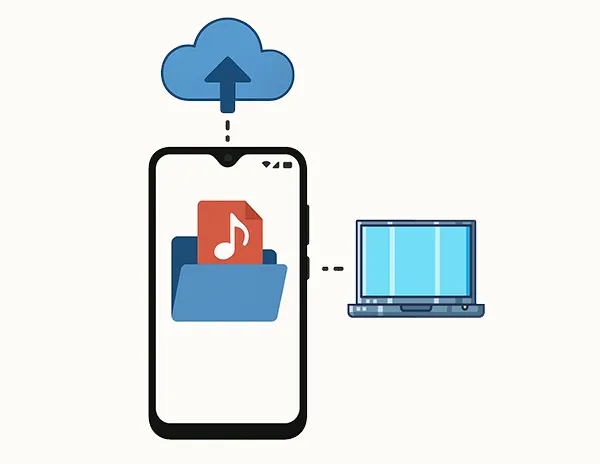
The storage space on an Android device is increasingly large, so we can store more and more favorite songs on the device. However, we still encounter losing music library due to device issues, accidental deletion, etc. To help you avoid this frustration, we've shared 5 ways on how to back up music on Android. You can follow one method to back up your songs without effort.
- Part 1: How to Back Up Music on Android via iReaShare Android Manager?
- Part 2: How to Back Up Music on My Android Phone via Google Drive?
- Part 3: How Do I Back Up My Music via YouTube Music?
- Part 4: How to Back Up Songs on Android via USB Cable Manually?
- Part 5: How to Back Up Android Music with SD Card?
- Part 6: FAQs About Android Music Backup
Part 1: How to Back Up Music on Android via iReaShare Android Manager?
iReaShare Android Manager is a specialized application designed to help you manage various aspects of your Android device from your computer, including backing up and restoring data. Therefore, you can use it to back up your songs on Android to your computer in 1 click. Besides, you can create playlists to easily organize your music.
Main features of this music manager:
* Load and display all your Android music files on the interface.
* Enable you to preview your music files and selectively transfer them to your computer.
* Back up all the songs from Android to computer at one go.
* Effortlessly restore your music from the backup to any Android devices.
* The restored songs will not replace your current music.
* Never change the quality and file format of your music files.
* Back up contacts, SMS, apps, videos, photos, and more.
* Support most Android devices running Android 6.0 and upper, such as Samsung Galaxy S25 Ultra/S25/S24/S23/S22/S21/S20, OnePlus 13/12/11/10/9/8/7, Xiaomi, Redmi, OPPO, Vivo, Tecno, Honor, Sony, Motorola, etc.
Download iReaShare Android Manager.
Download for Win Download for Mac
Here's how to back up your music on Android with this software:
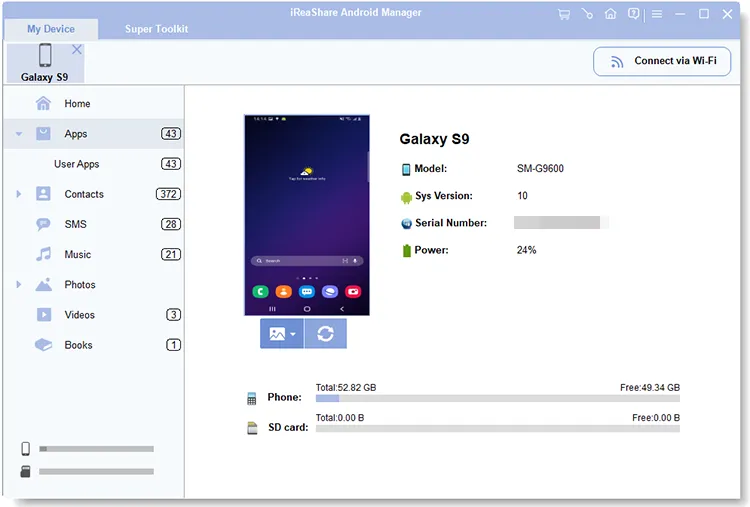
Step 1: Download and install this Android Manager software on your computer. Then launch it, and connect your Android device with USB.
Step 2: It will prompt you to enable the USB debugging mode on your Android phone. Follow the on-screen instructions to turn it on. Then the connection will be established.
Step 3: Choose "Music" and select the songs you want to back up. Then click "Export" to save them to your computer.
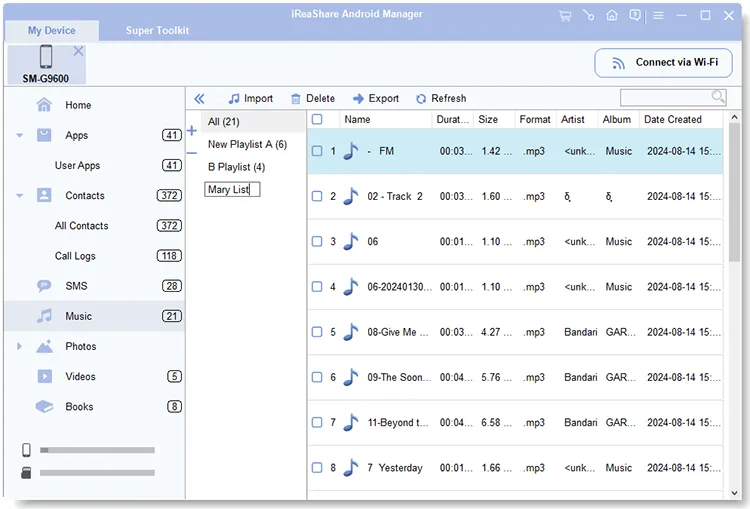
Tips: If you want to back up all your songs at once, please go to "Super Toolkit" and use the one-click backup feature.
This is the video guide to transferring music from Android to a computer with this software:
Part 2: How to Back Up Music on My Android Phone via Google Drive?
Google Drive offers a convenient way to back up various files, including your music library, to the cloud. Then you can easily access your songs on any devices.
Here's how to complete the Android music backup with Google Drive:
Step 1: If you don't already have it, download and install the Google Drive app from the Google Play Store on your Android phone.
Step 2: Launch the Google Drive app and sign in with your Google Account.
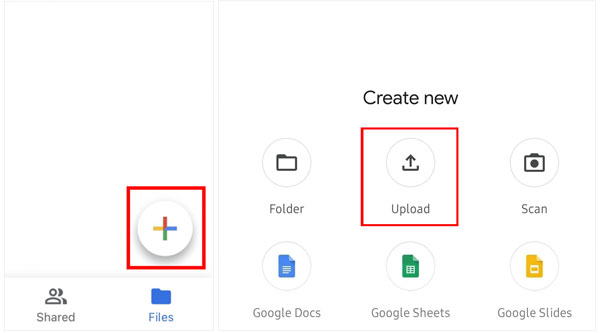
Step 3: Tap the "+" (plus) button, usually located at the bottom right of the screen. Select "Upload". Then choose the songs you want to backup from your phone's internal storage. Then Google Drive will begin uploading the selected music files to your cloud storage.
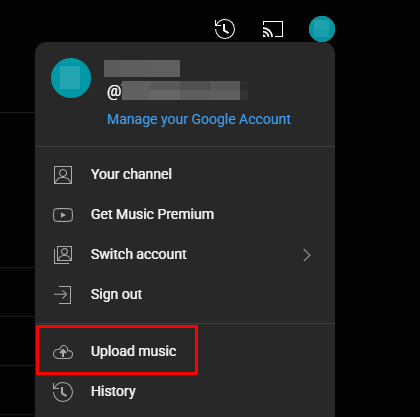
Part 3: How Do I Back Up My Music via YouTube Music?
YouTube Music operates primarily as a streaming service, but it does offer a way to upload your own music library, effectively creating a cloud-based backup that you can stream from any device where you're logged into your YouTube Music account.
Here's how:
Step 1: Open the YouTube Music app or go to the YouTube Music website in a browser on your Android device.
Step 2: Navigate to the "Library" tab. On the website, you should see an option to "Upload music". Click on this. In the app, this feature might not be directly available, so using the website is generally the way to upload.
Step 3: A file explorer window will appear. Locate and select the music files you want to upload from your Android device's storage.
Step 4: YouTube Music will upload your selected music files to your library. Once uploaded, these songs will appear in your YouTube Music library alongside the streaming content and can be streamed on your Android phone or any other device with YouTube Music.
Part 4: How to Back Up Songs on Android via USB Cable Manually?
The most straightforward way to back up your music is by manually copying the files from your Android phone to your computer using a USB cable.
Here's how to do it:
Step 1: Connect your Android phone to your computer using a USB cable. On your phone, you might need to change the USB connection mode to "File transfer" or "MTP".
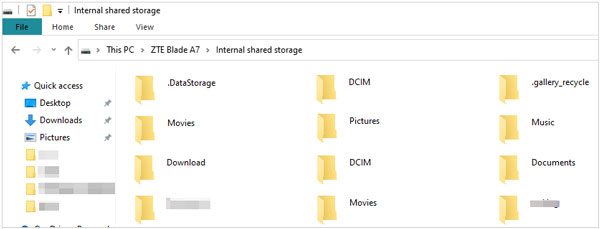
Step 2: On your Windows computer, go to "This PC". Your Android phone should appear as a connected device. For Mac, you need to install Android File Transfer first.
Step 3: Open your Android device in the file explorer and navigate to the folder where your music files are stored, such as the "Music" folder.
Step 4: Select the music files or folders you want to back up. Then drag and drop them to the desired location on your computer where you want to store the backup. Wait for the transferring process. Once done, securely disconnect your Android phone from the computer.
Tips: You can cast your Android device to your PC without hassle. Then easily transfer your songs and other files with drag and drop on the computer's screen.
Part 5: How to Back Up Android Music with SD Card?
If your Android phone has a microSD card and you store your music on it, you can directly back up your Android music to the memory card. But if your phone doesn't has a slot to install an SD card, you need to use a card reader to connect your phone and the SD card.
Here's how to back up Android music to an SD card:
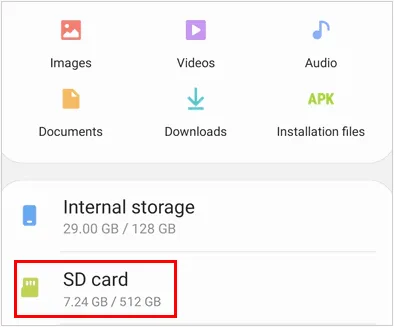
Step 1: Ensure you can access your microSD card on your Android phone with the File Manager app.
Step 2: Navigate to the music files stored on the Android phone's internal storage, and select them.
Step 3: Click the "More" icon, and choose "Copy". Then choose your SD card, and paste the songs to the card.
Part 6: FAQs About Android Music Backup
Q1: Does Google automatically back up my music files?
No. Google Drive or Google One doesn't automatically back up audio files or music unless you upload them manually to Google Drive or use a third-party app.
Q2: Can I restore music from my Android backup?
Yes, if you back up your music to your computer, you can easily restore it to your Android device. Besides, if you back up your music to Google Drive, you can directly download it to your Android device.
Q3: Where are my music files stored on my Android phone?
The location of your music files on your Android phone can vary depending on a few factors:
Where You Got the Music:
- Music you've downloaded or transferred manually: These files are usually stored in a folder named "Music" in your phone's internal storage.
- Music downloaded through a specific app: These apps often store their downloaded music in private app storage to prevent direct access and potential copyright issues. This means you usually can't access these files directly through a file manager.
Your Phone's Manufacturer and Android Version: While the "Music" folder is a common default, some manufacturers might have slightly different folder structures.
Conclusion
By employing one or a combination of these methods, you can ensure that your cherished music collection on your Android phone is safely backed up, providing peace of mind and preventing the heartache of losing your favorite tunes. Using iReaShare Android Manager allows you to back up and manage your music on the computer with ease. You can also use it to back up other Android data like SMS, call logs, videos, installed apps, etc.
Download for Win Download for Mac
Related Articles
How to Send a Group Text on Android and iPhone (3 Proven Solutions)
How to Transfer Files from Phone to Laptop Without USB: 6 Easy Methods
How to Transfer Photos from Android to Computer Efficiently [Ways and FAQs]
How to Wipe Android Phone Permanently | Protect Personal Privacy