


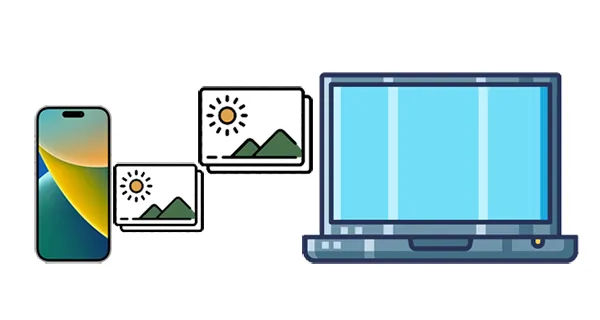
Your iPhone is likely filled with cherished memories captured in the form of photos and videos. Whether you're looking to back them up, edit them on a larger screen, or simply free up space on your device, you need to transfer photos from an iPhone to a laptop. Fortunately, there are 9 convenient methods available, catering to both Windows and macOS users. Let's get started.
Part 1: How to Transfer Photos from iPhone to Laptop (Windows & macOS)
These methods work regardless of whether you own a Windows or macOS laptop, offering flexibility and accessibility.
1.1 Using iReaShare iPhone Manager
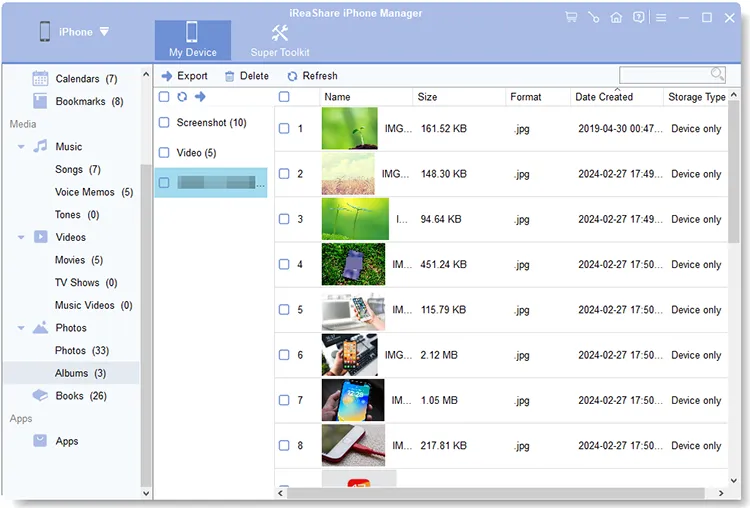
iReaShare iPhone Manager allows you to simplify the photo transfer from your iPhone to your laptop. With it, you can preview the thumbnails of your iPhone photos, and select and export the photos you want to your laptop without effort. What's more, you can transfer your pictures without losing image quality. All your photos will be transferred with their full resolutions and original formats.
Main features of iReaShare iPhone Manager:
* Copy iPhone photos to a computer without effort.
* Seamlessly transfer photos with USB, which is more stable than using Wi-Fi.
* Transfer your videos, music, contacts, text messages, and more.
* Allow you to remove your photos from your iPhone on the laptop.
* Back up your iPhone data to your laptop at one go.
* Provide Windows and Mac versions for users.
Download the iPhone management software.
Download for Win Download for Mac
Here's how to get pictures from an iPhone to a laptop:
Step 1: Download and install iReaShare iPhone Manager on your laptop. Then connect your iPhone to your laptop with a USB cable, and click "Trust" on the iPhone.
Step 2: After connecting, click "Photos" to view your iPhone pictures.
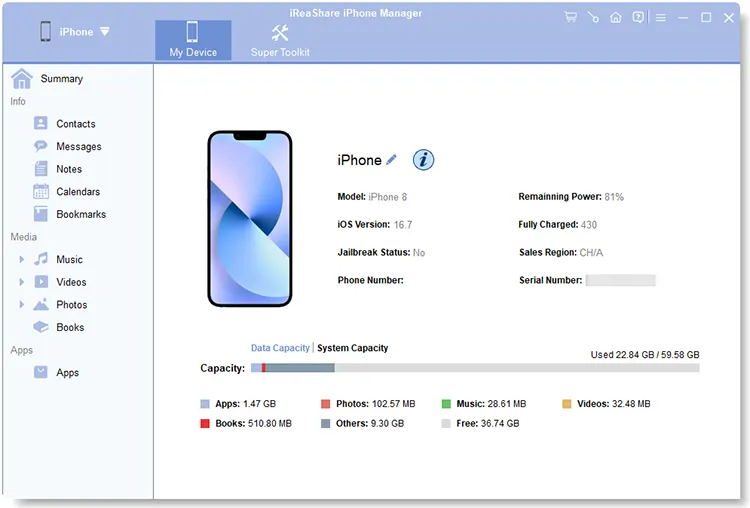
Step 3: Select the photos you want to transfer, and click "Export" to save them to your laptop.
Here's the video guide:
1.2 Using iCloud
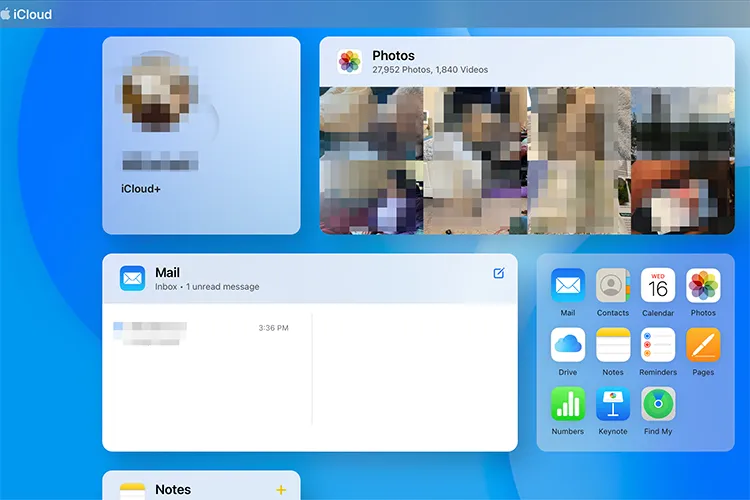
iCloud Photos automatically uploads and stores your photos and videos in the cloud, making them accessible across all your Apple devices and even on a web browser.
To use iCloud for downloading pictures from an iPhone to a laptop:
Step 1: Go to Settings on your iPhone, tap your Apple ID profile at the top, then select "iCloud". Tap on "Photos" and ensure "Sync this iPhone" is toggled on. Make sure your iPhone is connected to Wi-Fi for the upload to occur.
Step 2: Access the iCloud website on your laptop, and sign in with your Apple ID.
Step 3: Tap on "Photos" and download your desired photos on your laptop.
Tips: If needed, you can check how to back up your iPhone messages to iCloud without trouble.
1.3 Using Google Photos
Google Photos is a popular cloud-based photo storage and sharing service that works across different platforms. You can use it to upload photos from your iPhone and save to your laptop.
Here's how:
Step 1: Download the Google Photos app from the App Store and sign in with your Google Account.
Step 2: Open the Google Photos app, tap your profile icon in the top right corner, and tap "Turn on backup". You can choose the upload size according to your preference. Make sure your iPhone is connected to Wi-Fi for the backup to occur.

Step 3: Open your web browser and go to photos.google.com. Sign in with the same Google Account you used on your iPhone.
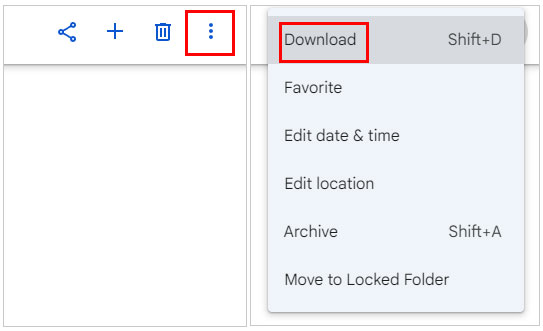
Step 4: You can select multiple photos and click the three dots in the top right corner, then choose "Download".
1.4 Using Email
For transferring a small number of photos, email can be a quick and straightforward method. However, generally, you can send files with 25MB or 50MB. In this case, you can follow the onscreen instructions to send it using Mail Drop, which can send more pictures at once.
Here's how to send photos from an iPhone to a laptop with email:
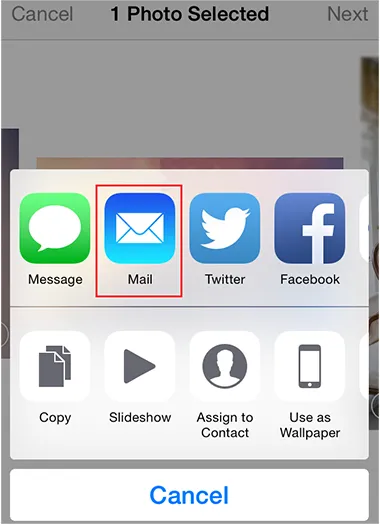
Step 1: Open the Photos app on your iPhone and select the photos you want to transfer.
Step 2: Tap the "Share" icon (usually a square with an arrow pointing upwards) and choose "Mail".
Step 3: Enter your own email address as the recipient and send the email.
Step 4: Open your email on your laptop, find the email you sent, and download the attached photos.
Part 2: How to Transfer Photos from iPhone to Laptop (Windows)
These methods are specifically designed for Windows operating systems, so you can transfer your photos from your iOS device to a Windows laptop.
2.1 Using File Explorer
File Explorer provides a direct way to access your iPhone's storage when it's connected to your Windows PC via USB. Not only can you transfer photos, but also copy camera videos to your laptop.
Here are the steps:
Step 1: Connect your iPhone to your Windows laptop using a USB cable. You might need to tap "Trust This Computer" on your iPhone.
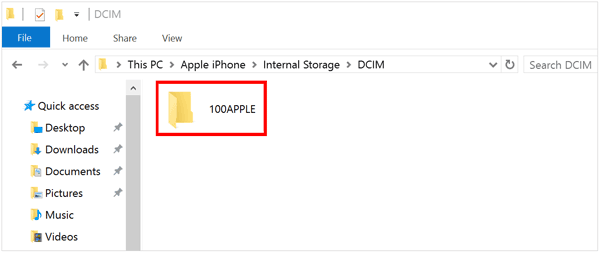
Step 2: Open File Explorer on your Windows laptop (Windows key + E). In the left-hand sidebar, you should see your iPhone listed under "Devices and drives". Click on your iPhone's name.
Step 3: You will likely see an "Internal Storage" folder, then a "DCIM" folder. Inside the DCIM folder, you'll find one or more folders containing your photos and videos.
Step 4: Select the photos you want to transfer. You can drag and drop them to a folder on your laptop or right-click on the selected photos, choose "Copy", navigate to your desired folder on your laptop, right-click, and choose "Paste".
2.2 Using iTunes
While primarily known for managing music and apps, iTunes can also be used to sync photos from your iPhone to your Windows laptop.
Here's the guide:
Step 1: If you don't have it already, download and install the latest version of iTunes from the Microsoft Store or the Apple website.
Step 2: Connect your iPhone to your Windows laptop using a USB cable. If prompted on your iPhone, tap "Trust".
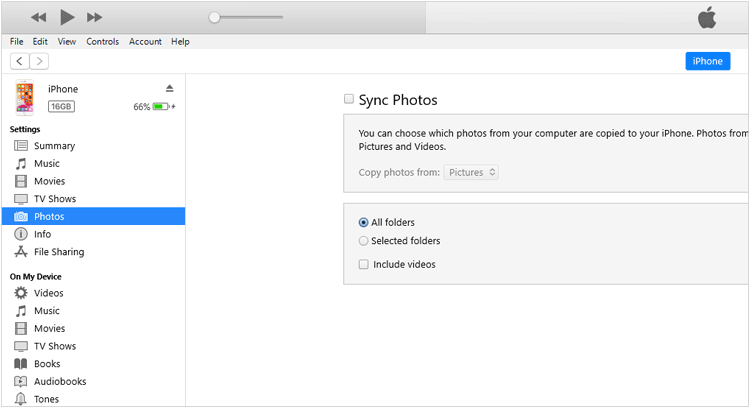
Step 3: Launch the iTunes application. Your iPhone should appear as an icon near the top left of the iTunes window. Click on it.
Step 4: Check the box next to "Sync Photos". You can choose to sync photos from "All folders" or select specific folders. Choose a destination folder on your laptop if prompted.
Step 5: Click the "Apply" button at the bottom right of the iTunes window to start the syncing process. The selected photos will be copied to the chosen folder on your Windows laptop.
Part 3: How to Transfer Pictures from iPhone to Laptop (macOS)
macOS offers seamless integration with Apple devices, providing several convenient ways to transfer photos between iPhone and MacBook.
3.1 Using Finder
Similar to File Explorer on Windows, Finder allows direct access to your iPhone's file system on your MacBook.
To transfer iPhone pictures to MacBook:
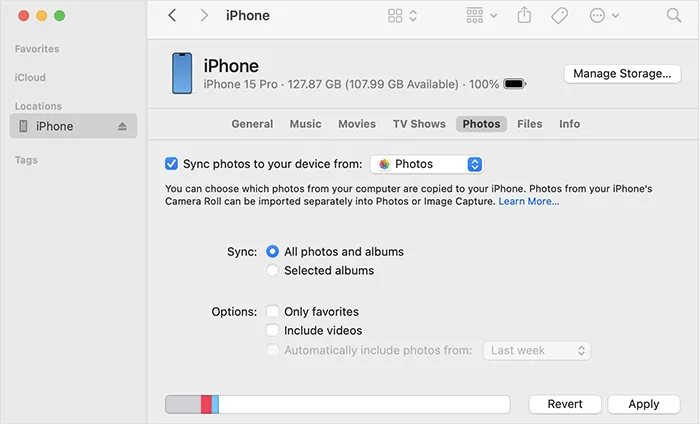
Step 1: Connect your iPhone to your Mac using a USB cable. You might need to tap "Trust" on your iPhone.
Step 2: Open a new Finder window. Your iPhone should appear in the sidebar under "Locations". Click on your iPhone's name.
Step 3: If it's the first time you're connecting, you might need to click "Trust" on your Mac and enter your administrator password.
Step 4: Click on the "Photos" tab. Then you can select all photos or specific albums you want. Finally, click "Apply" to sync them to your Mac laptop.
3.2 Using Mac Photos App
The built-in Photos app on macOS is tightly integrated with iOS and provides a smooth way to import your iPhone pictures.
Here's how:
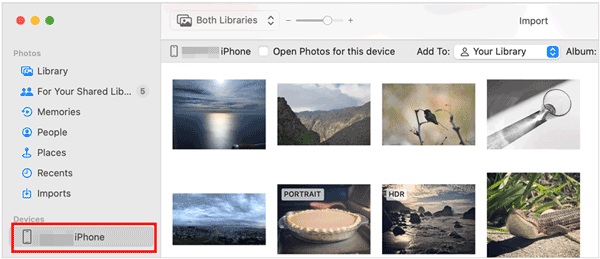
Step 1: Connect your iPhone to your Mac using a USB cable. The Photos app might open automatically. If not, open it from your "Applications" folder or "Launchpad".
Step 2: In the Photos app, you should see your iPhone listed in the sidebar under "Devices". Click on your iPhone's name.
Step 3: The Photos app will display the new photos and videos on your iPhone. You can select specific items to import or click "Import All New Items". You can also choose to delete the photos from your iPhone after importing by checking the relevant option.
Step 4: Once imported, your photos will be available in the Photos Library on your Mac.
3.3 Using AirDrop
AirDrop is a wireless solution for transferring photos from your iPhone to your Mac laptop. It's quick, simple, and doesn't require a USB cable.
To AirDrop photos from an iPhone to a MacBook:
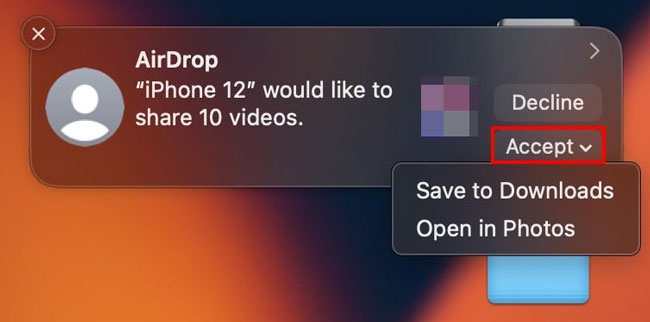
Step 1: Ensure both your iPhone and Mac have Wi-Fi and Bluetooth enabled.
Step 2: On your iPhone, select the photos you want to transfer. Next, tap the "Share" icon and choose "AirDrop".
Step 3: Accept the transfer on your Mac, and the photos will be saved directly to your "Downloads" folder.
Part 4: FAQs About Transferring Photos from iPhone to Laptop
Q1: How do I ensure my photos are not compressed when transferred?
If you're using Google Photos to transfer photos, you can choose the original quality. iCloud, AirDrop, and iReaShare iPhone Manager also preserve the full quality of the image.
Q2: Why can't I see my photos when I connect my iPhone to my laptop?
This can happen for several reasons:
- Make sure your iPhone is unlocked when connected to the laptop.
- Ensure you've allowed the laptop to access your iPhone by clicking "Trust This Computer" on your iPhone.
- You might need to update your iTunes or Apple Mobile Device Support on Windows for the device to show up properly.
- If using iCloud, make sure it's enabled and synced correctly.
Conclusion
With these effective methods, whether you're using a Mac or Windows laptop, you can easily transfer photos from your iPhone to your laptop. If you want the wireless transfer, you can use iCloud, Google Photos, and AirDrop. If you prefer offline photo transfer, iReaShare iPhone Manager can do it well, efficiently transferring unlimited photos at once with original quality.
Download for Win Download for Mac
Related Articles
Solved: How to Sync Contacts from iPhone to Mac with Ease
How to Back Up iPhone to External Hard Drive Easily (4 Proven Ways)
Easily Get Photos off iPhone: 5 Effective Solutions in 2025
Easily Print Text Messages from iPhone via 4 Methods (Latest)
